Parent info
Parts you need
Affiliate links — we may earn a small commission
Try this circuit in your browser!
Run the code, press the buttons and watch what happens — before you buy any parts. No account needed.
Open in Simulator →Any BLE heart rate strap. Any brand. All on your wrist.
Imagine this: you strap on your chest monitor and snap your ESP32 build onto your wrist. It reads “AEROBIC — 142 bpm” in green text on a round display with a matching green ring. You push harder — the display turns orange. “THRESHOLD — 167 bpm.” You built a real training computer.
Here’s the secret: every BLE heart rate monitor uses the same open standard (Heart Rate Service, UUID 0x180D). Your Polar H10, your $8 Amazon strap, your Garmin arm band — they all broadcast the same format. One ESP32 sketch connects to all of them.
Total: ~$35 (+ a BLE HR monitor you may already own) | Time: ~2 hours | Difficulty: ●●○○○
What you’ll need
| Part | What it does | Price |
|---|---|---|
| ESP32-S3 Dev Board | The brain. S3 required — built-in BLE radio. | ~$15 |
| Waveshare 1.28” Round Display | 240×240 circular screen. Color-coded zone display. | ~$20 |
| 3.7V 250mAh LiPo Battery | Compact wrist battery. Via TP4056 charge board. | ~$5 |
| Any BLE HR monitor | Chest strap or arm band. Polar, Garmin, Wahoo, $8 generic — all work. | $8–50 |
You also need: a TP4056 charge board (often bundled with the LiPo for $2) and Arduino IDE 2.x.
ESP32 vs ESP32-S3: This project requires BLE. Any ESP32 variant with Bluetooth works — the S3 is preferred for its lower sleep current, but ESP32-WROOM also works fine.
How it works (60 seconds)
Think of Bluetooth Low Energy like a TV broadcast. Your HR monitor constantly broadcasts a data packet — your heart rate in BPM — using a channel everyone knows (UUID 0x180D). The ESP32 tunes to that channel, listens, and every time a new BPM arrives, it updates the display.
You don’t have to poll — you subscribe to notifications. The monitor pushes data to you automatically. When your heart rate changes, your display updates within one second.
Why the open standard matters: Bluetooth SIG (the organization that defines Bluetooth standards) specified the Heart Rate Service format. Every company that makes a BLE HR monitor follows that spec. It doesn’t matter who made the monitor — the data format is identical. One sketch, every device.
Step 0: Power circuit
Time: ~10 minutes
Set up the LiPo + TP4056 charge board exactly as described in the Step Counter Watch guide. Quick summary:
- LiPo red → TP4056 BAT+, black → BAT-
- TP4056 OUT+ → ESP32-S3 3.3V (or VIN), OUT- → GND
- TP4056’s USB-C port charges the battery
Check: Plug in USB to the TP4056 — charging LED lights up. Unplug USB — ESP32 powers from battery.
Step 1: Wire it up
Time: ~5 minutes
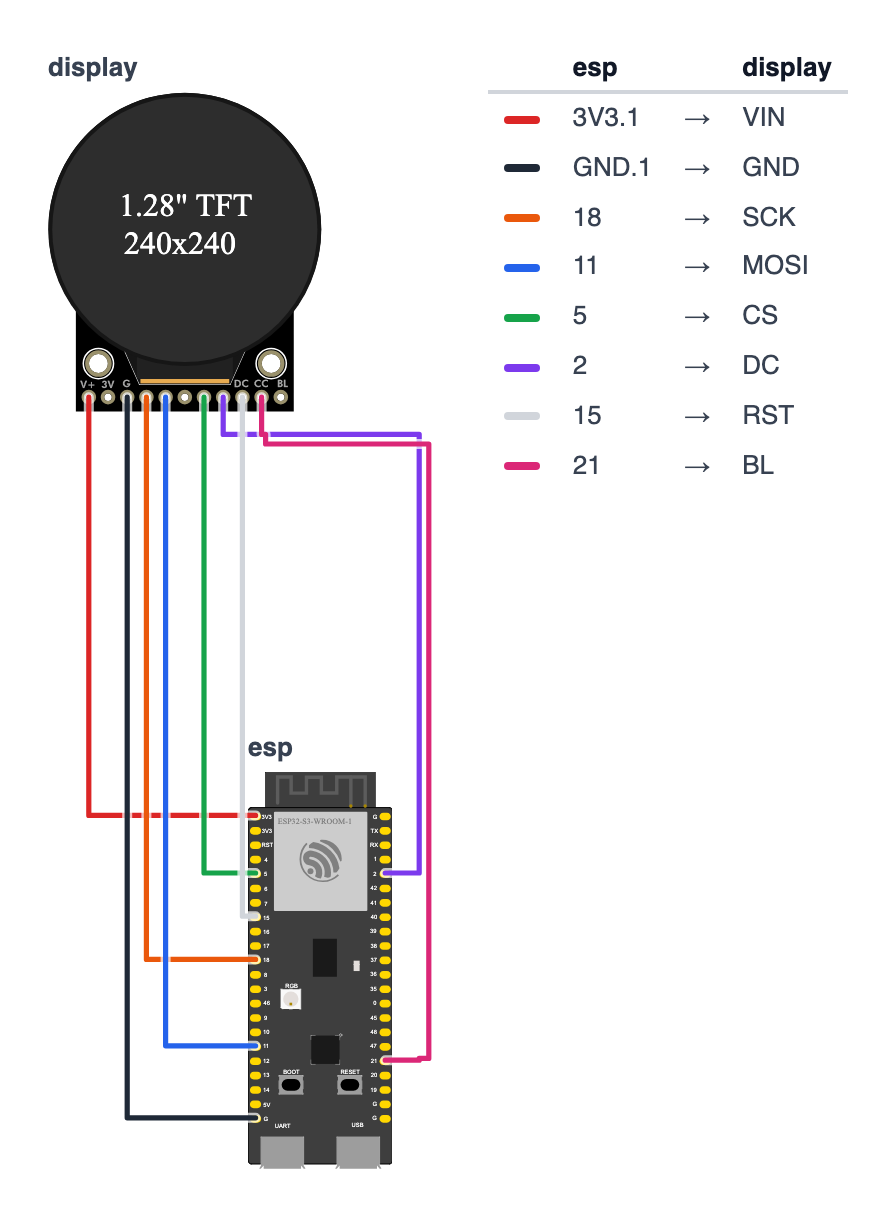
This project has the simplest wiring of all six builds — just the display and the battery. BLE is entirely inside the ESP32-S3 chip, no extra hardware needed.
Waveshare Round Display — 8 wires:
- Display VCC → ESP32-S3 3.3V — red wire
- Display GND → ESP32-S3 GND — black wire
- Display SCK → ESP32-S3 GPIO18 (C6: GPIO23) — orange wire
- Display MOSI → ESP32-S3 GPIO11 (C6: GPIO22) — blue wire
- Display CS → ESP32-S3 GPIO5 (C6: GPIO18) — green wire
- Display DC → ESP32-S3 GPIO2 (C6: GPIO10) — purple wire
- Display RST → ESP32-S3 GPIO15 (C6: GPIO3) — white wire
- Display BL → ESP32-S3 GPIO21 (C6: GPIO4) — pink wire
ESP32-S3         Round Display
  3.3V ─────────── VCC
  GND  ─────────── GND
  GPIO18 ─────────── SCK
  GPIO11 ─────────── MOSI
  GPIO5  ─────────── CS
  GPIO2  ─────────── DC
  GPIO15 ─────────── RST
  GPIO21 ─────────── BL

No extra sensors — BLE radio is built into the ESP32-S3 chip.
Check: That’s 8 wires. Double-check CS → GPIO5, DC → GPIO2 (C6: CS → GPIO18, DC → GPIO10). If those two are swapped, the display shows garbage.
Step 2: Flash the code
Time: ~10 minutes
-
In Arduino IDE, install:
NimBLE-Arduinoby h2zero (version 1.4.x or later) — leaner BLE stack, uses 50% less RAMLovyanGFXby lovyan03
-
Change
USER_AGEto your actual age. This sets your max HR for zone calculations. -
Select your board and upload.
The big picture first. This program listens to your heart rate strap over Bluetooth and shows the number on a round display with color-coded training zones.
Here is the key insight: every BLE heart rate monitor ever made — Polar, Wahoo, Garmin, a $8 Amazon strap — uses the same open standard called the Heart Rate Service (UUID 0x180D). It’s like a universal socket. One ESP32 sketch works with all of them.
Instead of asking “what is your heart rate?” every second (polling), the ESP32 subscribes to notifications. The heart rate monitor pushes a new BPM value whenever it measures one — typically once per second — and the ESP32 receives it and updates the display immediately.
// ========== CHOOSE YOUR BOARD ==========
// Uncomment the line for YOUR board:
#define BOARD_S3    // ESP32-S3-DevKitC-1
//#define BOARD_C6  // ESP32-C6-DevKitC-1
// ========================================

#ifdef BOARD_S3
  #define PIN_DISP_SCLK        18
  #define PIN_DISP_MOSI        11
  #define PIN_DISP_DC          2
  #define PIN_DISP_CS          5
  #define PIN_DISP_RST         15
  #define PIN_DISP_BL          21
#endif
#ifdef BOARD_C6
  #define PIN_DISP_SCLK        23
  #define PIN_DISP_MOSI        22
  #define PIN_DISP_DC          10
  #define PIN_DISP_CS          18
  #define PIN_DISP_RST         3
  #define PIN_DISP_BL          4
#endif

#include <Arduino.h>
#include <NimBLEDevice.h>
#include <LovyanGFX.hpp>

class LGFX : public lgfx::LGFX_Device {
  lgfx::Panel_GC9A01 _panel_instance;
  lgfx::Bus_SPI      _bus_instance;
  lgfx::Light_PWM    _light_instance;
public:
  LGFX(void) {
    { auto cfg = _bus_instance.config();
      cfg.spi_host = SPI2_HOST; cfg.freq_write = 40000000;
      cfg.pin_sclk = PIN_DISP_SCLK; cfg.pin_mosi = PIN_DISP_MOSI; cfg.pin_miso = -1; cfg.pin_dc = PIN_DISP_DC;
      _bus_instance.config(cfg); _panel_instance.setBus(&_bus_instance); }
    { auto cfg = _panel_instance.config();
      cfg.pin_cs = PIN_DISP_CS; cfg.pin_rst = PIN_DISP_RST; cfg.panel_width = 240; cfg.panel_height = 240;
      _panel_instance.config(cfg); }
    { auto cfg = _light_instance.config();
      cfg.pin_bl = PIN_DISP_BL;
      _light_instance.config(cfg); _panel_instance.setLight(&_light_instance); }
    setPanel(&_panel_instance);
  }
};
static LGFX display;

#define USER_AGE  16
#define MAX_HR    (220 - USER_AGE)

#define HR_SERVICE_UUID  "180D"
#define HR_CHAR_UUID     "2A37"

static NimBLEClient*           pClient  = nullptr;
static const NimBLEAdvertisedDevice* pDevice  = nullptr;
static bool deviceFound = false;
static bool connected   = false;
static int  currentHR   = 0;

uint16_t hrZoneColor(int hr) {
  float pct = (float)hr / (float)MAX_HR;
  if (pct < 0.60f) return display.color565(0,   100, 255);
  if (pct < 0.70f) return display.color565(0,   200, 80);
  if (pct < 0.80f) return display.color565(220, 180, 0);
  if (pct < 0.90f) return display.color565(255, 100, 0);
  return                  display.color565(255, 20,  20);
}

const char* hrZoneName(int hr) {
  float pct = (float)hr / (float)MAX_HR;
  if (pct < 0.60f) return "RECOVERY";
  if (pct < 0.70f) return "AEROBIC";
  if (pct < 0.80f) return "TEMPO";
  if (pct < 0.90f) return "THRESHOLD";
  return "MAX EFFORT";
}

void drawHR(int hr, bool live) {
  display.fillScreen(TFT_BLACK);
  uint16_t zoneColor = live ? hrZoneColor(hr) : display.color565(80,80,80);

  for (int r = 118; r >= 115; r--) {
    display.drawCircle(120, 120, r, zoneColor);
  }

  display.setTextSize(5);
  display.setTextColor(live ? zoneColor : display.color565(100,100,100));
  char hbuf[4]; sprintf(hbuf, "%d", hr);
  int textW = strlen(hbuf) * 30;
  display.setCursor((240 - textW) / 2, 85);
  display.print(hbuf);

  display.setTextColor(display.color565(120,120,120));
  display.setTextSize(1);
  display.setCursor(105, 145); display.print("bpm");

  display.setTextColor(zoneColor);
  const char* zone = live ? hrZoneName(hr) : "SCANNING...";
  int zw = strlen(zone) * 6;
  display.setCursor((240 - zw) / 2, 165);
  display.print(zone);

  display.fillTriangle(120, 60, 108, 48, 132, 48, zoneColor);
  display.fillTriangle(120, 60, 108, 48, 108, 35, zoneColor);
  display.fillTriangle(120, 60, 132, 48, 132, 35, zoneColor);
  display.fillCircle(111, 38, 7, zoneColor);
  display.fillCircle(129, 38, 7, zoneColor);

  display.fillCircle(225, 15, 5,
    connected ? display.color565(0,200,0) : display.color565(200,0,0));

  if (live && hr > 0) {
    display.setTextColor(display.color565(150,150,150));
    display.setCursor(88, 190);
    int pct = (int)((float)hr / MAX_HR * 100.0f);
    char pbuf[8]; sprintf(pbuf, "%d%% MAX", pct);
    display.print(pbuf);
  }
}

class ScanCallback : public NimBLEScanCallbacks {
  void onResult(const NimBLEAdvertisedDevice* advertisedDevice) override {
    if (advertisedDevice->haveServiceUUID() &&
        advertisedDevice->isAdvertisingService(NimBLEUUID(HR_SERVICE_UUID))) {
      Serial.print("HR monitor found: ");
      Serial.println(advertisedDevice->toString().c_str());
      pDevice     = advertisedDevice;
      deviceFound = true;
      NimBLEDevice::getScan()->stop();
    }
  }
};

void hrNotifyCallback(NimBLERemoteCharacteristic* pChar,
                      uint8_t* pData, size_t length, bool isNotify) {
  if (length < 2) return;

  if (pData[0] & 0x01) {
    currentHR = (int)((pData[2] << 8) | pData[1]);
  } else {
    currentHR = (int)pData[1];
  }

  drawHR(currentHR, true);
  Serial.print("HR: "); Serial.println(currentHR);
}

void setup() {
  Serial.begin(115200);
  display.init();
  display.setRotation(0);
  display.setBrightness(200);
  drawHR(0, false);

  NimBLEDevice::init("BuildCoolHRM");
  NimBLEScan* pScan = NimBLEDevice::getScan();
  pScan->setAdvertisedDeviceCallbacks(new ScanCallback());
  pScan->setActiveScan(true);
  pScan->start(30, false);
}

void loop() {
  if (deviceFound && !connected) {
    deviceFound = false;
    pClient = NimBLEDevice::createClient();
    if (pClient->connect(pDevice)) {
      connected = true;
      Serial.println("Connected!");

      NimBLERemoteService* pSvc = pClient->getService(NimBLEUUID(HR_SERVICE_UUID));
      if (pSvc) {
        NimBLERemoteCharacteristic* pChar = pSvc->getCharacteristic(NimBLEUUID(HR_CHAR_UUID));
        if (pChar && pChar->canNotify()) {
          pChar->subscribe(true, hrNotifyCallback);
        }
      }
    }
  }

  if (connected && !pClient->isConnected()) {
    connected = false;
    currentHR = 0;
    drawHR(0, false);
    NimBLEDevice::getScan()->start(30, false);
  }

  delay(100);
}
Line-by-line: what every line does and why
Lines 1–2: NimBLE instead of the default BLE
#include <NimBLEDevice.h>The ESP32 Arduino core includes a BLE library that uses ~110KB of RAM. NimBLE uses ~50KB — that’s 60KB saved. When you also have a display driver in memory, that difference is the gap between “runs fine” and “random crashes from running out of memory.” Always use NimBLE for projects that combine BLE with a screen.
Lines 18–19: Zone calculation
#define USER_AGE  16
#define MAX_HR    (220 - USER_AGE)
220 - age is the standard formula for estimating maximum heart rate. For age 16: max HR = 204 bpm. Training zones are percentages of this maximum: Zone 1 (recovery) is below 60% of max, Zone 5 (maximum effort) is above 90%. Change USER_AGE to your actual age so the zone colors match your body.
Lines 21–22: The universal BLE identifiers
#define HR_SERVICE_UUID  "180D"
#define HR_CHAR_UUID     "2A37"
These two UUID (Unique Universal Identifier) codes are defined by the Bluetooth Special Interest Group — the organization that sets Bluetooth standards. Every manufacturer who makes a BLE heart rate monitor agrees to use these exact codes. 180D is the Heart Rate Service. 2A37 is the Heart Rate Measurement value inside that service. Because of this standard, one sketch works with every BLE HR monitor ever made.
hrZoneColor() and hrZoneName(): color-coding your effort
float pct = (float)hr / (float)MAX_HR;
if (pct < 0.60f) return display.color565(0, 100, 255);
pct is the current heart rate as a fraction of your maximum. display.color565(R, G, B) converts 8-bit red, green, blue values into the 16-bit color format the display uses. Five if statements map five zones to five colors. The entire display — the ring, the number text, the zone name, and the heart icon — all change to the zone color at once.
hrNotifyCallback(): decoding the BPM packet
if (pData[0] & 0x01) {
  currentHR = (int)((pData[2] << 8) | pData[1]);
} else {
  currentHR = (int)pData[1];
}
The Bluetooth SIG defines the exact byte format for heart rate data. Byte 0 is a “flags” byte. If bit 0 of byte 0 is 1, the BPM is stored as a 16-bit number across bytes 1 and 2 (rare — would allow values above 255). If bit 0 is 0, the BPM fits in one byte (byte 1 — enough for any human). pData[0] & 0x01 checks that one bit using a bitwise AND operation. pData[2] << 8 shifts the high byte 8 positions left, then | pData[1] combines both bytes into one 16-bit number. This is raw binary parsing — reading the exact format that every HR monitor on Earth sends.
ScanCallback: finding the heart rate monitor
class ScanCallback : public NimBLEScanCallbacks {
  void onResult(const NimBLEAdvertisedDevice* advertisedDevice) override {
    if (advertisedDevice->isAdvertisingService(NimBLEUUID(HR_SERVICE_UUID))) {
      deviceFound = true;
      NimBLEDevice::getScan()->stop();
    }
  }
};
ScanCallback is a class — a template for an object. onResult runs automatically whenever the BLE scanner detects a nearby device advertising itself. The code checks: “Is this device advertising the Heart Rate Service UUID?” If yes, save a reference to it and stop scanning. We don’t care about the device’s name — only whether it speaks Heart Rate protocol.
loop(): connecting and subscribing
if (deviceFound && !connected) {
  pClient = NimBLEDevice::createClient();
  if (pClient->connect(pDevice)) {
    NimBLERemoteService* pSvc = pClient->getService(NimBLEUUID(HR_SERVICE_UUID));
    NimBLERemoteCharacteristic* pChar = pSvc->getCharacteristic(NimBLEUUID(HR_CHAR_UUID));
    pChar->subscribe(true, hrNotifyCallback);
  }
}
Four steps to get BPM data: create a client → connect to the device → find the Heart Rate Service → find the Heart Rate Measurement characteristic → subscribe. subscribe(true, hrNotifyCallback) registers our callback function. From now on, every time the monitor sends a new BPM, hrNotifyCallback runs automatically — even if loop() is in the middle of delay(100). This is interrupt-driven communication over Bluetooth.
The whole thing in one sentence
The ESP32 scans for any BLE device advertising the Heart Rate Service, subscribes to BPM notifications, and updates the full-color zone display immediately every time a new reading arrives.
First thing to try: upload the code, put on your heart rate monitor, and watch the display. Within 10 seconds it should connect (dot turns green) and show your resting BPM in blue. Do 10 jumping jacks and watch it turn green, then yellow.
Check: After flashing, the display shows grey “SCANNING…” text with a red dot in the corner. Put on your HR monitor — after 5–15 seconds the dot turns green and BPM appears.
Step 3: First connection
-
Put your HR monitor in pairing mode. First-time pairing may need you to hold a button for 5 seconds. Check your monitor’s manual. After the first pairing, the ESP32 reconnects automatically.
-
Power on your ESP32 and watch the display. You should see “SCANNING…” briefly, then your heart rate appears within 10 seconds.
-
Test zone colors by taking a few deep breaths to see resting (blue), then doing 10 jumping jacks to push into green or yellow zones.
Step 4: Ride with it!
Mount the display on your wrist using the watch case from the Step Counter Watch project, or simply hold it for a test ride.
The display shows:
- Large BPM number in the zone color — impossible to miss at a glance
- Zone name — Recovery, Aerobic, Tempo, Threshold, or Max Effort
- Percentage of max HR — useful context for training intensity
- Heart icon at the top — pulses when in higher zones
- Connection dot — green when receiving live data, red when scanning
Training zone reference (for USER_AGE = 16, max HR = 204):
| Zone | BPM | Color | What it means |
|---|---|---|---|
| Recovery | <122 | Blue | Easy spinning, warming up |
| Aerobic | 122–143 | Green | Endurance building |
| Tempo | 143–163 | Yellow | Comfortably hard |
| Threshold | 163–184 | Orange | Hard — can’t talk much |
| Max Effort | 184+ | Red | Sprint, interval, race pace |
What just happened (what you learned)
-
BLE GATT hierarchy — Bluetooth Low Energy organizes data in a tree: a device has Services (grouped functionality), each service has Characteristics (data values). The Heart Rate Service (0x180D) has a Heart Rate Measurement characteristic (0x2A37). To get data: connect → find service → find characteristic → subscribe. Every BLE device using these standard UUIDs works identically.
-
Notifications vs. polling — instead of the ESP32 asking “what’s your heart rate?” every second, the monitor pushes data whenever it has a reading.
pChar->subscribe(true, hrNotifyCallback)registers a callback. When new data arrives,hrNotifyCallbackruns immediately — even ifloop()is in the middle ofdelay(100). Interrupt-driven communication over BLE. -
NimBLE vs. the default BLE stack — the ESP32 Arduino core includes a BLE stack that uses ~110KB of RAM. NimBLE uses ~50KB. For projects combining BLE with a display, that extra 60KB is the difference between “it works” and “random crashes from out-of-memory.”
-
Parsing the HR value format — the 0x2A37 characteristic uses a flags byte. Bit 0 = 0 means 8-bit HR in byte 1. Bit 0 = 1 means 16-bit HR in bytes 1–2. Most monitors use 8-bit (max 255 bpm — safe for humans). This is your first experience reading a Bluetooth SIG-defined binary format.
Level Up
Zone 5 alert: After connecting, track how long you’ve been in Max Effort. If Zone 5 continues for more than 30 seconds, flash the entire screen red twice. Coaches use “time over threshold” as a key intensity metric — now you have it automatically.
Log HR to SPIFFS: In the notification callback, append currentHR and millis() to a CSV file on SPIFFS. Add a Wi-Fi web server that serves a Chart.js line graph of the last session. Personal training log: every ride’s heart rate curve, saved, no subscription.
Weatherproofing for sweat: Sweat is more corrosive than rain — it has salt. Conformal coat the PCB before putting it on your wrist. Seal all case seams with neutral-cure silicone. The watch should be at least IP54 before you exercise in it.
Troubleshooting
| Problem | Fix |
|---|---|
| Display stays on “SCANNING…” forever | Confirm HR monitor is powered on and in Bluetooth range (2–10m). Some monitors need a button press to enable BLE. |
| First pairing fails | Check your HR monitor’s manual — it may need to be put in “pairing mode” by holding a button for 5 seconds. |
| Connected but BPM shows 0 | Put the monitor firmly on your chest/arm. Some monitors won’t transmit valid HR until they detect skin contact. |
| Display shows garbage | CS → GPIO5, DC → GPIO2 (C6: CS → GPIO18, DC → GPIO10). If swapped, you get garbage. Check both. |
| “Out of memory” crashes | Make sure you’re using NimBLE-Arduino, NOT the default ESP32 BLE stack. Check Library Manager — two BLE libraries may be installed. |
| HR drops to 0 mid-ride | Monitor out of range or battery low. The code auto-reconnects when it comes back in range. |