Parent info
Parts you need
Affiliate links — we may earn a small commission
Try this circuit in your browser!
Run the code, press the buttons and watch what happens — before you buy any parts. No account needed.
Open in Simulator →Press once. Someone far away sees your light.
Imagine this: a small box on your desk with one big button. Your best friend is at university three cities away. They have a matching box. When they miss you, they press their button. A warm amber light glows on your box for 10 seconds. No notification sound. No message. No explanation needed. Just: I thought of you.
You press yours. Their light glows.
That’s it. The most emotionally powerful thing you’ll build this Christmas.
Two complete devices. About 1 hour to build both. Around $38 total.
What you’ll need (for two complete devices)
| Part | What it does | Price |
|---|---|---|
| ESP32-S3 Dev Board × 2 | One per device — connects to internet, handles button and LED | ~$24 |
| Large 60mm arcade button × 2 | Big satisfying button — easy to press, unmistakable | ~$4 |
| WS2812B single LED module × 2 | The warm light that glows when a ping arrives | ~$2 |
| Small enclosure × 2 | 3D print or buy a small project box | ~$4 |
| USB-C power supply × 2 | One per device, any USB phone charger works | ~$6 |
Total: ~$38 for both devices | Time: ~1 hour | Difficulty: ●○○○○
The two devices do NOT need to be on the same WiFi network. They both connect to a free internet broker. Device in your bedroom + device at university in another city = works fine.
How it works (60 seconds)
Think of it like a post box in the cloud.
Both devices connect to a free MQTT broker — a relay server on the internet. When you press your button, your device sends a short message to the broker: “A pressed their button.” Your partner’s device is subscribed to that address and receives the message instantly, wherever they are. Their LED glows.
Neither device ever talks directly to the other. They both talk to the broker, which routes messages between them. This is why it works across different WiFi networks, in different countries — as long as both have internet.
The round-trip time from button press to LED glow: under 1 second.
Step 0: Install the MQTT library
Time: ~2 minutes
In Arduino IDE: Sketch → Include Library → Manage Libraries
Search for “PubSubClient” — install the version by Nick O’Leary.
Also install “FastLED” if not already installed.
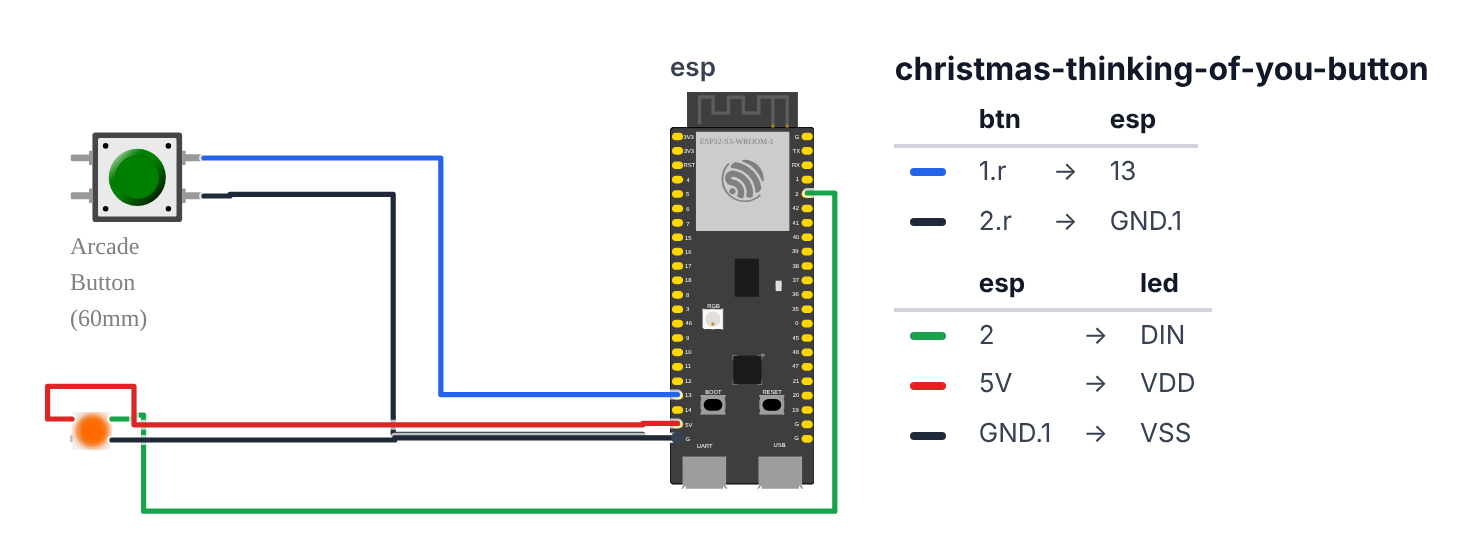
Step 1: Wire Device A (build two identical devices)
Time: ~10 minutes per device
Same wiring for both devices.
Arcade button:
- Button terminal 1 → ESP32 GPIO 13 (C6: GPIO 5)
- Button terminal 2 → ESP32 GND
WS2812B LED module: 3. LED DIN → ESP32 GPIO 2 (C6: GPIO 8) 4. LED VCC → ESP32 5V 5. LED GND → ESP32 GND
That’s 5 connections per device. Build both before uploading.
Check: No external resistor needed for a single LED module. The data signal is short enough that the resistor is optional — but add one if you happen to have it. Use the 5V pin, not 3.3V — a WS2812B needs at least 3.5V to show its colours properly.
Step 2: Upload the code
Time: ~10 minutes
This is the same code for BOTH devices — you only change the DEVICE_ID and PARTNER_ID values.
For Device A: set DEVICE_ID = "deviceA" and PARTNER_ID = "deviceB"
For Device B: set DEVICE_ID = "deviceB" and PARTNER_ID = "deviceA"
Both devices need their own WiFi name and password filled in.
The big picture first. This program turns two ESP32 boards into a pair of connected friendship devices — like walkie-talkies for feelings. Press your button. Somewhere in the world, your partner’s light glows warm amber. They press theirs. Your light glows.
The trick is a message broker — a relay server on the internet (like a post box in the cloud). Both devices connect to it. Device A publishes a “ping” message. Device B is subscribed to A’s address and receives it instantly. Neither device needs to know the other’s address directly. It works across different WiFi networks in different countries.
This is the same code for both devices. You only change two words.
// ========== CHOOSE YOUR BOARD ==========
// Uncomment the line for YOUR board:
#define BOARD_S3    // ESP32-S3-DevKitC-1
//#define BOARD_C6  // ESP32-C6-DevKitC-1
// ========================================

#ifdef BOARD_S3
  #define PIN_BUTTON           13
  #define PIN_NEOPIXEL         2
#endif
#ifdef BOARD_C6
  #define PIN_BUTTON           5
  #define PIN_NEOPIXEL         8
#endif

#include <FastLED.h>
#include <WiFi.h>
#include <PubSubClient.h>

#define DEVICE_ID  "deviceA"
#define PARTNER_ID "deviceB"

const char* ssid     = "YourWiFiName";
const char* password = "YourWiFiPassword";

const char* mqtt_server = "broker.hivemq.com";
const int   mqtt_port   = 1883;

String myTopic      = "buildcool/thinkingofyou/" + String(DEVICE_ID);
String partnerTopic = "buildcool/thinkingofyou/" + String(PARTNER_ID);

#define BUTTON_PIN  PIN_BUTTON
#define LED_PIN      PIN_NEOPIXEL
#define NUM_LEDS     1
CRGB leds[NUM_LEDS];

WiFiClient espClient;
PubSubClient mqttClient(espClient);

bool ledActive   = false;
unsigned long ledOnTime   = 0;
const unsigned long LED_DURATION = 10000;

void mqttCallback(char* topic, byte* payload, unsigned int length) {
  String msg = "";
  for (unsigned int i = 0; i < length; i++) msg += (char)payload[i];
  if (String(topic) == partnerTopic && msg == "ping") {
    ledActive = true;
    ledOnTime = millis();
  }
}

void connectMQTT() {
  while (!mqttClient.connected()) {
    Serial.print("Connecting to MQTT broker...");
    String clientId = "esp32-" + String(DEVICE_ID) + "-" + String(random(0xffff), HEX);
    if (mqttClient.connect(clientId.c_str())) {
      Serial.println("connected.");
      mqttClient.subscribe(partnerTopic.c_str());
    } else {
      Serial.println("failed. Retrying in 3s.");
      delay(3000);
    }
  }
}

void setup() {
  Serial.begin(115200);
  pinMode(BUTTON_PIN, INPUT_PULLUP);

  FastLED.addLeds<WS2812B, LED_PIN, GRB>(leds, NUM_LEDS);
  FastLED.setBrightness(80);
  leds[0] = CRGB::Black;
  FastLED.show();

  for (int i = 0; i < 3; i++) {
    leds[0] = CRGB::White; FastLED.show(); delay(150);
    leds[0] = CRGB::Black; FastLED.show(); delay(150);
  }

  WiFi.begin(ssid, password);
  while (WiFi.status() != WL_CONNECTED) delay(500);
  Serial.println("WiFi connected: " + WiFi.localIP().toString());

  mqttClient.setServer(mqtt_server, mqtt_port);
  mqttClient.setCallback(mqttCallback);
  connectMQTT();

  Serial.println("Device " + String(DEVICE_ID) + " ready. Press the button!");
}

void loop() {
  if (!mqttClient.connected()) connectMQTT();
  mqttClient.loop();

  static bool lastBtn = HIGH;
  bool btn = digitalRead(BUTTON_PIN);
  if (btn == LOW && lastBtn == HIGH) {
    mqttClient.publish(myTopic.c_str(), "ping");
    leds[0] = CRGB(255, 140, 0);
    FastLED.show();
    delay(200);
    leds[0] = CRGB::Black;
    FastLED.show();
    Serial.println("Ping sent to " + String(PARTNER_ID) + "!");
  }
  lastBtn = btn;

  if (ledActive) {
    unsigned long elapsed = millis() - ledOnTime;
    if (elapsed < LED_DURATION) {
      uint8_t brightness = beatsin8(15, 80, 255);
      leds[0] = CHSV(20, 200, brightness);
      FastLED.show();
    } else {
      ledActive = false;
      leds[0] = CRGB::Black;
      FastLED.show();
    }
  }

  delay(20);
}
Line-by-line: what every line does and why
Lines 1–3: Borrowing three instruction books
#include <FastLED.h>
#include <WiFi.h>
#include <PubSubClient.h>
#include means “grab this instruction book.”
- FastLED — controls the single LED.
- WiFi — connects to the internet.
- PubSubClient — the MQTT library. MQTT is a simple message system (like a post office). “Pub” means publish (send a message). “Sub” means subscribe (listen for messages).
Lines 5–6: Device identity
#define DEVICE_ID  "deviceA"
#define PARTNER_ID "deviceB"
#define gives a name to a piece of text. For Device B, change these to "deviceB" and "deviceA". These two lines are the only difference between the two devices’ code.
Lines 8–14: Connection details
const char* ssid     = "YourWiFiName";
const char* password = "YourWiFiPassword";
const char* mqtt_server = "broker.hivemq.com";
const int   mqtt_port   = 1883;
WiFi name and password — replace with real values. broker.hivemq.com is a free public MQTT relay server. Port 1883 is the standard MQTT port (like how port 80 is for websites).
Lines 16–17: Message addresses (topics)
String myTopic      = "buildcool/thinkingofyou/" + String(DEVICE_ID);
String partnerTopic = "buildcool/thinkingofyou/" + String(PARTNER_ID);
MQTT uses topics — addresses like mailbox numbers. Device A’s topic is buildcool/thinkingofyou/deviceA. Device B subscribes to that address and receives everything sent to it. String(DEVICE_ID) converts the #define text into a String so we can join it with +. The / separates levels, like folders in a path.
Lines 19–27: Hardware and connection objects
#define BUTTON_PIN  PIN_BUTTON
#define LED_PIN      PIN_NEOPIXEL
#define NUM_LEDS     1
CRGB leds[NUM_LEDS];
WiFiClient espClient;
PubSubClient mqttClient(espClient);- Button on pin 13 (C6: pin 5), LED on pin 2 (C6: pin 8) — the numbers come from the board block at the top.
CRGB leds[1]— a shelf with just 1 box for the single LED.WiFiClient espClient— creates a basic internet connection object.PubSubClient mqttClient(espClient)— creates the MQTT message handler, usingespClientas its connection. NamedmqttClient.
Lines 29–33: LED state tracking
bool ledActive   = false;
unsigned long ledOnTime   = 0;
const unsigned long LED_DURATION = 10000;
bool ledActive = false— is the LED currently glowing because a ping arrived?boolmeans true or false.ledOnTime— when did the glow start, in milliseconds?LED_DURATION = 10000— the LED glows for 10,000 milliseconds = 10 seconds.
mqttCallback(): what happens when a message arrives
void mqttCallback(char* topic, byte* payload, unsigned int length) {
  String msg = "";
  for (unsigned int i = 0; i < length; i++) msg += (char)payload[i];
  if (String(topic) == partnerTopic && msg == "ping") {
    ledActive = true;
    ledOnTime = millis();
  }
}
This function runs automatically when a message arrives on any subscribed topic. The broker calls it for us.
char* topic— which topic the message arrived on.byte* payload— the message content as raw bytes.unsigned int length— how many bytes the message is.- The
forloop builds the message into a readableString: it loops through each byte (byte* payload) and adds it as a character. if (String(topic) == partnerTopic && msg == "ping")—==means “is equal to?”&&means AND. If the topic is our partner’s and the message says “ping”: setledActive = trueand note the time.
connectMQTT(): connecting (or reconnecting) to the broker
void connectMQTT() {
  while (!mqttClient.connected()) {
    String clientId = "esp32-" + String(DEVICE_ID) + "-" + String(random(0xffff), HEX);
    if (mqttClient.connect(clientId.c_str())) {
      mqttClient.subscribe(partnerTopic.c_str());
    } else {
      delay(3000);
    }
  }
}
while (!mqttClient.connected())—!means NOT. Keep trying until connected.String(random(0xffff), HEX)— generate a random number and convert to hex. This makes the client ID unique every time, preventing “duplicate client” errors if both devices reconnect at the same moment.mqttClient.connect(clientId.c_str())— try to connect with that unique ID..c_str()converts aStringto the raw text format the library expects.mqttClient.subscribe(partnerTopic.c_str())— after connecting, subscribe to the partner’s topic (our “mailbox”).
setup(): runs once on power-on
void setup() {
  Serial.begin(115200);
pinMode(BUTTON_PIN, INPUT_PULLUP);Serial.begin(115200)— open the phone line to your computer.pinMode(BUTTON_PIN, INPUT_PULLUP)— configure pin 13 (C6: pin 5) as an input with a built-in “pull-up” resistor. This makes the pin read HIGH when nothing is connected. When the button is pressed, it connects the pin to GND and reads LOW. No external resistor needed.
  for (int i = 0; i < 3; i++) {
    leds[0] = CRGB::White; FastLED.show(); delay(150);
    leds[0] = CRGB::Black; FastLED.show(); delay(150);
  }
Three quick white blinks — the device’s way of saying “I’m alive.” for (int i = 0; i < 3; i++) loops 3 times. int i = 0 creates a counter starting at 0. i < 3 keeps going while i is less than 3. i++ adds 1 each time.
  WiFi.begin(ssid, password);
  while (WiFi.status() != WL_CONNECTED) delay(500);
  mqttClient.setServer(mqtt_server, mqtt_port);
  mqttClient.setCallback(mqttCallback);
  connectMQTT();
}
Connect to WiFi, register the MQTT server address and the callback function (so it knows to call mqttCallback when messages arrive), then connect to the broker and subscribe.
loop(): the heartbeat — runs forever
void loop() {
  if (!mqttClient.connected()) connectMQTT();
  mqttClient.loop();
if (!mqttClient.connected()) connectMQTT()— if the broker disconnected (WiFi hiccup), reconnect.mqttClient.loop()— must be called every frame. This is what checks for incoming messages and callsmqttCallbackwhen one arrives.
  static bool lastBtn = HIGH;
  bool btn = digitalRead(BUTTON_PIN);
  if (btn == LOW && lastBtn == HIGH) {
    mqttClient.publish(myTopic.c_str(), "ping");
    leds[0] = CRGB(255, 140, 0);
    FastLED.show(); delay(200);
    leds[0] = CRGB::Black; FastLED.show();
    Serial.println("Ping sent!");
  }
  lastBtn = btn;
static bool lastBtn = HIGH—staticremembers the previous button state between calls.digitalRead(BUTTON_PIN)— read the current button state (HIGH = not pressed, LOW = pressed).if (btn == LOW && lastBtn == HIGH)— the button just changed from not-pressed to pressed (the “edge”). This fires only once per press, not every frame while held down.mqttClient.publish(myTopic.c_str(), "ping")— send the word “ping” to our own topic. The partner is subscribed there and will receive it.- Brief amber flash on your device: confirmation that the message was sent.
  if (ledActive) {
    unsigned long elapsed = millis() - ledOnTime;
    if (elapsed < LED_DURATION) {
      uint8_t brightness = beatsin8(15, 80, 255);
      leds[0] = CHSV(20, 200, brightness);
      FastLED.show();
    } else {
      ledActive = false;
      leds[0] = CRGB::Black;
      FastLED.show();
    }
  }
  delay(20);
}
if (ledActive)— is the LED supposed to be glowing?elapsed < LED_DURATION— has 10 seconds passed? If not, keep glowing.beatsin8(15, 80, 255)— a slow 15-BPM wave between 80 and 255. Creates the breathing effect.CHSV(20, 200, brightness)— warm amber (hue 20), vivid (saturation 200), brightness from the wave.- When 10 seconds pass, set
ledActive = falseand turn off the LED.
The whole thing in one sentence
When powered on, the device connects to WiFi and the MQTT broker, subscribes to the partner’s topic, and blinks three times (setup). Then it loops forever: check for incoming pings (light up if one arrives), check if the button was pressed (send a ping if so), and let the LED breathe for 10 seconds after each received ping.
First thing to try: upload to both devices with correct DEVICE_ID/PARTNER_ID values. Power both on, wait for three startup blinks on each. Press Device A’s button. Device B’s LED should glow amber within 1 second.
Check after uploading Device A: Open Serial Monitor (115200 baud). You should see “WiFi connected” followed by “connected.” (MQTT), then “Device deviceA ready.” Three white blinks on the LED confirm it’s alive.
Step 3: Test both devices together
Time: ~5 minutes
- Upload code to both devices (remember to change
DEVICE_IDandPARTNER_IDfor Device B). - Power both on. Wait for them both to show the three startup blinks.
- Press the button on Device A.
- Watch Device B’s LED: it should glow warm amber for 10 seconds.
- Press Device B’s button. Device A’s LED glows.
Check: If Device B’s LED doesn’t react within 2 seconds, open Serial Monitor on Device A and confirm “Ping sent to deviceB!” appears. If not — the button wiring is wrong. If “Ping sent” appears but Device B doesn’t react — check the MQTT topic names match exactly.
Step 4: Put them in their homes
Time: ~10 minutes per device
- 3D print or find two matching small project boxes.
- Drill or cut a hole in the top for the arcade button.
- Cut a small hole or use a translucent window for the LED.
- Mount button on top, LED glowing through the front or side.
- Label each one: “Press when you miss me.”
- Give one away. Keep one. Plug both into USB chargers.
What just happened (what you learned)
-
MQTT publish/subscribe — a broker (HiveMQ) sits on the internet. Device A publishes to a topic; Device B subscribes to that same topic and receives the message instantly. Like a public noticeboard that routes notes by address.
-
Unique client IDs — MQTT brokers reject duplicate client IDs. Adding
random(0xffff)to the client ID string means every connection gets a fresh ID, so two devices never clash even if they reconnect simultaneously. -
INPUT_PULLUP edge detection —
INPUT_PULLUPmakes the pin read HIGH at rest and LOW when the button connects it to GND. Comparingbtn == LOW && lastBtn == HIGHcatches only the first moment of the press, not every frame while it’s held. -
IoT across different networks — the two devices never talk directly to each other. They both talk to the same broker, which can be anywhere in the world. Works on different WiFi networks, in different countries, without any special router setup.
-
beatsin8()for animations — FastLED’s sine wave generator that returns a value between min and max at the given BPM, automatically advancing withmillis(). No math required. Like a metronome built into the library.
Level Up
Urgent ping: Hold the button for 3 seconds instead of tapping it. The payload changes from "ping" to "ping:urgent". Device B glows blue instead of amber for urgent pings. Different colours, same hardware.
Three-way group: Extend to three people — A, B, and C. Each device subscribes to both other topics. Pressing A’s button pings both B and C simultaneously. Requires two subscriptions per device and different LED colours per sender.
Daily ping count: Use the Preferences library (built into ESP32 Arduino) to count how many pings arrived today. Double-press the button to flash the count. Shows you how often someone was thinking of you.
Troubleshooting
| Problem | Fix |
|---|---|
| Three blinks but Serial shows “failed. Retrying in 3s.” for MQTT | broker.hivemq.com is sometimes slow. Wait 30 seconds. If it never connects, try test.mosquitto.org port 1883 as the broker. |
| Button press does nothing (no “Ping sent” in Serial) | Check GPIO 13 (C6: GPIO 5) is connected to button terminal, GND to other terminal. Also check INPUT_PULLUP is set — without it, the pin floats. |
| Device B doesn’t react to Device A’s button | Open Serial Monitor on both. Check Device B shows “connected.” and that the partnerTopic variable value matches Device A’s myTopic exactly. |
| LED glows but the wrong colour | Check COLOR_ORDER GRB. Most WS2812B modules use GRB. If amber looks pink, switch to RGB in the addLeds call. |
| Both devices work in my house but not apart | Both need internet (not just WiFi). Check that neither is on a WiFi network with restricted outbound ports. Port 1883 must be open. |
| LED stays on forever, doesn’t turn off | Check that LED_DURATION = 10000 (10 seconds in milliseconds, not 10). |