Parent info
Parts you need
Affiliate links — we may earn a small commission
Try this circuit in your browser!
Open Wokwi Simulator, paste the diagram.json, and test the wiring before buying any parts.
You type “BOO.” Your pumpkin freaks out.
Imagine this: you carved a pumpkin. You put it on the porch. Now you open Telegram on your phone and type “BOO” — the pumpkin flashes red and its jaw snaps open.
You didn’t write a single line of code. You just told it what to do. In English.
That’s what we’re building. In 30 minutes. For about $30.
What you’ll need
| Part | What it does | Price |
|---|---|---|
| ESP32-S3-DevKitC-1 N8R8 | The brain. Runs the AI agent locally. | ~$12 |
| WS2812 LED ring (16 LEDs) | The glow inside your pumpkin. Each LED can be any color. | ~$5 |
| SG90 Servo motor | Moves something — a jaw, a lid, an eye. | ~$3 |
| Breadboard + jumper wires | Connects everything. No soldering. | ~$5 |
| USB-C data cable | Connects board to your computer for setup. | ~$5 |
You also need: home WiFi, a Telegram account (free), and an AI API key (Claude, OpenAI, or similar).
Total: ~$30 | Time: ~30 minutes | Difficulty: ●●○○○
Important: The board MUST be the N8R8 version (8MB flash + 8MB PSRAM). The AI agent needs that memory. Regular ESP32 boards won’t work. Look for “8MB PSRAM” on the product page before buying.
How ESP-Claw works (60 seconds)
Think of it like this: your phone has Siri. Now your pumpkin has Siri too.
You type a message in Telegram → ESP-Claw sends it to an AI (like Claude) → the AI understands what you want → it writes a tiny program (in Lua) → ESP-Claw saves that program on the chip → the chip runs it.
The clever part: once that program is saved, it runs without internet. The AI helped create it, but the pumpkin runs it alone. Even if your WiFi goes down, the pumpkin keeps glowing.
This is called “Chat Coding” — you describe what you want, and an AI turns it into working hardware behavior.
Step 0: Prepare your pumpkin
Time: ~10 minutes
Before any electronics — you need a pumpkin with a moving part.
What the servo does: A servo is a small motor that rotates to an exact angle when you tell it to. Think of it like a robot finger — you say “go to 90 degrees” and it snaps there. We’ll use it to move something on the pumpkin.
Three ideas (pick one):
A) Jaw that opens and closes (easiest)
- Carve a mouth but leave the bottom jaw attached as a flap
- Hot-glue the servo to the inside of the pumpkin, near the jaw hinge
- Attach a popsicle stick or stiff wire from the servo arm to the jaw flap
- When servo goes to 90° → jaw opens. When it goes back to 0° → jaw closes.
B) Lid that pops open (medium)
- Cut the top of the pumpkin normally but keep a hinge on one side (don’t cut all the way around)
- Mount the servo inside with hot glue, arm pointing up toward the lid
- Attach the servo arm to the lid with a short piece of wire or a popsicle stick
- Servo at 0° → lid closed. Servo at 90° → lid pops open.
C) Eye that looks around (coolest)
- Carve one big eye socket
- Mount a ping pong ball on the servo arm (hot glue)
- Draw a pupil on the ball with a marker
- Mount the servo behind the eye hole
- When the servo moves → the eye looks left and right.
You’ll need: Hot glue gun OR strong tape. A popsicle stick or stiff wire. That’s it — no special parts.
Check: Try moving the servo arm by hand. It should rotate freely. If your mechanism makes the arm too hard to turn, the servo will buzz and overheat. Keep it loose.
The LED ring goes inside the pumpkin, facing the carved front. It lights up the entire face from behind. Just set it on the bottom of the pumpkin or tape it to the inside wall.
Step 1: Wire it up
Time: ~5 minutes
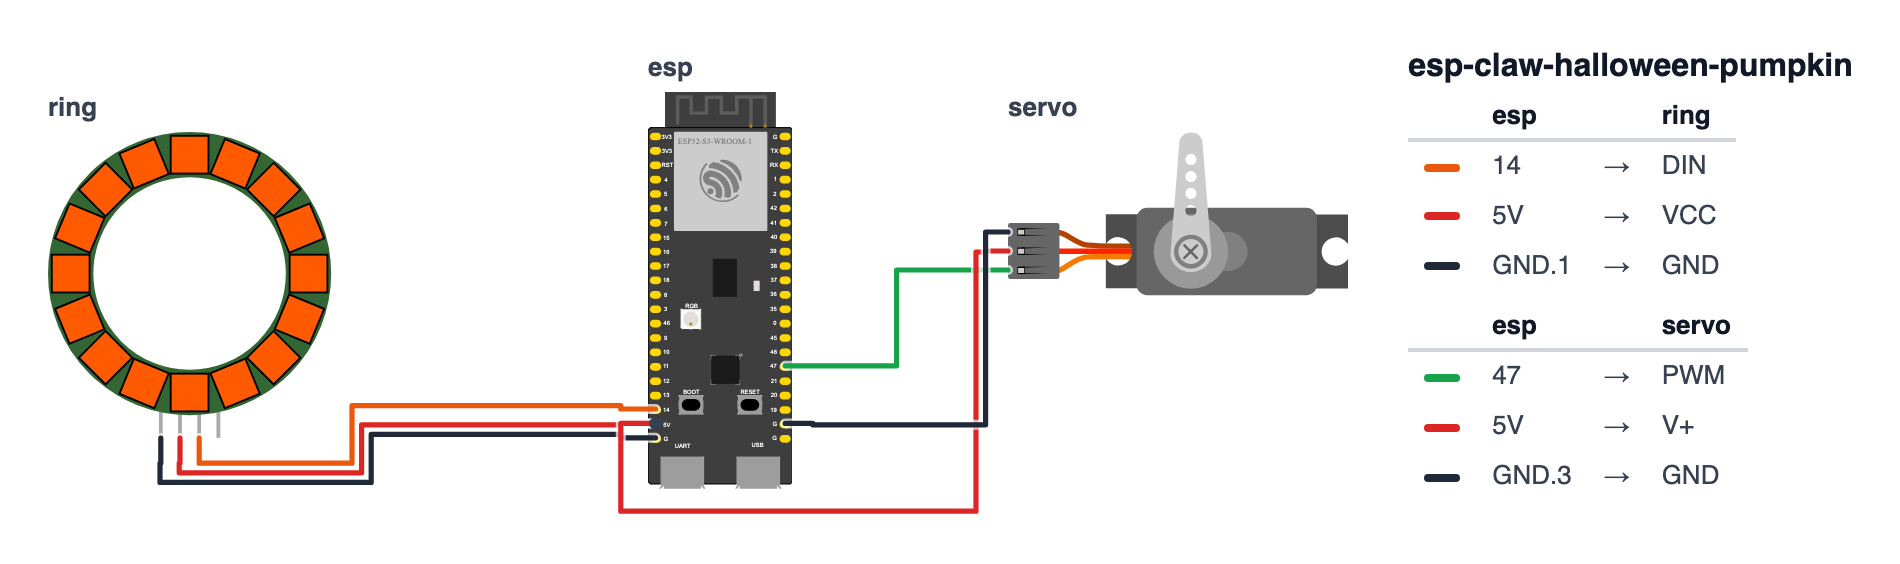
You’re connecting 6 wires total. That’s it.
LED Ring (3 wires):
- Ring DIN (data in) → board GPIO14 — orange wire
- Ring VCC (power) → board 5V — red wire
- Ring GND (ground) → board GND — black wire
Servo (3 wires): 4. Servo PWM (signal, orange wire from servo) → board GPIO47 — green wire 5. Servo VCC (red wire from servo) → board 5V — red wire 6. Servo GND (brown wire from servo) → board GND — black wire
Check: Count your wires. You should see 6 connections: 2 red (power), 2 black (ground), 1 orange (LED data), 1 green (servo signal). Board is NOT plugged into USB yet.
Common mistake: Plugging the LED ring DIN wire into DOUT instead of DIN. DIN = data IN (from board TO ring). DOUT = data OUT (to chain another ring). You want DIN.
Step 2: Flash ESP-Claw from your browser
Time: ~3 minutes
No Arduino IDE. No downloads. Your browser does everything.
- Plug the USB-C cable into the board, then into your computer.
- Open Chrome or Edge (Firefox won’t work — it doesn’t support Web Serial).
- Go to: https://esp-claw.com/en/flash/
- Select ESP32-S3 from the chip dropdown.
- Click “Flash Firmware”.
- A popup asks you to pick a serial port — select your board.
- Wait ~1 minute. A progress bar shows the download.
Check: The flash page says “Firmware flashed successfully” or similar. If nothing happens: try a different USB cable (charge-only cables have no data wires — this is the #1 problem).
After flashing, the page asks for your WiFi name and password. Type them in and click Connect.
Check: The page shows your board’s IP address (something like 192.168.1.47). Click the link to open the config page. Keep this tab open.
Step 3: Set up AI and Telegram
Time: ~5 minutes
You’re in the ESP-Claw config page (the link from Step 2). Now you tell your pumpkin how to think and how to listen.
AI setup (so your pumpkin understands English):
- Find the LLM section in the config.
- Select Claude (Anthropic) as the provider.
- Paste your API key (get one at console.anthropic.com — it’s like a password for the AI service).
- Set model to
claude-sonnet-4-5(fast and smart enough). - Save.
Telegram setup (so you can chat with your pumpkin):
- Open Telegram on your phone.
- Search for @BotFather and start a chat.
- Type
/newbot. Give your bot a name: PumpkinBot. - BotFather gives you a token — a long string of letters and numbers. Copy it.
- Back in the ESP-Claw config page, find Telegram under IM Settings.
- Paste the token. Save. Restart the board.
Check: Open Telegram, find your PumpkinBot, type “Hi”. If ESP-Claw responds — you’re done with setup. If not, see Troubleshooting at the bottom.
Step 4: Chat with your pumpkin!
Time: ~2 minutes per effect
This is the fun part. Open PumpkinBot in Telegram and type these:
“Light up the ring orange like a candle flame”
The ring starts flickering in warm orange and amber — like a real candle. It keeps going even if you close Telegram.
What happened behind the scenes: The AI understood “candle flame” → wrote a Lua script that randomizes brightness across 16 LEDs → ESP-Claw saved it → it runs locally forever.
“When I type BOO, flash red three times and snap the servo to 90 degrees”
Now type BOO. The pumpkin strobes red. The servo snaps. Type BOO again — same thing.
What happened: The AI created a “trigger rule” — the word BOO activates a Lua script. This rule is saved on the chip. It survives power cycles.
“Create a slow purple breathing effect — fade in and out every 3 seconds”
The pumpkin slowly pulses deep purple. Inhale. Exhale. Perfect for a dark hallway.
“Every day at 18:00, turn on the candle effect automatically”
Set it and forget it. Every evening at 6pm, your pumpkin turns itself on.
Note: Set your timezone in the config page first (under Timezone). Use format like
EST5EDT(US Eastern) orCET-1CEST(Central Europe).
“When someone types TRICK OR TREAT, do a rainbow celebration and wave the servo”
Hand your phone to trick-or-treaters with the bot open. They type TRICK OR TREAT. The pumpkin puts on a light show. Kids love it.
What just happened (what you learned)
You might not realize it, but you just used some serious concepts:
-
Edge computing — the AI generated code, but the code runs on the chip itself, not in the cloud. That’s why it works offline. This is how smart home devices, self-driving cars, and factory robots work.
-
Event-driven programming — when you said “when I type BOO, do X”, you created a trigger. The system waits for an event (the word BOO) and reacts. This is how all interactive software works — from games to websites.
-
Automation scheduling — the 18:00 candle effect is a cron job. Every server in the world uses this to run tasks at specific times. You just set one up by chatting.
-
Natural language interface — you told a machine what to do in English, and it figured out the details. This is the future of programming. Not everyone will write code, but everyone will instruct AI.
Level Up
Motion-activated scares: Connect a PIR motion sensor to GPIO5. Tell ESP-Claw: “When the PIR sensor on GPIO5 fires, trigger the BOO scare effect.” Now your pumpkin scares people automatically when they walk by.
Multiple moods: Tell ESP-Claw: “Create a skill called ‘spooky’ that does purple breathing, a skill called ‘party’ that does rainbow, and a skill called ‘chill’ that does slow orange. Let me switch by typing the name.” Now you have three modes.
Share your creation: ESP-Claw has a Skills Lab where you can publish your Halloween skills for others to install.
★★ You completed: ESP-Claw Halloween Pumpkin!
Troubleshooting
| Problem | Fix |
|---|---|
| Flash page doesn’t show my board | Use Chrome/Edge, not Firefox. Try a different USB cable (data, not charge-only). Try a different USB port. |
| Bot doesn’t respond in Telegram | Check: Is the board powered on? Is WiFi connected? Is the bot token correct? Is the API key valid with credit? |
| “PSRAM” error on startup | You need the N8R8 board (8MB PSRAM). Check your board — if it says N4R2, it won’t work. |
| Servo twitches but wrong angle | Tell ESP-Claw: “The servo isn’t accurate — adjust the PWM calibration for SG90.” It will fix itself. |
| LED ring doesn’t light | Check: DIN wire on GPIO14 (not DOUT). VCC on 5V (not 3.3V). Try the board’s built-in RGB LED first: “light up the built-in LED green.” |
| Scheduled task runs at wrong time | Set timezone in config page. Format: EST5EDT, CET-1CEST, GMT0BST. |