Parent info
Parts you need
Affiliate links — we may earn a small commission
Try this circuit in your browser!
Run the code, press the buttons and watch what happens — before you buy any parts. No account needed.
Open in Simulator →Your room just got a guardian.
Imagine this: you walk into the room. A servo whirs. The turret — your NERF blaster mounted on a pan/tilt bracket — swings smoothly toward you and locks on. On your phone, the dashboard updates: TARGET ACQUIRED.
You’re on the control page. You decide whether it fires.
That’s what we’re building — a motion-tracking turret with a WiFi control panel. SCAN mode sweeps the room automatically. TRACK mode locks onto any detected movement. Fire mode is deliberately a manual step.
Builds in 4 hours. About $35 plus your NERF blaster.
What you’ll need
| Part | What it does | Price |
|---|---|---|
| ESP32-S3 Dev Board | Brain + web server. Runs SCAN/TRACK/SAFE mode logic. | ~$12 |
| 2x MG996R servo | Metal gears, high torque — holds a NERF blaster without drooping. | ~$8 |
| PIR Motion Sensor (HC-SR501) | Detects body heat movement up to 7m away. | ~$2 |
| 5V 3A USB power bank | External power for servos — critical (never power servos from ESP32 pins). | ~$10 |
| 3D printed pan/tilt bracket | Mounts two servos at right angles. Free to print. | $0 |
| Zip ties + hardware | Secures the NERF blaster to the tilt platform. | ~$3 |
Total: ~$35 + NERF blaster | Time: ~4 hours | Difficulty: ●●●○○
Safety first: The fire mode in this project requires a deliberate manual action from the web dashboard (tap ENABLE FIRE). It is disabled by default. Only run fire mode in a space where all participants know what’s happening and have eye protection. Never leave a fire-enabled turret running unattended.
How it works (60 seconds)
Think of it like this: the PIR sensor is a tripwire, and the servos are the reaction.
PIR (Passive Infrared) detects heat moving through space — specifically the difference in infrared radiation as a warm body crosses its field of view. It doesn’t see video; it just sees “something warm moved.”
When the PIR fires, the pan servo smoothly sweeps from wherever it is toward center (where the target is assumed to be). The tilt servo raises from idle to aimed position. On your phone dashboard, the status updates.
Two modes:
- SCAN: Pan servo sweeps back and forth 140° continuously — the robot is always watching
- TRACK: When PIR fires, the servo locks on. Optional fire via web button.
The web dashboard on your phone shows the current mode, status text, and control buttons. Everything goes through WiFi — no physical buttons needed.
Step 0: Build the pan/tilt mount
Time: ~20 minutes
Search Printables or Thingiverse for “servo pan tilt mount” and print one in PLA. Most designs use two standard servo horns as pivot points — one for pan (horizontal) and one for tilt (vertical).
If you don’t have a 3D printer:
- Buy a pre-made metal pan/tilt bracket kit (~$5 on Amazon)
- Or improvise with thick cardboard, hot glue, and a servo horn
Assembly:
- Attach the pan servo (MG996R #1) to the base bracket — it rotates the whole assembly horizontally
- Attach the tilt servo (MG996R #2) to the secondary arm — it rotates the blaster up/down
- Mount your NERF blaster to the tilt platform using zip ties — firm but removable
- If adding fire capability: 3D print a small lever arm that presses the trigger and attach the optional third servo to the blaster frame
Check: Move both servo arms by hand through their full range. Nothing should bind or snag. The blaster should be secure but not so tight that it restricts servo movement.
Step 1: Wire it up
Time: ~15 minutes
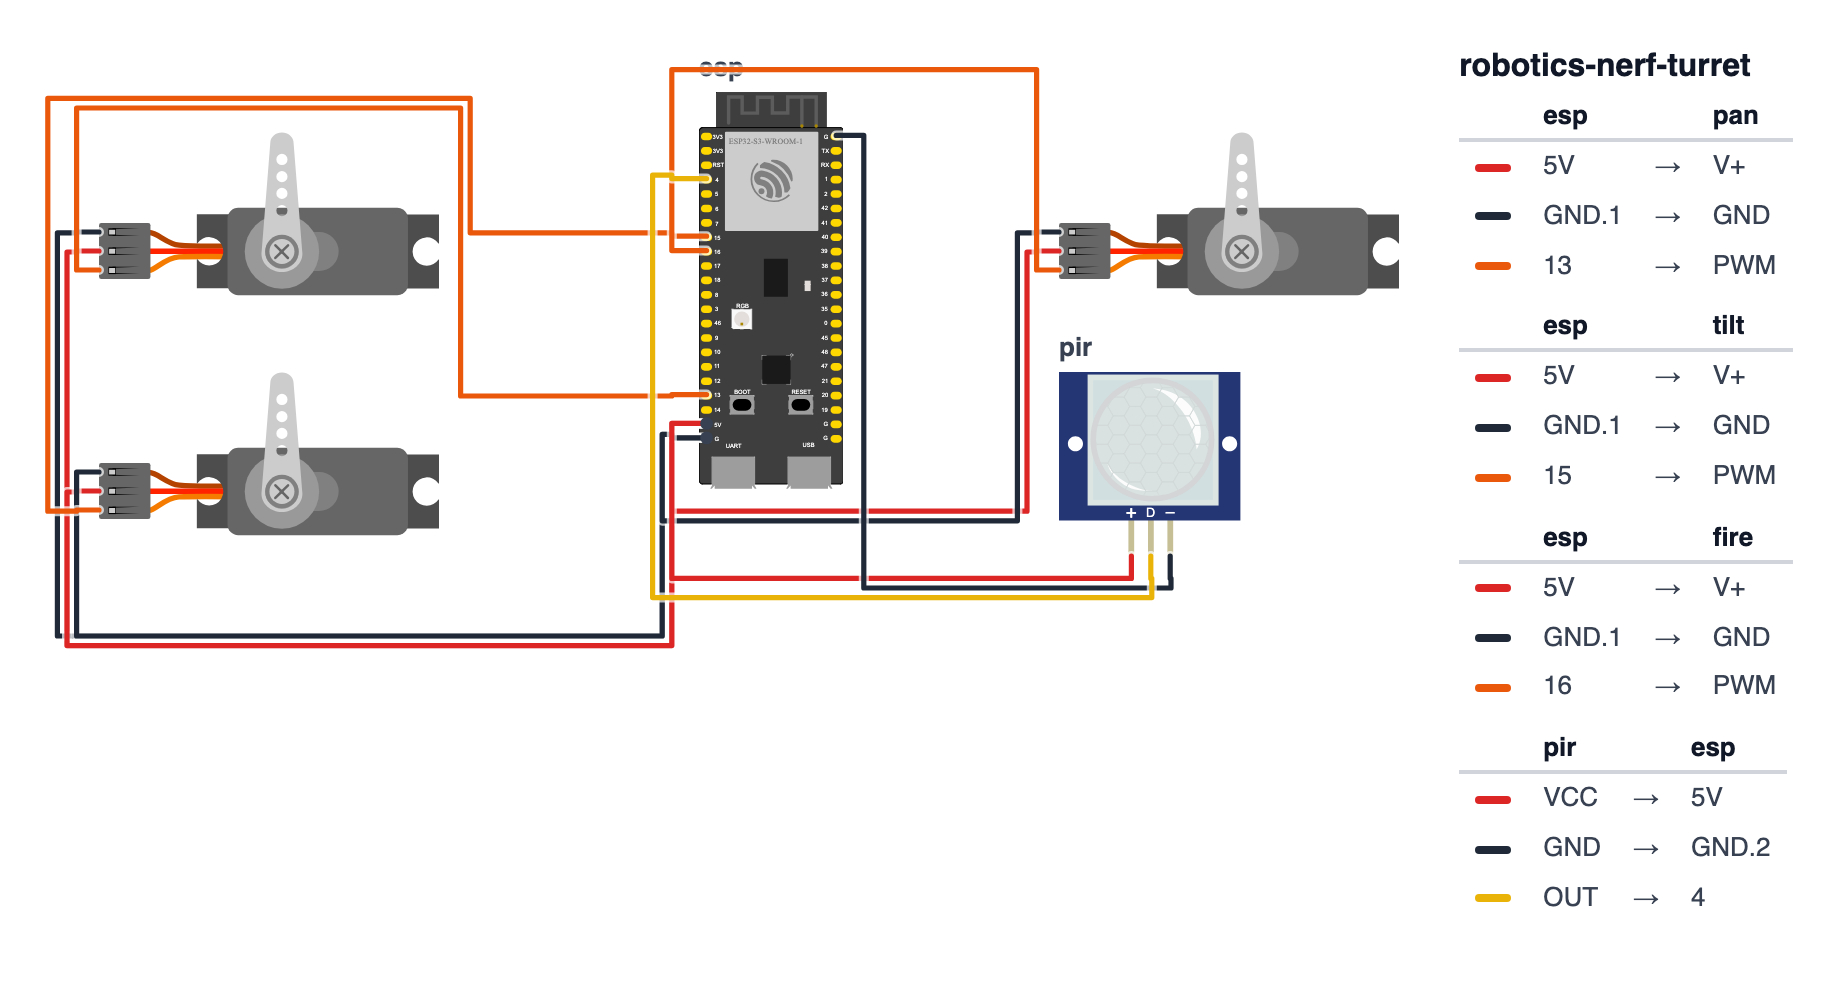
CRITICAL: Power servos from external 5V, NOT from ESP32 pins. MG996R servos draw up to 1A each under load. The ESP32’s 5V and 3.3V pins are rated for ~40mA. Connecting a servo directly causes brownouts, resets, and potential damage.
Correct power setup:
- USB power bank → servo power rail (red wires from both servos)
- ESP32 GND → power bank GND — shared ground is required
- Servo signal wires → ESP32 GPIOs
| ESP32 GPIO | Connected To | Notes |
|---|---|---|
| GPIO 13 | Pan Servo signal | orange/yellow wire |
| GPIO 15 | Tilt Servo signal | orange/yellow wire |
| GPIO 4 | PIR HC-SR501 OUT | HIGH when motion detected |
| GPIO 16 | Trigger Servo signal (optional) | for fire mode only |
| GND | Power bank GND + PIR GND | shared ground reference |
PIR sensor: VCC → 5V (from power bank), GND → GND, OUT → GPIO 4.
Check: With power bank connected (not USB), manually move each servo arm. When the ESP32 boots, both servos should snap to their starting positions (pan=90°, tilt=80°). If a servo twitches randomly, check for a missing shared ground connection.
Step 2: Flash the code
Time: ~5 minutes
Install ESPAsyncWebServer and ESP32Servo libraries. Select ESP32S3 Dev Module. Upload:
The big picture first. This program has three modes — SAFE, SCAN, and TRACK — managed by a state machine. Think of it like a traffic light: it’s always in exactly one state (red/yellow/green), and buttons change the state. The SCAN state sweeps the pan servo like a pendulum. The TRACK state locks on when the PIR sensor detects movement. A web page on your phone controls which state the turret is in.
// ========== CHOOSE YOUR BOARD ==========
// Uncomment the line for YOUR board:
#define BOARD_S3    // ESP32-S3-DevKitC-1
//#define BOARD_C6  // ESP32-C6-DevKitC-1
// ========================================

#ifdef BOARD_S3
  #define PIN_PAN              13
  #define PIN_TILT             15
  #define PIN_FIRE             16
  #define PIN_PIR              4
#endif
#ifdef BOARD_C6
  #define PIN_PAN              5
  #define PIN_TILT             3
  #define PIN_FIRE             4
  #define PIN_PIR              0
#endif

#include <ESP32Servo.h>
#include <WiFi.h>
#include <ESPAsyncWebServer.h>

#define PAN_MIN    20
#define PAN_MAX   160
#define PAN_CENTER 90
#define TILT_IDLE  80
#define TILT_UP    55

Servo panServo, tiltServo, fireServo;

bool fireEnabled = false;
int  panPos      = PAN_CENTER;
int  scanDir     = 1;

const char* ssid = "TURRET-CONTROL";
const char* pass = "armed2024";
AsyncWebServer server(80);

const char turretHTML[] PROGMEM = R"rawliteral(
<!DOCTYPE html><html>
<head>
<meta name="viewport" content="width=device-width,initial-scale=1">
<title>Turret Control</title>
<style>
  body{background:#0a0a0a;color:#ff3333;font-family:monospace;
       padding:20px;text-align:center}
  h1{letter-spacing:8px;font-size:1.8em}
  button{margin:8px;padding:16px 32px;font-size:1em;font-weight:bold;
         background:#1a0000;color:#ff3333;border:2px solid #ff3333;
         cursor:pointer;letter-spacing:2px}
  button:hover{background:#ff3333;color:#000}
  #status{margin-top:20px;padding:10px;border:1px solid #333;
          font-size:1.2em}
  .green{color:#00ff00}
  .red{color:#ff0000}
</style></head>
<body>
<h1>TURRET CONTROL</h1>
<div id="status">STANDBY</div>
<br>
<button onclick="fetch('/track')">TRACKING MODE</button>
<button onclick="fetch('/scan')">SCAN MODE</button>
<button onclick="fetch('/safe')">SAFE MODE</button>
<br>
<button onclick="fetch('/arm')" style="border-color:#ff6600;color:#ff6600">
  ENABLE FIRE (caution)</button>
<button onclick="fetch('/disarm')">DISARM</button>
<br>
<button onclick="fetch('/fire')">MANUAL FIRE</button>
<script>
setInterval(()=>{
  fetch('/status').then(r=>r.text()).then(t=>{
    document.getElementById('status').innerHTML=t;
  });
},500);
</script></body></html>
)rawliteral";

enum Mode { SAFE, SCAN, TRACK };
Mode currentMode = SCAN;
String statusMsg = "SCANNING";

void fireOnce() {
  if (!fireEnabled) return;
  fireServo.write(50);
  delay(300);
  fireServo.write(90);
}

void setup() {
  Serial.begin(115200);
  pinMode(PIN_PIR, INPUT);

  panServo.attach(PIN_PAN,   500, 2400);
  tiltServo.attach(PIN_TILT, 500, 2400);
  fireServo.attach(PIN_FIRE, 500, 2400);

  panServo.write(PAN_CENTER);
  tiltServo.write(TILT_IDLE);
  fireServo.write(90);

  WiFi.softAP(ssid, pass);
  Serial.println(WiFi.softAPIP());

  server.on("/",       HTTP_GET,[](AsyncWebServerRequest* r){
    r->send_P(200,"text/html",turretHTML);});
  server.on("/safe",   HTTP_GET,[](AsyncWebServerRequest* r){
    currentMode=SAFE; statusMsg="SAFE MODE"; r->send(200,"text/plain","OK");});
  server.on("/scan",   HTTP_GET,[](AsyncWebServerRequest* r){
    currentMode=SCAN; statusMsg="SCANNING"; r->send(200,"text/plain","OK");});
  server.on("/track",  HTTP_GET,[](AsyncWebServerRequest* r){
    currentMode=TRACK; statusMsg="TRACKING"; r->send(200,"text/plain","OK");});
  server.on("/arm",    HTTP_GET,[](AsyncWebServerRequest* r){
    fireEnabled=true;
    statusMsg="<span class='red'>ARMED — FIRE ENABLED</span>";
    r->send(200,"text/plain","OK");});
  server.on("/disarm", HTTP_GET,[](AsyncWebServerRequest* r){
    fireEnabled=false;
    statusMsg="<span class='green'>DISARMED</span>";
    r->send(200,"text/plain","OK");});
  server.on("/fire",   HTTP_GET,[](AsyncWebServerRequest* r){
    fireOnce(); r->send(200,"text/plain","FIRED");});
  server.on("/status", HTTP_GET,[](AsyncWebServerRequest* r){
    r->send(200,"text/html",statusMsg);});

  server.begin();
  Serial.println("Turret online. SSID: TURRET-CONTROL / armed2024");
}

void loop() {
  if (currentMode == SAFE) {
    panServo.write(PAN_CENTER);
    tiltServo.write(TILT_IDLE);
    delay(100);
    return;
  }

  bool motion = digitalRead(PIN_PIR);

  if (currentMode == SCAN || !motion) {
    panPos += scanDir * 2;
    if (panPos >= PAN_MAX) { panPos = PAN_MAX; scanDir = -1; }
    if (panPos <= PAN_MIN) { panPos = PAN_MIN; scanDir =  1; }
    panServo.write(panPos);
    tiltServo.write(TILT_IDLE);
    delay(20);
  }

  if (currentMode == TRACK && motion) {
    for (int aim = panPos; aim != PAN_CENTER; aim += (PAN_CENTER > aim ? 1 : -1)) {
      panServo.write(aim);
      delay(8);
    }
    panPos = PAN_CENTER;
    tiltServo.write(TILT_UP);
    statusMsg = "<span class='red'>TARGET ACQUIRED</span>";

    if (fireEnabled) {
      delay(500);
      fireOnce();
    }
    delay(800);
    tiltServo.write(TILT_IDLE);
    statusMsg = "TRACKING";
  }

  delay(10);
}
Line-by-line: what every line does and why
Lines 1–3: Borrowing the instruction books
#include <ESP32Servo.h>
#include <WiFi.h>
#include <ESPAsyncWebServer.h>
#include means “grab this instruction book.” ESP32Servo teaches the code how to send the exact electrical signal servos need. WiFi.h creates the hotspot. ESPAsyncWebServer handles the control page without freezing the servo movement.
Lines 5–13: Naming the pins and servo angles
#define PAN_PIN   13
#define TILT_PIN  15
...
#define TILT_IDLE  80
#define TILT_UP    55
Servos receive a position as a number from 0 to 180 — degrees. TILT_IDLE = 80 means the tilt servo rests at 80° (aimed at door-handle height). TILT_UP = 55 means 55° — raised and aimed. The pan servo sweeps from 20° to 160° — that’s a 140° sweep across the room.
Lines 15–21: Creating the servo and turret state
Servo panServo, tiltServo, fireServo;
bool fireEnabled = false;
int  panPos      = PAN_CENTER;
int  scanDir     = 1;
Servo is a box that knows how to talk to a servo motor. We create three: one for left-right movement (pan), one for up-down (tilt), and one optional for the trigger. scanDir = 1 is a direction flag — when it’s +1, the pan moves right; when it’s -1, it moves left. Flipping scanDir at the edges creates the back-and-forth pendulum sweep.
enum Mode: Named states
enum Mode { SAFE, SCAN, TRACK };
Mode currentMode = SCAN;
enum creates a named list of options — like a multiple-choice answer. Instead of remembering that 0=safe, 1=scan, 2=track, you can write currentMode == TRACK which reads like English. The turret starts in SCAN mode.
setup() — Attaching servos
panServo.attach(PAN_PIN, 500, 2400);attach connects the servo library to a pin. The numbers 500 and 2400 are the pulse widths in microseconds for 0° and 180°. A standard servo expects a pulse between 0.5ms and 2.4ms to position itself — shorter pulse = one end, longer pulse = other end. Specifying these exact numbers ensures the MG996R servo reaches its full range without stalling at the ends.
setup() — Web routes
server.on("/safe", HTTP_GET,[](AsyncWebServerRequest* r){
  currentMode=SAFE; statusMsg="SAFE MODE"; r->send(200,"text/plain","OK");});
Each server.on(...) registers a URL. When your phone browser taps SAFE MODE, it sends a request to /safe. The code inside the [](...) braces runs — it sets currentMode and replies “OK.” This is called a lambda — a tiny function without a name, written inline where it’s used.
loop() — SAFE mode
if (currentMode == SAFE) {
  panServo.write(PAN_CENTER);
  tiltServo.write(TILT_IDLE);
  delay(100);
  return;
}
return exits the loop() function immediately — nothing below this runs when in SAFE mode. The turret centers itself and stays still.
loop() — SCAN mode pendulum
panPos += scanDir * 2;
if (panPos >= PAN_MAX) { panPos = PAN_MAX; scanDir = -1; }
if (panPos <= PAN_MIN) { panPos = PAN_MIN; scanDir =  1; }
panServo.write(panPos);
delay(20);
Each loop, panPos increases by 2° (when scanDir = +1) or decreases by 2° (when scanDir = -1). When it hits the maximum (160°), scanDir flips to -1. When it hits the minimum (20°), it flips back to +1. This creates a pendulum. delay(20) = 50 loops per second = about 2°×50 = 100° per second sweep rate.
loop() — TRACK mode lock-on
for (int aim = panPos; aim != PAN_CENTER; aim += (PAN_CENTER > aim ? 1 : -1)) {
  panServo.write(aim);
  delay(8);
}
This for loop moves the pan servo one degree at a time toward center (90°). PAN_CENTER > aim ? 1 : -1 is a direction check — if center is to the right of where we are, move +1; if it’s to the left, move -1. Moving 1° every 8ms = about 125°/second — slow enough to look deliberate and give the servo time to physically move.
The whole thing in one sentence
The turret creates a WiFi hotspot with a control page, starts in SCAN mode sweeping the pan servo like a pendulum, and switches to TRACK mode when the PIR sensor detects movement — smoothly centering on the target.
First thing to try: Upload and connect to TURRET-CONTROL WiFi. Open 192.168.4.1 and tap SCAN MODE — watch the pan servo sweep back and forth. Then tap TRACKING MODE and walk in front of the PIR sensor.
Check: Upload succeeds. Connect phone to TURRET-CONTROL WiFi (password: armed2024). Open
192.168.4.1. You should see the dark-themed control panel with TRACKING/SCAN/SAFE buttons.
Step 3: Configure and test modes
Time: ~5 minutes
-
SAFE MODE first. Tap SAFE MODE — both servos move to center/idle. Nothing happens. This is your “safe to handle” mode.
-
SCAN MODE. Tap SCAN MODE. The pan servo should begin sweeping back and forth across its full range (20°–160°). Watch the physical servo move. The dashboard shows SCANNING.
-
TRACK MODE. Tap TRACKING MODE. Walk in front of the PIR sensor. The servo should smoothly sweep to center (90°) and the tilt servo should raise. Dashboard shows TARGET ACQUIRED.
PIR tuning: The HC-SR501 has two small adjustment dials. One controls sensitivity (distance, typically 3–7m). One controls hold time (how long it stays HIGH after motion stops, 5–300 seconds). Set hold time to minimum (rotate counter-clockwise) for fastest tracking reset.
Step 4: Demo sequence
The best way to show this off:
- Start in SCAN mode — let it sweep automatically for a minute
- Enable TRACK mode — walk past the doorway PIR sensor
- Watch the turret track the movement and snap to TARGET ACQUIRED on the dashboard
- Mention casually that there’s a ENABLE FIRE button
- Let the viewer decide if they want to enable it
What just happened (what you learned)
-
MG996R vs SG90 servos — SG90 has plastic gears, ~1.8 kg/cm torque — fine for sensor mounts. MG996R has metal gears, ~11 kg/cm torque — necessary for holding a 500g NERF blaster without drooping. Both use the same 50Hz PWM signal: 500µs = 0°, 1500µs = 90°, 2400µs = 180°.
-
External power for servos — Servos draw up to 1A each under load. ESP32 pins are rated for ~40mA. Without external power, connecting a servo causes brownouts or chip resets. Shared ground between ESP32 and the external supply is required — without it, the PWM signal has no reference.
-
Enum for mode state —
enum Mode { SAFE, SCAN, TRACK }gives three named states.currentMode == TRACKis instantly readable;currentMode == 2requires remembering what 2 means. Enums are the standard pattern for mode-based state machines. -
Smooth pan with a for loop — Moving 1° per 8ms creates a sweep instead of a snap. Two benefits: looks more dramatic (deliberate, predatory tracking), and is mechanically gentler on servo gears (rapid large movements cause wear).
Level Up
Two PIR sensors for directional tracking. Mount one PIR facing left, one facing right. When left PIR fires first, pan toward 20°. When right fires first, pan toward 160°. Use timestamps (millis()) to determine which fired first. The turret now knows which side of the room the target came from.
Predictive lead. After PIR stops, continue panning in the detected direction for 500ms. The target is probably still moving — lead ahead of where it was, not where it is.
Replace PIR with ESP32-CAM face detection. Run the face detection example from the ESP32-CAM Arduino examples. Feed face bounding box X/Y coordinates into the pan/tilt servos. The turret follows faces across the room. The reaction when people see this is immediate.
★★ You completed: NERF Auto-Turret!
Troubleshooting
| Problem | Fix |
|---|---|
| Servo twitches randomly | Missing shared ground. ESP32 GND must connect to power bank GND. |
| Servo doesn’t move to full range | Change servo.attach(pin, 500, 2400) — default range misses the ends on MG996R. |
| PIR fires constantly | Turn the sensitivity dial counter-clockwise (less sensitive). Also avoid aiming PIR at heat vents, windows, or sunlight. |
| PIR never fires | Check VCC on 5V (not 3.3V). PIR HC-SR501 needs 5V to operate. |
| Dashboard doesn’t update | Phone went back to home WiFi. Re-connect to TURRET-CONTROL in WiFi settings. |
| Tilt servo droops over time | NERF blaster too heavy for the servo at this arm length. Try a stronger servo or shorten the arm distance. |
| Fire servo doesn’t press trigger | Adjust the 50° angle in fireServo.write(50) — may need 40° or 60° depending on your blaster’s trigger position. |