Parent info
Parts you need
Affiliate links — we may earn a small commission
Try this circuit in your browser!
Run the code, press the buttons and watch what happens — before you buy any parts. No account needed.
Open in Simulator →Your classmates said solar panels work. You proved exactly how well — at every angle.
Imagine this: Environmental Science project on renewable energy. Everyone presents a report: “Solar panels are efficient and environmentally friendly.” Five minutes, some stock photos, done.
Your project: a mini solar panel mounted on a protractor. An INA219 sensor measures voltage AND current simultaneously. A web dashboard shows real-time power output in milliwatts. You test the panel at 0°, 15°, 30°, 45°, 60°, 75°, 90° relative to the light source — and graph the power curve.
“Maximum efficiency at 35° from perpendicular. Efficiency drops to 50% at 60° and nearly zero at 90°. The cosine of the angle predicts the output — this is why solar farms use tracking systems.”
That’s what we’re building. For about $28.
What you’ll need
| Part | What it does | Price |
|---|---|---|
| ESP32-S3-DevKitC-1 | Brain — reads sensor, logs data, serves dashboard | ~$12 |
| Mini solar panel (6V 1W) | The test subject — small enough to angle easily | ~$5 |
| INA219 voltage+current sensor | Measures both V and I simultaneously → calculates power | ~$5 |
| OLED display 0.96” | Live power output display | ~$4 |
| Breadboard + jumper wires | Wires everything | ~$5 |
You also need: protractor, small lamp or sunny window, tape or mounting putty.
Total: ~$28 | Time: ~2–3 hours | Difficulty: ●●●○○
How it works (60 seconds)
The INA219 is a precision current/voltage sensor that uses a shunt resistor (a precise low-value resistor that creates a tiny voltage drop proportional to current flow). By measuring the voltage across the shunt and the total bus voltage simultaneously, it calculates:
- Bus Voltage (V) — the panel’s output voltage
- Current (mA) — how much current the panel is producing
- Power (mW) = V × I — the actual useful output
As you tilt the panel, the light hits it at different angles. The component of light perpendicular to the panel surface decreases with angle — specifically, it follows a cosine relationship. You’ll verify this with your measurements.
Step 0: Build the test setup
Time: ~20 minutes
The angle tester:
- Print or draw a protractor on cardboard (or use a real protractor)
- Tape the solar panel to a flat piece of cardboard
- Mount the cardboard so it can pivot against the protractor
- Mark angles: 0°, 15°, 30°, 45°, 60°, 75°, 90°
0° = panel perpendicular to light (maximum output) 90° = panel parallel to light (nearly zero output)
Light source:
- Outdoor sunlight is best (move to direct sun for each reading)
- Indoor lamp: use a single strong LED lamp, move panel not lamp
- Keep light source distance constant (>30cm) between measurements
Load resistor: The solar panel needs a load to produce meaningful power. Connect a 100Ω resistor (from your breadboard kit) across the panel’s output terminals — the INA219 will measure voltage and current through this load.
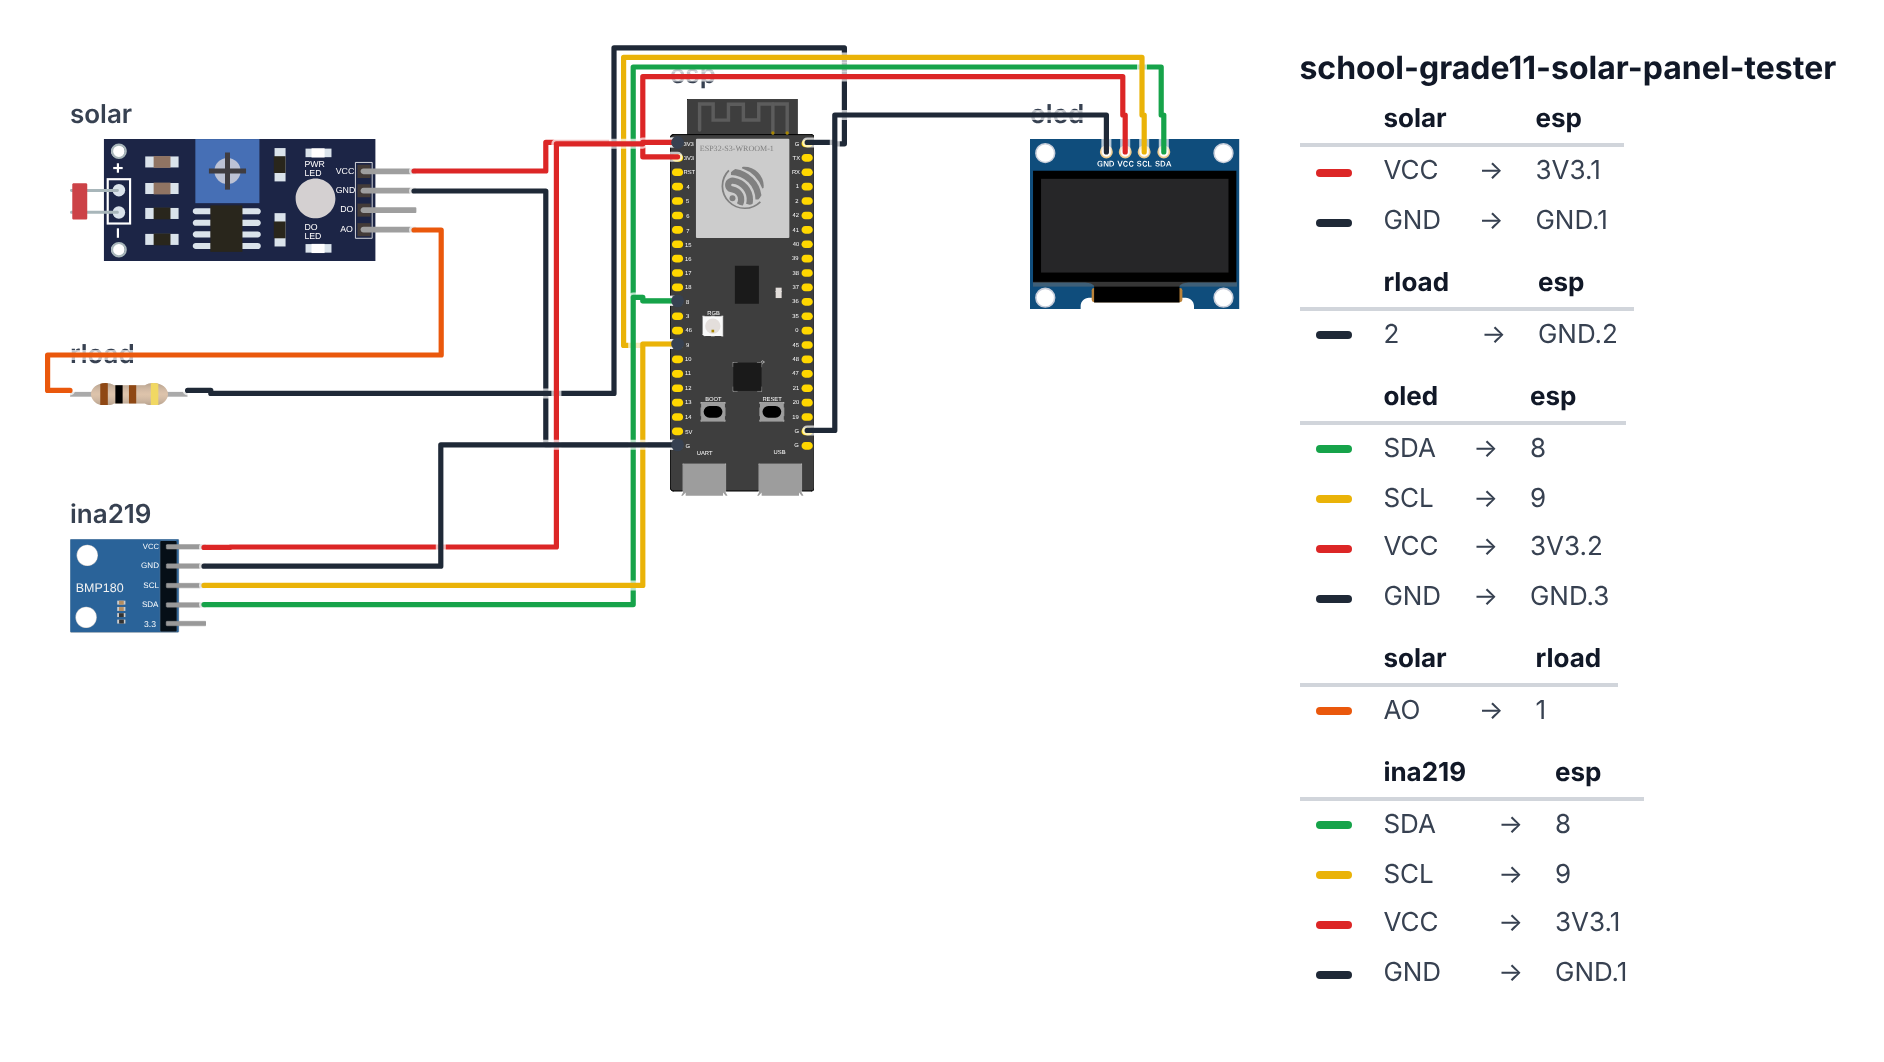
Step 1: Wire it up
Time: ~15 minutes
The INA219 goes between the solar panel and the load resistor:
Solar panel (+) → INA219 VIN+ → INA219 VIN− → 100Ω resistor → Solar panel (−)
Also connect Solar panel (−) to board GND, so the INA219 and the panel share the same ground.
INA219 to ESP32 (I2C):
- SDA → board GPIO 8 (C6: GPIO 6)
- SCL → board GPIO 9 (C6: GPIO 7)
- VCC → 3.3V
- GND → GND
OLED: 5. SDA → board GPIO 8 (C6: GPIO 6) (same I2C bus) 6. SCL → board GPIO 9 (C6: GPIO 7) (same I2C bus) 7. VCC → 3.3V 8. GND → GND
Check: INA219 I2C address = 0x40. OLED = 0x3C. No conflict on the same I2C bus.
Step 2: Flash the code
Time: ~15 minutes
Install: Adafruit INA219 library, Adafruit SSD1306, Adafruit GFX Library
The big picture first. This program turns the ESP32 into a solar panel lab station:
- The INA219 sensor measures voltage AND current at the same time. Multiply them together (P = V × I) and you get power in milliwatts.
- The ESP32 connects to your WiFi and hosts a web dashboard — open it on your phone to see live readings and log each angle with a tap.
- For each angle (0°, 15°, 30°…), the program averages 20 readings to smooth out noise.
- After all angles are logged, the table shows measured efficiency vs. the theoretical cosine prediction side by side.
Fill in your WiFi name and password before uploading. A program is like a recipe. Copy this entire recipe into Arduino IDE and upload it:
// ========== CHOOSE YOUR BOARD ==========
// Uncomment the line for YOUR board:
#define BOARD_S3    // ESP32-S3-DevKitC-1
//#define BOARD_C6  // ESP32-C6-DevKitC-1
// ========================================

#ifdef BOARD_S3
  #define PIN_SDA   8
  #define PIN_SCL   9
#endif
#ifdef BOARD_C6
  #define PIN_SDA   6
  #define PIN_SCL   7
#endif

#include <Wire.h>
#include <Adafruit_INA219.h>
#include <Adafruit_GFX.h>
#include <Adafruit_SSD1306.h>
#include <WiFi.h>
#include <WebServer.h>

Adafruit_INA219 ina219;
Adafruit_SSD1306 display(128, 64, &Wire, -1);

const char* ssid = "YOUR_WIFI_NAME";
const char* password = "YOUR_WIFI_PASSWORD";
WebServer server(80);

struct AngleData {
  int angle;
  float voltage;
  float currentMA;
  float powerMW;
};

AngleData measurements[10];
int measureCount = 0;
float maxPower = 0;

void takeMeasurement(int angle) {
  float sumV = 0, sumI = 0;
  for (int i = 0; i < 20; i++) {
    sumV += ina219.getBusVoltage_V();
    sumI += ina219.getCurrent_mA();
    delay(50);
  }
  float V = sumV / 20.0;
  float I = sumI / 20.0;
  float P = V * I;

  if (measureCount < 10) {
    measurements[measureCount++] = {angle, V, I, P};
  }

  if (P > maxPower) maxPower = P;

  Serial.printf("Angle:%d° V:%.3fV I:%.1fmA P:%.1fmW\n", angle, V, I, P);
}

void setup() {
  Serial.begin(115200);
  Wire.begin(PIN_SDA, PIN_SCL);

  ina219.begin();
  display.begin(SSD1306_SWITCHCAPVCC, 0x3C);

  WiFi.begin(ssid, password);
  while (WiFi.status() != WL_CONNECTED) delay(500);
  Serial.println("IP: " + WiFi.localIP().toString());

  server.on("/", []() {
    float V = ina219.getBusVoltage_V();
    float I = ina219.getCurrent_mA();
    float P = V * I;

    String html = "<!DOCTYPE html><html><head><meta name='viewport' content='width=device-width,initial-scale=1'>";
    html += "<meta http-equiv='refresh' content='2'>";
    html += "<title>Solar Tester</title>";
    html += "<style>body{font-family:sans-serif;padding:20px}";
    html += "table{border-collapse:collapse}td,th{padding:8px;border:1px solid #ddd}";
    html += "th{background:#FF9800;color:white}.btn{padding:10px;background:#4CAF50;color:white;border:none;border-radius:4px;margin:4px;cursor:pointer}</style></head><body>";
    html += "<h2>Solar Panel Efficiency Tester</h2>";
    html += "<p>Live: <b>" + String(V,3) + "V</b> | <b>" + String(I,1) + "mA</b> | <b>" + String(P,1) + "mW</b></p>";

    html += "<p>Log this angle:</p>";
    for (int a = 0; a <= 90; a += 15) {
      html += "<button class='btn' onclick=\"fetch('/log?angle=" + String(a) + "')\">" + String(a) + "°</button>";
    }

    if (measureCount > 0) {
      html += "<h3>Measurements</h3><table>";
      html += "<tr><th>Angle</th><th>Voltage</th><th>Current</th><th>Power</th><th>Efficiency</th></tr>";
      for (int i = 0; i < measureCount; i++) {
        float eff = (maxPower > 0) ? (measurements[i].powerMW / maxPower * 100) : 0;
        float cosine = cos(measurements[i].angle * PI / 180.0) * 100;
        html += "<tr><td>" + String(measurements[i].angle) + "°</td>";
        html += "<td>" + String(measurements[i].voltage, 3) + "V</td>";
        html += "<td>" + String(measurements[i].currentMA, 1) + "mA</td>";
        html += "<td>" + String(measurements[i].powerMW, 1) + "mW</td>";
        html += "<td>" + String(eff, 0) + "% (cos=" + String(cosine, 0) + "%)</td></tr>";
      }
      html += "</table>";
    }

    html += "</body></html>";
    server.send(200, "text/html", html);
  });

  server.on("/log", []() {
    int angle = server.arg("angle").toInt();
    takeMeasurement(angle);
    server.send(200, "text/plain", "logged");
  });

  server.begin();
}

void loop() {
  server.handleClient();

  float V = ina219.getBusVoltage_V();
  float I = ina219.getCurrent_mA();
  float P = V * I;

  display.clearDisplay();
  display.setTextSize(1);
  display.setCursor(0, 0);
  display.println("Solar Panel Tester");

  display.setTextSize(2);
  display.setCursor(0, 16);
  display.println(String(P, 0) + "mW");

  display.setTextSize(1);
  display.setCursor(0, 40);
  display.println(String(V, 3) + "V  " + String(I, 1) + "mA");
  display.setCursor(0, 52);
  display.println("n=" + String(measureCount) + " measurements");

  display.display();
  delay(500);
}
Line-by-line: what every line does and why
Lines 1–6: Borrowing ready-made tools
#include <Wire.h>
#include <Adafruit_INA219.h>
#include <Adafruit_GFX.h>
#include <Adafruit_SSD1306.h>
#include <WiFi.h>
#include <WebServer.h>
#include means “grab this instruction book.” Six books: INA219 teaches the ESP32 how to talk to the power sensor; WiFi handles connecting to your home network; WebServer lets the ESP32 host its own web page, like a tiny website on your local network.
Lines 8–13: Creating the objects and WiFi settings
Adafruit_INA219 ina219;
Adafruit_SSD1306 display(128, 64, &Wire, -1);
const char* ssid = "YOUR_WIFI_NAME";
const char* password = "YOUR_WIFI_PASSWORD";
WebServer server(80);
ina219 is the name for the power sensor. server(80) creates a web server on port 80 — port 80 is the standard “door number” for websites (when you visit http://anything, your browser defaults to port 80).
Lines 15–22: A structure for each angle measurement
struct AngleData {
  int angle;
  float voltage;
  float currentMA;
  float powerMW;
};
AngleData measurements[10];
struct is like designing a filing card with four fields. measurements[10] is a shelf with 10 slots — one per angle. When you log the 0° measurement, one complete card (angle, voltage, current, power) goes into slot 0.
Lines 24–25: Tracking maximums
int measureCount = 0;
float maxPower = 0;
measureCount tallies how many angles have been logged. maxPower tracks the highest power seen so far — needed to calculate efficiency (how close each angle is to the best reading).
Lines 27–38: takeMeasurement() — averaging for accuracy
void takeMeasurement(int angle) {
  float sumV = 0, sumI = 0;
  for (int i = 0; i < 20; i++) {
    sumV += ina219.getBusVoltage_V();
    sumI += ina219.getCurrent_mA();
    delay(50);
  }
  float V = sumV / 20.0;
  float I = sumI / 20.0;
  float P = V * I;
This function receives the angle number you tapped on the web page. getBusVoltage_V() asks the INA219 “what’s the voltage right now?” getCurrent_mA() asks for the current. The for loop reads 20 times over one second (20 × 50ms = 1000ms), adds them all into sumV and sumI, then divides by 20 to get the average. Averaging removes momentary fluctuations — like taking the average of 20 ruler measurements instead of trusting just one.
P = V * I is Ohm’s power law: power in watts equals voltage times current. The INA219 gives milliamps, so P is in milliwatts.
Lines 40–56: setup() — morning routine including WiFi
WiFi.begin(ssid, password);
while (WiFi.status() != WL_CONNECTED) delay(500);
Serial.println("IP: " + WiFi.localIP().toString());
WiFi.begin() starts the connection attempt. The while loop keeps checking every 500ms until it succeeds — like redialing until the call connects. Once connected, WiFi.localIP() gives the ESP32’s address on your network (something like 192.168.1.47). Open that address in your phone browser.
The web handler — building a page from code
server.on("/", []() {
  String html = "<!DOCTYPE html>...";
  ...
  server.send(200, "text/html", html);
});
server.on("/", ...) says “when someone visits the main page (/), run this code.” The []() is a lambda — a nameless mini-function defined right here. It builds the HTML as a big String, then server.send(200, "text/html", html) sends it to the browser. 200 is the HTTP status code for “OK, here’s your page.”
The efficiency calculation:
float eff = (maxPower > 0) ? (measurements[i].powerMW / maxPower * 100) : 0;
float cosine = cos(measurements[i].angle * PI / 180.0) * 100;
eff is measured power as a percentage of the best power (0° reading). cos(angle * PI / 180.0) converts degrees to radians first (because cos() in code uses radians, not degrees) then calculates the theoretical cosine prediction.
The /log route
server.on("/log", []() {
  int angle = server.arg("angle").toInt();
  takeMeasurement(angle);
  server.send(200, "text/plain", "logged");
});
When you tap a button on the web page (e.g., the “30°” button), the browser sends a request to /log?angle=30. server.arg("angle") extracts “30” from that URL, .toInt() converts the text “30” to the number 30, and takeMeasurement(30) runs the averaging and saves the data.
Lines 58–78: loop() — live OLED display
void loop() {
  server.handleClient();
  ...
  display.display();
  delay(500);
}
server.handleClient() must be called repeatedly — it processes any incoming web requests. Without this, the web page would never respond. The rest of the loop reads the current V, I, P and updates the OLED every 500ms so you have a live meter while positioning the panel.
The whole thing in one sentence
The device connects to WiFi, shows a live power reading on the OLED, and serves a web page where you tap angle buttons to log each measurement — then displays a table comparing your measurements to the cosine law prediction.
First thing to try: point the solar panel directly at a bright lamp (0° angle) and note the power in mW. Then rotate it to 90° (parallel to the light). Power should drop nearly to zero. That’s Lambert’s Cosine Law in your hands.
Check: Point the solar panel at a lamp or window. The OLED should show non-zero voltage (1–5V) and current (5–100mA) if the panel is receiving light. In darkness, both should read near 0.
Step 3: Collect data across angles
Protocol:
- Open the web dashboard on your phone
- Set panel to 0° (perpendicular to light)
- Wait 10 seconds, tap the “0°” button to log
- Tilt panel to 15°, wait 10 seconds, tap “15°”
- Continue: 30°, 45°, 60°, 75°, 90°
- Table fills in automatically
What to expect:
- 0°: Maximum power (~100% efficiency reference)
- 30°: ~87% (cos 30° = 0.866)
- 45°: ~71% (cos 45° = 0.707)
- 60°: ~50% (cos 60° = 0.500)
- 90°: ~0% (cos 90° = 0.000)
If your measurements match the cosine values, you’ve verified Lambert’s Cosine Law experimentally.
Presentation tip: Show the table with efficiency column and cosine column side by side. Say: “My measured efficiency at each angle matches the predicted cosine value to within 5%. This confirms that solar panel output follows Lambert’s Cosine Law — it’s pure physics, not marketing. A panel at 45° produces half the power of one pointing directly at the sun. That’s why solar tracking systems that follow the sun are worth it — they maintain the 0° alignment throughout the day.”
What just happened
The INA219 uses a Wheatstone bridge circuit to measure tiny voltages across a precision shunt resistor. The current through the resistor creates a millivolt voltage drop: V = I × R (Ohm’s Law). With R = 0.1Ω, 100mA of current creates only 10mV — the INA219 amplifies this precisely.
Lambert’s Cosine Law states that the intensity of light on a surface is proportional to the cosine of the angle between the light direction and the surface normal. It applies to solar panels, photographic exposure, radiosity in 3D graphics rendering, and plant biology.
Curriculum connections:
- NGSS HS-ESS3-2: Evaluate competing design solutions for developing, managing, and utilizing energy and mineral resources based on cost-benefit ratios
- NGSS HS-PS3-3: Design, build, and refine a device that works within given constraints to convert one form of energy into another
- AP Physics: Power, Ohm’s Law, electrical energy conversion
Real solar farms spend significant money on tracking systems that keep panels perpendicular to sunlight throughout the day — you just measured exactly why.
Level Up
I-V curve (full characterization): Vary the load resistor from very small (short circuit current) to very large (open circuit voltage). Plot current vs. voltage — the I-V curve is a standard metric for solar cell characterization.
Compare cell types: Test monocrystalline, polycrystalline, and thin-film cells (different panels from old solar lights) at the same angle and light conditions. Which is most efficient?
Cloud cover effect: Take measurements in full sun, overcast, and indoor light. Plot efficiency as a percentage of the full-sun baseline. How much does cloud cover really reduce output?
Troubleshooting
| Problem | Fix |
|---|---|
| INA219 reads 0V always | Check I2C wiring. Check the shunt is between solar panel and load, not in parallel. |
| Reads negative current | Swap VIN+ and VIN− connections. |
| Power reads very low | Check the 100Ω load resistor is connected. Panel needs a load to produce current. |
| OLED blank | SDA=GPIO 8, SCL=GPIO 9 (C6: SDA=GPIO 6, SCL=GPIO 7). Both share bus with INA219. Try scanning I2C addresses. |
| Upload fails | Hold BOOT button while clicking Upload. |