Parent info
Parts you need
Affiliate links — we may earn a small commission
Try this circuit in your browser!
Run the code, press the buttons and watch what happens — before you buy any parts. No account needed.
Open in Simulator →Is the garage too cold for Dad’s plants? Check your phone.
Imagine opening a browser on your phone and seeing 19.2°C / 67.6°F in big green numbers. Humidity: 48% — comfortable. Or maybe it shows red and 31°C and you realize you should open a window. No app to install. No account to create. Just type an IP address.
That’s a $14 weather station you built yourself. It runs 24/7, serves any phone on your WiFi, and updates every 5 seconds. Your smart home store charges $40 for the same thing and requires their app.
1 hour. About $14.
What you’ll need
| Part | What it does | Price |
|---|---|---|
| ESP32-S3 Dev Board | The brain — reads the sensor and hosts the web page | ~$12 |
| DHT22 Temperature & Humidity Sensor | Accurate room temperature and humidity readings | ~$4 |
| 10kΩ pull-up resistor | Keeps the data line stable — often included with DHT22 kits | ~$0.10 |
| Breadboard + jumper wires | Connects everything. No soldering. | ~$3 |
You also need: home WiFi, Arduino IDE 2 with ESP32 board package installed.
Total: ~$14 | Time: ~1 hour | Difficulty: ●○○○○
How it works (60 seconds)
The DHT22 sensor is like a tiny weather station. Give it 3.3V and it measures temperature and humidity, sending the results over a single data wire as a stream of pulses — a bit like Morse code, but for numbers.
The ESP32 reads those pulses, converts them to °C and °F, and hosts a web page on your home WiFi. When you open the IP address in your browser, the ESP32 sends you fresh HTML with the current readings. The page refreshes itself every 5 seconds automatically.
The URL esp32temp.local works too — no need to remember the IP address. That’s mDNS, which lets the ESP32 register a human-readable hostname on your network.
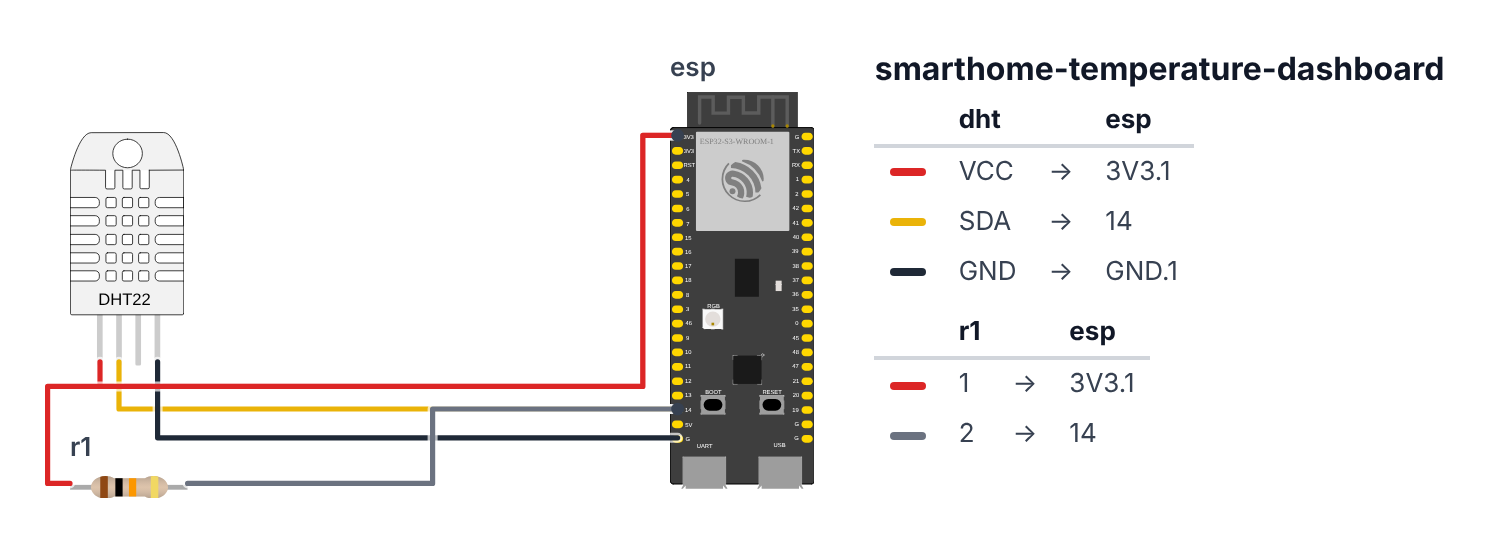
Step 1: Wire it up
Time: ~5 minutes
The DHT22 has 4 pins. You use 3 of them.
Looking at the front of the DHT22 (the side with the grid pattern):
- Pin 1 (leftmost): VCC → board 3.3V — red wire
- Pin 2: DATA → board GPIO 14 (C6: GPIO 4) — yellow wire
- Pin 3: Not connected (leave empty)
- Pin 4 (rightmost): GND → board GND — black wire
Pull-up resistor (required):
- Connect one end of the 10kΩ resistor to 3.3V
- Connect the other end to GPIO 14 (C6: GPIO 4) (same pin as the DATA wire)
This pulls the data line HIGH when idle. Without it, the sensor communication fails.
Check: 3 wires to the DHT22, plus the 10kΩ resistor bridging between 3.3V and GPIO 14 (C6: GPIO 4). Total: 4 connections. Board not plugged into USB yet.
Note: If your DHT22 came in a module (on a small PCB with 3 pins instead of 4), it already has the pull-up resistor built in. Just connect VCC, GND, and DATA — skip the external resistor.
Step 2: Flash the code
Time: ~10 minutes
Install the DHT sensor library by Adafruit from Library Manager (also install Adafruit Unified Sensor when prompted). Then upload this code with your WiFi credentials:
The big picture first. This program turns the ESP32 into a tiny weather station with a built-in website. The DHT22 sensor is the eyes — it reads temperature and humidity. The ESP32 is the brain — it checks the sensor every 2 seconds, picks a color based on comfort zones, builds an HTML page with the current readings, and sends it to any browser that asks. There are two web addresses: one for humans (big colored numbers, auto-refreshes every 5 seconds) and one for machines (/api returns JSON numbers that apps like Home Assistant can read). The ESP32 also tells your WiFi network its nickname esp32temp.local so you never have to remember an IP address again.
// ========== CHOOSE YOUR BOARD ==========
// Uncomment the line for YOUR board:
#define BOARD_S3 // ESP32-S3-DevKitC-1
//#define BOARD_C6 // ESP32-C6-DevKitC-1
// ========================================
#ifdef BOARD_S3
#define PIN_DHT 14
#endif
#ifdef BOARD_C6
#define PIN_DHT 4
#endif
#include <WiFi.h>
#include <WebServer.h>
#include <ESPmDNS.h>
#include <DHT.h>
const char* ssid = "YourWiFiName";
const char* password = "YourWiFiPassword";
const char* hostname = "esp32temp";
DHT dht(PIN_DHT, DHT22);
WebServer server(80);
float tempC = 0;
float humidity = 0;
unsigned long lastRead = 0;
void readSensor() {
if (millis() - lastRead < 2000) return;
lastRead = millis();
float t = dht.readTemperature();
float h = dht.readHumidity();
if (!isnan(t) && !isnan(h)) { tempC = t; humidity = h; }
}
String colorForTemp(float t) {
if (t < 18) return "#4fc3f7";
if (t < 24) return "#66bb6a";
if (t < 28) return "#ffa726";
return "#ef5350";
}
String colorForHumidity(float h) {
if (h < 30) return "#ef9a9a";
if (h < 60) return "#66bb6a";
return "#4fc3f7";
}
void handleRoot() {
readSensor();
float tempF = tempC * 9.0 / 5.0 + 32.0;
String tColor = colorForTemp(tempC);
String hColor = colorForHumidity(humidity);
String html = "<!DOCTYPE html><html><head>"
"<meta name='viewport' content='width=device-width,initial-scale=1'>"
"<meta http-equiv='refresh' content='5'>"
"<style>"
"body{font-family:sans-serif;background:#0f0f23;color:#eee;"
"text-align:center;padding:30px;margin:0}"
"h1{color:#9c27b0;font-size:28px}"
".card{background:#1a1a3e;border-radius:16px;padding:30px;margin:20px auto;"
"max-width:300px;box-shadow:0 4px 20px rgba(0,0,0,0.4)}"
".value{font-size:64px;font-weight:bold;margin:10px 0}"
".label{color:#888;font-size:14px;margin-top:8px}"
".unit{font-size:24px;vertical-align:super}"
"p.small{color:#555;font-size:12px;margin-top:40px}"
"</style></head><body>"
"<h1>🌡 Room Sensor</h1>"
"<div class='card'>"
"<div class='value' style='color:" + tColor + "'>" +
String(tempC, 1) + "<span class='unit'>°C</span></div>"
"<div style='color:#888;font-size:18px'>" + String(tempF, 1) + " °F</div>"
"<div class='label'>Temperature</div>"
"</div>"
"<div class='card'>"
"<div class='value' style='color:" + hColor + "'>" +
String(humidity, 0) + "<span class='unit'>%</span></div>"
"<div class='label'>Humidity</div>"
"</div>"
"<p class='small'>Auto-refreshes every 5 seconds<br>"
"Also accessible at: <strong>http://esp32temp.local</strong></p>"
"</body></html>";
server.send(200, "text/html", html);
}
void handleJSON() {
readSensor();
String json = "{\"temp_c\":" + String(tempC, 1) +
",\"temp_f\":" + String(tempC * 9.0/5.0 + 32.0, 1) +
",\"humidity\":" + String(humidity, 0) + "}";
server.send(200, "application/json", json);
}
void setup() {
Serial.begin(115200);
dht.begin();
WiFi.begin(ssid, password);
while (WiFi.status() != WL_CONNECTED) { delay(500); Serial.print("."); }
Serial.printf("\nConnected! IP: %s\n", WiFi.localIP().toString().c_str());
Serial.printf("Also try: http://%s.local\n", hostname);
if (MDNS.begin(hostname)) {
Serial.printf("mDNS started: http://%s.local\n", hostname);
}
server.on("/", handleRoot);
server.on("/api", handleJSON);
server.begin();
Serial.println("Temperature dashboard running.");
}
void loop() {
server.handleClient();
}Line-by-line: what every line does and why
The tool kit — #include lines
#include <WiFi.h>
#include <WebServer.h>
#include <ESPmDNS.h>
#include <DHT.h>Four instruction books. WiFi.h teaches the ESP32 to connect to your home network. WebServer.h teaches it to respond to web browsers — when your phone types the IP address, this book handles the conversation. ESPmDNS.h teaches it the “friendly name” trick so esp32temp.local works. DHT.h is the Adafruit library that knows how to decode the DHT22’s single-wire data pulses.
Settings and pin labels
const char* ssid     = "YourWiFiName";
const char* password = "YourWiFiPassword";
const char* hostname = "esp32temp";
  #define PIN_DHT   14
const means “this never changes.” char* means “a piece of text.” Think of these as sticky labels on different boxes: one box holds your WiFi name, one holds the password, one holds the hostname. PIN_DHT 14 (from the BOARD_S3 block at the top of the sketch — the C6 block says 4) tells the library which leg of the board the sensor’s data wire is plugged into. The word DHT22 in the next line tells the library which model sensor it is — there’s also a DHT11 that uses a slightly different signal format.
Objects — the specialists
DHT dht(PIN_DHT, DHT22);
WebServer server(80);
DHT dht(...) creates a DHT specialist named dht. It knows everything about talking to that specific sensor on that specific pin. WebServer server(80) creates a web-server specialist named server listening on port 80. Port 80 is the standard port for HTTP — it’s like saying “front door” for web traffic. When your browser opens the IP address without a port number, it automatically knocks on port 80.
Memory slots for the readings
float tempC    = 0;
float humidity = 0;
unsigned long lastRead = 0;
float is a number with a decimal point — like 21.4 or 48.0. tempC and humidity are the shelves that hold the most recent valid readings. unsigned long lastRead is a stopwatch timestamp — it records the last moment (in milliseconds since power-on) when the sensor was successfully read. Starting at 0 means “never read yet.”
readSensor() — the 2-second rule
void readSensor() {
  if (millis() - lastRead < 2000) return;
  lastRead = millis();
  float t = dht.readTemperature();
  float h = dht.readHumidity();
  if (!isnan(t) && !isnan(h)) { tempC = t; humidity = h; }
}
millis() is the board’s built-in stopwatch — it returns how many milliseconds have passed since power-on. millis() - lastRead < 2000 asks: “has less than 2 seconds passed since the last read?” If yes, return immediately and skip the rest — the DHT22 hardware needs 2 seconds between reads or it gives garbage data.
dht.readTemperature() asks the sensor for the current temperature. It talks to the sensor over GPIO 14 (C6: GPIO 4) using a special timed pulse sequence. If communication fails (electrical noise, loose wire), the library returns NaN — which stands for “Not a Number,” a special value that means “I have no idea.” isnan(t) checks: “is this Not a Number?” The ! in front means “NOT,” so !isnan(t) means “is this a real number?” Only when both t and h are real numbers do we update the global tempC and humidity shelves. One bad reading can’t corrupt the display.
colorForTemp() — the comfort zone chart
String colorForTemp(float t) {
  if (t < 18) return "#4fc3f7";
  if (t < 24) return "#66bb6a";
  if (t < 28) return "#ffa726";
  return "#ef5350";
}
This function is like a decision tree. You hand it a temperature and it hands you back a hex color code — the same format used in web design (#RRGGBB). Below 18°C → blue (cold). 18–24°C → green (comfortable — based on ASHRAE’s human comfort guidelines). 24–28°C → orange (warm). Above 28°C → red (hot). The last return has no if — it’s the fallback for anything not caught above. String means the function hands back a piece of text.
colorForHumidity() — same idea for moisture
String colorForHumidity(float h) {
  if (h < 30) return "#ef9a9a";
  if (h < 60) return "#66bb6a";
  return "#4fc3f7";
}
Same pattern. Below 30% humidity is too dry — skin and throat feel it. 30–60% is ideal. Above 60% feels humid and encourages mold. Three zones, three colors.
handleRoot() — building the web page
void handleRoot() {
  readSensor();
  float tempF  = tempC * 9.0 / 5.0 + 32.0;
  String tColor = colorForTemp(tempC);
  String hColor = colorForHumidity(humidity);
  String html = "..." ;
  server.send(200, "text/html", html);
}
Every time a browser opens the IP address, server calls handleRoot(). First it calls readSensor() to get fresh numbers. Then it converts Celsius to Fahrenheit using the standard formula (°C × 9/5 + 32). Then it picks the two colors. Then it builds one long HTML string with those values baked in — String(tempC, 1) converts the float 21.4 into the text “21.4” (the 1 means one decimal place). Finally server.send(200, "text/html", html) sends everything to the browser. 200 is the HTTP code for “success” — the same code every working website sends when it serves a page.
The <meta http-equiv='refresh' content='5'> line in the HTML is an instruction to the browser: “reload this page automatically after 5 seconds.” No JavaScript needed — plain HTML does it.
handleJSON() — the machine-readable version
void handleJSON() {
  readSensor();
  String json = "{\"temp_c\":" + String(tempC, 1) +
                ",\"temp_f\":" + String(tempC * 9.0/5.0 + 32.0, 1) +
                ",\"humidity\":" + String(humidity, 0) + "}";
  server.send(200, "application/json", json);
}
When your browser opens /api, this runs instead of handleRoot(). It builds a JSON string — curly braces {}, key-value pairs separated by colons. The \" is an escaped quote — it’s how you put a " character inside a string that’s already surrounded by ". "application/json" tells the browser “this is data, not a webpage.” Home Assistant, Apple Shortcuts, and Node-RED all know how to read this format.
setup() — startup sequence
void setup() {
  Serial.begin(115200);
  dht.begin();
  WiFi.begin(ssid, password);
  while (WiFi.status() != WL_CONNECTED) { delay(500); Serial.print("."); }
  if (MDNS.begin(hostname)) { ... }
  server.on("/",    handleRoot);
  server.on("/api", handleJSON);
  server.begin();
}
dht.begin() wakes up the DHT22 library and prepares GPIO 14 (C6: GPIO 4) for communication. WiFi.begin(ssid, password) starts the connection attempt. The while loop prints a dot every 500ms until the connection succeeds — this is a loading spinner in text form. MDNS.begin(hostname) registers the name esp32temp with your network’s mDNS system, so esp32temp.local resolves to this board’s IP on any Apple or modern device. server.on("/", handleRoot) says: “when someone visits the root address /, call handleRoot.” server.on("/api", handleJSON) registers the second route. server.begin() starts listening.
loop() — the forever cycle
void loop() {
  server.handleClient();

}
server.handleClient() checks: “has any browser sent a request?” If yes, it calls the right handleRoot or handleJSON function and sends back the response. If not, it returns instantly. MDNS.update() handles the background mDNS name broadcasting. These two calls run thousands of times per second — the board is always listening, always ready to respond.
The whole thing in one sentence
The ESP32 reads temperature and humidity from a DHT22 sensor, picks a color based on comfort zones, and serves a self-refreshing web page (plus a JSON endpoint for automation) to any browser on your network — with a friendly .local hostname so you never need to remember the IP.
First thing to try: After uploading, open the Serial Monitor. You’ll see the IP address printed. Open it on your phone. Then open the /api endpoint — you’ll see raw JSON numbers. That’s the exact format Home Assistant reads to create sensors automatically.
Check: Open Serial Monitor (115200 baud). You should see “Connected! IP: 192.168.x.x” and “mDNS started.” Open that IP in your phone browser (on the same WiFi). You should see temperature and humidity in big colored numbers.
Step 3: Place the sensor right
Time: ~2 minutes
The DHT22 reads the air around it. Where you put it matters:
- Good: Middle of the room, 1.2–1.5m height
- Bad: Near a window (sun heats it), next to a heater vent, next to a lamp, directly on the board (the ESP32’s processor generates heat)
If accuracy is important: mount the DHT22 on a 20–30cm wire extension away from the board. The board generates a small amount of heat that can raise readings by 1–2°C when the sensor is close.
Check: Compare the reading to a regular thermometer in the same room. They should be within 0.5°C of each other after a few minutes. If they’re off by more, check placement (not near heat sources) and wait a few minutes for the sensor to stabilize.
Step 4: Use it!
Open the IP in your browser. Readings update every 5 seconds automatically.
Try these:
- On iOS: tap Share → “Add to Home Screen” — the dashboard is now one tap away
- Type
http://esp32temp.localin any browser on your WiFi — it finds the board by name - Open
http://[ESP32 IP]/apito see the JSON output — this is what automation systems like Home Assistant use to read your sensor
Multiple rooms: Build a second unit, change hostname to "esp32bedroom". Now you have esp32temp.local (living room) and esp32bedroom.local (bedroom). Any phone in the house can check either one.
What just happened
-
DHT22 single-wire protocol: The sensor transmits 40 bits of data (16 bits temperature, 16 bits humidity, 8 bits checksum) as a sequence of pulses. A short pulse is
0, a long pulse is1. This is why you need a pull-up resistor (the line idles HIGH; the sensor pulls it LOW to signal). The 2-second minimum between reads is a hardware limitation — the sensor’s internal ADC needs time to reset. -
mDNS — local DNS without a server: Your router assigns the ESP32 a random IP like
192.168.1.47that can change after a restart. mDNS (also called Bonjour on Apple devices) lets the ESP32 broadcast “I’m at this IP, call meesp32temp.local.” Any device on your network resolves it automatically. The hostname stays the same even when the IP changes. -
isnan()defensive programming: Hardware sensors occasionally fail. The DHT22 uses a checksum, but communication can still fail under electrical noise.readTemperature()returnsNaN(Not a Number) on failure. Without theisnan()check, one bad read would replace your valid temperature withnanon the web page. Always validate sensor data before using it — never assume hardware is perfect. -
The JSON
/apiendpoint: Home Assistant, Node-RED, and Apple Shortcuts can poll an HTTP URL and parse JSON. By adding/apialongside the dashboard, the same ESP32 serves humans (dashboard) and machines (JSON). This is the REST API pattern — one endpoint per resource, structured data format.
Level Up
Add a 24-hour history graph. Create a circular buffer float tempHistory[288] and fill it every 5 minutes. Add a /history endpoint returning CSV data. Include Chart.js on the dashboard page to draw a line graph from that data. After 24 hours you’ll see the temperature curve of your room — heating cycles, sun warming the window in the afternoon, overnight temperature drop.
Add Telegram alerts for extreme readings. If temperature exceeds 28°C or drops below 16°C, send a Telegram message (see the alarm project for the HTTPClient pattern). Add a bool alertSent flag so you only send one alert per threshold crossing, not every 5 seconds.
Deploy two sensors in the same dashboard. The /api endpoint returns JSON. On a simple web page (hosted anywhere), use JavaScript to fetch() both sensor URLs and display all rooms at once. No app, no Home Assistant required — just two ESP32 boards and one webpage.
Troubleshooting
| Problem | Fix |
|---|---|
| Reads “nan” or 0.0 | Check the pull-up resistor is connected between 3.3V and GPIO 14 (C6: GPIO 4). Try a different GPIO pin — some pins have conflicts. Make sure you waited 2+ seconds between reads. |
| Reading seems too high | Move the DHT22 away from the ESP32 board (use a short wire extension). The chip generates heat. Don’t put it near lamps, sun, or heating vents. |
esp32temp.local doesn’t work |
mDNS sometimes fails on Android. Try the raw IP address instead. On iPhone/Mac, .local hostnames always work. On Android, use a browser that supports mDNS (some do, some don’t). |
| Page doesn’t auto-refresh | The meta refresh tag requires the page to load successfully. If you see a static page, try manually reloading. |
| WiFi connects but page won’t load from phone | Make sure your phone is on the same WiFi (not mobile data). Some routers have “AP isolation” which blocks devices from talking to each other — check your router settings. |