Parent info
Parts you need
Affiliate links — we may earn a small commission
Try this circuit in your browser!
Run the code, press the buttons and watch what happens — before you buy any parts. No account needed.
Open in Simulator →Your classmates played recorders. You built your own instrument.
Music class project: perform on an instrument or build a simple one. Most people play something they already know. The adventurous ones make a rubber-band guitar. That’s fine.
You built an 8-key electronic instrument with physical buttons, a volume knob, two selectable musical scales, and an octave switch. It plays real musical notes tuned to A440 standard. You can play “Happy Birthday” on it. You can also play in a pentatonic scale, a blues scale, or any scale you program in. Your instrument doesn’t exist anywhere else in the world. You designed it.
That’s not a music project. That’s an invention.
What you’ll need
| Part | What it does | Price |
|---|---|---|
| ESP32-S3-DevKitC-1 | The brain — generates frequencies, reads buttons | ~$12 |
| Passive piezo buzzer | Makes sound from electrical frequency signals | ~$2 |
| Tactile push buttons (8) | One button per note — your keys | ~$4 |
| 10kΩ potentiometer | Volume knob | ~$2 |
| Breadboard + jumper wires | Connects everything | ~$5 |
Total: ~$25 | Time: ~90 minutes | Difficulty: ●●○○○
Why piezo and not a speaker? A passive piezo buzzer vibrates when you apply an alternating voltage. If you change how fast the voltage alternates (the frequency), the buzzer vibrates at different speeds — different pitches. A 440Hz signal = the note A above middle C. An 880Hz signal = the A one octave higher. This is exactly how all sound works: frequency = pitch.
How it works (60 seconds)
The ESP32 constantly checks 8 buttons. When you press a button, it generates a square wave on the buzzer pin at the frequency of the note assigned to that button. The potentiometer adjusts volume by changing how long the buzzer is on during each cycle (pulse-width modulation). A mode button cycles through different scales (major, pentatonic, blues) and an octave button shifts all notes up or down. You can play actual songs on it once you learn which buttons are which notes.
Step 0: Understand music and frequency
Time: ~5 minutes
Musical notes have specific frequencies:
| Note | Frequency (Hz) | Note | Frequency (Hz) |
|---|---|---|---|
| C4 (middle C) | 261.6 | G4 | 392.0 |
| D4 | 293.7 | A4 | 440.0 |
| E4 | 329.6 | B4 | 493.9 |
| F4 | 349.2 | C5 | 523.3 |
The octave above any note is exactly double the frequency. C5 = 523Hz = exactly 2 × C4 = 2 × 261Hz. This is not a coincidence — it’s the mathematical basis of music. The ESP32 generates these frequencies digitally by toggling a pin on/off at the exact right rate.
Different scales are just different selections of which notes to include. A major scale: C D E F G A B C. A pentatonic scale: C D E G A (no F or B — 5 notes instead of 7). A blues scale: C Eb F Gb G Bb (flattened notes create the “blue” sound).
Step 1: Wire it up
Time: ~20 minutes
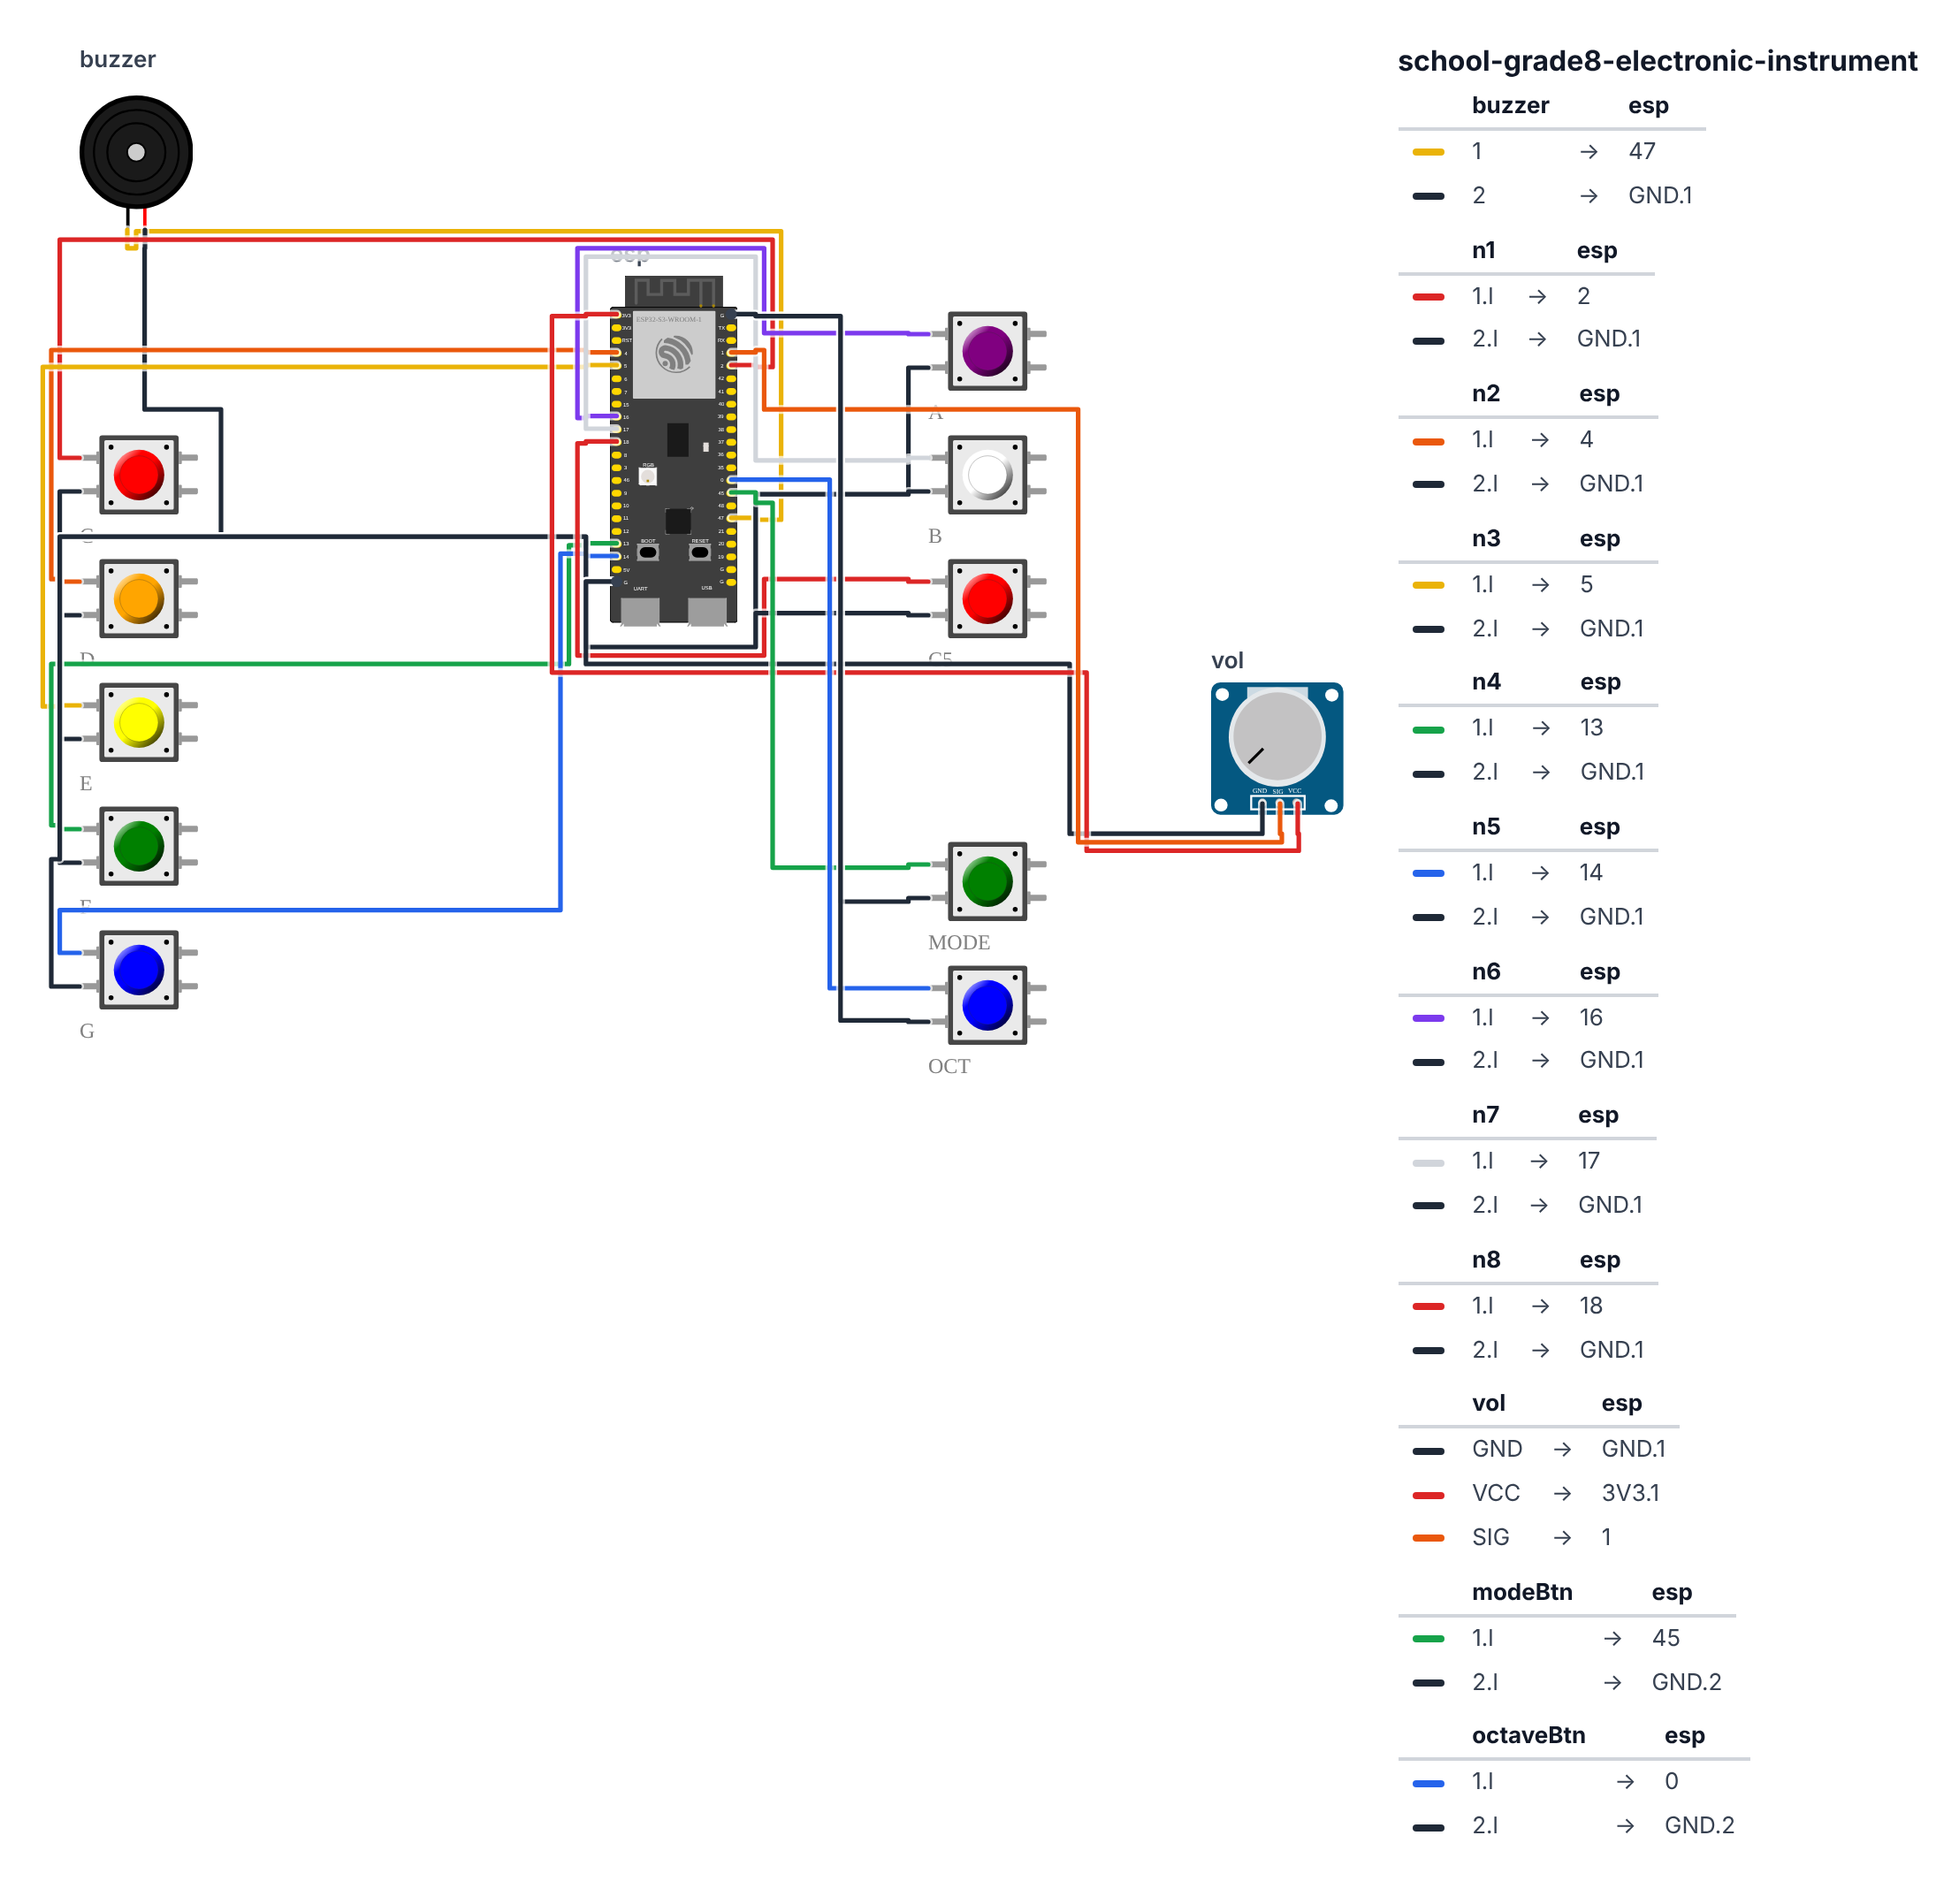
Passive Buzzer (2 wires):
- Buzzer + → board GPIO 47 (C6: GPIO 7) — yellow wire
- Buzzer - → board GND — black wire
8 Note Buttons (one wire each + shared GND): 3. Button 1 (Note 1) → board GPIO 2 (C6: GPIO 2 too) — wire to GND via button 4. Button 2 (Note 2) → board GPIO 4 (C6: GPIO 0) — wire to GND via button 5. Button 3 (Note 3) → board GPIO 5 — wire to GND via button 6. Button 4 (Note 4) → board GPIO 13 (C6: GPIO 10) — wire to GND via button 7. Button 5 (Note 5) → board GPIO 14 (C6: GPIO 11) — wire to GND via button 8. Button 6 (Note 6) → board GPIO 16 (C6: GPIO 21) — wire to GND via button 9. Button 7 (Note 7) → board GPIO 17 (C6: GPIO 20) — wire to GND via button 10. Button 8 (Note 8) → board GPIO 18 — wire to GND via button
Volume Potentiometer (3 wires): 11. Pot left leg → board GND — black wire 12. Pot right leg → board 3.3V — red wire 13. Pot middle wiper → board GPIO 1 (C6: GPIO 1 too) — orange wire
Mode Button (switches scale): 14. Mode button → board GPIO 45 (C6: GPIO 15) → GND
Octave Button: 15. Octave button → board GPIO 0 (C6: GPIO 3) → GND. On the S3, GPIO 0 is also the board’s BOOT button, so BOOT works as a second octave button. Don’t hold it while you plug in the USB cable, or the board waits for an upload instead of starting.
Check: Each note button has two legs. One leg connects to its GPIO pin. The other leg connects to GND. The ESP32 uses INPUT_PULLUP so the pin reads HIGH when unpressed, LOW when pressed. Pressing connects the GPIO pin to GND through the button.
Step 2: Flash the code
Time: ~20 minutes
Here is the big picture. This program turns the ESP32 into a monophonic synthesizer (one note at a time):
- The ESP32 generates sound by rapidly flipping pin 47 HIGH and LOW. The speed of flipping determines the pitch. 440 flips per second = the note A. 880 flips per second = A one octave higher.
- Each of the 8 buttons maps to one note in the selected scale.
- The potentiometer controls volume by changing how long the pin stays HIGH vs. LOW during each cycle (pulse-width modulation).
- The MODE button cycles through four scales: C Major, Pentatonic, Blues, and Chromatic. The OCTAVE button doubles all frequencies (one octave up).
// ========== CHOOSE YOUR BOARD ==========
// Uncomment the line for YOUR board:
#define BOARD_S3    // ESP32-S3-DevKitC-1
//#define BOARD_C6  // ESP32-C6-DevKitC-1
// ========================================

#ifdef BOARD_S3
  const int notePins[8] = {2, 4, 5, 13, 14, 16, 17, 18};
  #define PIN_BUZZER    47
  #define PIN_VOLUME    1
  #define PIN_MODE_BTN  45
  #define PIN_OCTAVE    0
#endif
#ifdef BOARD_C6
  const int notePins[8] = {2, 0, 5, 10, 11, 21, 20, 18};
  #define PIN_BUZZER    7
  #define PIN_VOLUME    1
  #define PIN_MODE_BTN  15
  #define PIN_OCTAVE    3
#endif

#define BUZZER_PIN PIN_BUZZER
#define VOLUME_PIN PIN_VOLUME
#define MODE_BTN   PIN_MODE_BTN
#define OCTAVE_BTN PIN_OCTAVE

float scaleC_Major[8]    = {261.6, 293.7, 329.6, 349.2, 392.0, 440.0, 493.9, 523.3};
float scalePentatonic[8] = {261.6, 293.7, 329.6, 392.0, 440.0, 523.3, 587.3, 659.3};
float scaleBlues[8]      = {261.6, 311.1, 349.2, 370.0, 392.0, 466.2, 523.3, 622.3};
float scaleChromatic[8]  = {261.6, 277.2, 293.7, 311.1, 329.6, 349.2, 370.0, 392.0};

float* scales[4] = {scaleC_Major, scalePentatonic, scaleBlues, scaleChromatic};
const char* scaleNames[4] = {"C Major", "Pentatonic", "Blues", "Chromatic"};

int currentScale = 0;
int octaveMultiplier = 1;

int volume = 50;

void playTone(float frequency, int dutyCycle) {
  if (frequency <= 0 || dutyCycle <= 0) {
    digitalWrite(BUZZER_PIN, LOW);
    return;
  }

  int periodUs = (int)(1000000.0 / frequency);
  int onTime = periodUs * dutyCycle / 100;
  int offTime = periodUs - onTime;

  if (onTime > 0) {
    digitalWrite(BUZZER_PIN, HIGH);
    delayMicroseconds(onTime);
  }
  if (offTime > 0) {
    digitalWrite(BUZZER_PIN, LOW);
    delayMicroseconds(offTime);
  }
}

void stopTone() {
  digitalWrite(BUZZER_PIN, LOW);
}

int lastModeBtn = HIGH;
int lastOctaveBtn = HIGH;
unsigned long lastModeChange = 0;

void setup() {
  Serial.begin(115200);

  for (int i = 0; i < 8; i++) {
    pinMode(notePins[i], INPUT_PULLUP);
  }

  pinMode(BUZZER_PIN, OUTPUT);
  pinMode(MODE_BTN, INPUT_PULLUP);
  pinMode(OCTAVE_BTN, INPUT_PULLUP);

  digitalWrite(BUZZER_PIN, LOW);

  Serial.println("Electronic Instrument Ready");
  Serial.printf("8 keys: GPIO%d,%d,%d,%d,%d,%d,%d,%d\n", notePins[0], notePins[1], notePins[2], notePins[3], notePins[4], notePins[5], notePins[6], notePins[7]);
  Serial.printf("MODE button (GPIO%d) = change scale\n", PIN_MODE_BTN);
  Serial.printf("OCTAVE button (GPIO%d) = shift octave\n", PIN_OCTAVE);

  float startupNotes[] = {261.6, 329.6, 392.0, 523.3, 392.0, 329.6, 261.6};
  for (int n = 0; n < 7; n++) {
    unsigned long noteEnd = millis() + 150;
    while (millis() < noteEnd) {
      playTone(startupNotes[n], 30);
    }
    stopTone();
    delay(30);
  }

  Serial.print("Scale: "); Serial.println(scaleNames[currentScale]);
}

void loop() {
  int rawVol = analogRead(VOLUME_PIN);
  int dutyCycle = map(rawVol, 0, 4095, 5, 40);

  int modeBtn = digitalRead(MODE_BTN);
  if (lastModeBtn == HIGH && modeBtn == LOW && millis() - lastModeChange > 300) {
    currentScale = (currentScale + 1) % 4;
    Serial.print("Scale changed to: "); Serial.println(scaleNames[currentScale]);

    for (int i = 0; i < 4; i++) {
      float freq = scales[currentScale][i] * octaveMultiplier;
      unsigned long noteEnd = millis() + 80;
      while (millis() < noteEnd) playTone(freq, dutyCycle);
      stopTone();
      delay(20);
    }
    lastModeChange = millis();
  }
  lastModeBtn = modeBtn;

  int octBtn = digitalRead(OCTAVE_BTN);
  if (lastOctaveBtn == HIGH && octBtn == LOW) {
    octaveMultiplier = (octaveMultiplier == 1) ? 2 : 1;
    Serial.print("Octave: "); Serial.println(octaveMultiplier == 1 ? "Normal" : "High");
    delay(300);
  }
  lastOctaveBtn = octBtn;

  float activeFreq = 0;
  int pressedNote = -1;

  for (int i = 0; i < 8; i++) {
    if (digitalRead(notePins[i]) == LOW) {
      pressedNote = i;
      activeFreq = scales[currentScale][i] * octaveMultiplier;
      break;
    }
  }

  if (activeFreq > 0) {
    playTone(activeFreq, dutyCycle);

    static int lastPressed = -1;
    if (pressedNote != lastPressed) {
      Serial.print("Button "); Serial.print(pressedNote + 1);
      Serial.print(": "); Serial.print(activeFreq, 1); Serial.println(" Hz");
      lastPressed = pressedNote;
    }
    lastPressed = pressedNote;
  } else {
    stopTone();
    static int lastPressed = -1;
    lastPressed = -1;
  }
}
Line-by-line: what every line does and why
Lines 1–4: Pin assignments
const int notePins[8] = {2, 4, 5, 13, 14, 16, 17, 18};
#define PIN_BUZZER    47
#define PIN_VOLUME    1
#define BUZZER_PIN PIN_BUZZER
#define VOLUME_PIN PIN_VOLUME
notePins[8] is a shelf of 8 GPIO pin numbers — one per button. Button 1 connects to GPIO 2, button 2 to GPIO 4, and so on (C6: GPIO 2, GPIO 0, …). BUZZER_PIN is the pin that sends sound signals (GPIO 47, C6: GPIO 7). VOLUME_PIN is the analog pin reading the potentiometer (GPIO 1 on both boards).
Lines 6–14: The four musical scales
float scaleC_Major[8] = {261.6, 293.7, 329.6, 349.2, 392.0, 440.0, 493.9, 523.3};Each array holds 8 frequencies in Hz. 261.6 is Middle C. 440.0 is the note A — the standard tuning reference that every orchestra uses. When you press button 1, the program plays 261.6 Hz. When you press button 6, it plays 440.0 Hz — the A note. These numbers are not arbitrary: they come from the physics of sound waves (each octave is exactly double).
float* scales[4] = {scaleC_Major, scalePentatonic, scaleBlues, scaleChromatic};scales is a shelf of 4 pointers — each pointer points to one of the four scale arrays. scales[currentScale] gives us the currently selected scale. This is how the MODE button switches between scales without needing four separate code sections.
Lines 18–19: Current state
int currentScale = 0;
int octaveMultiplier = 1;
currentScale starts at 0 (C Major). octaveMultiplier starts at 1 (normal pitch). When the OCTAVE button is pressed, it switches to 2 — doubling all frequencies, which raises the pitch by exactly one octave.
Lines 23–37: playTone() — the sound engine
int periodUs = (int)(1000000.0 / frequency);
int onTime = periodUs * dutyCycle / 100;
int offTime = periodUs - onTime;
1,000,000 / frequency converts frequency (cycles per second) into period (microseconds per cycle). For 440 Hz: 1,000,000 / 440 = 2272 microseconds per complete cycle. onTime is how long the pin stays HIGH each cycle. offTime is the rest. At 50% duty cycle (equal on/off), it’s loudest. At 5%, it’s quiet.
digitalWrite(BUZZER_PIN, HIGH);
delayMicroseconds(onTime);
digitalWrite(BUZZER_PIN, LOW);
delayMicroseconds(offTime);
This is the sound engine in its most basic form. Flip HIGH, wait, flip LOW, wait — and the buzzer vibrates at the frequency you specified. The function plays exactly one period and returns. The loop() calls it thousands of times per second while a button is held.
Lines 43–65: setup() — the startup jingle
for (int i = 0; i < 8; i++) {
  pinMode(notePins[i], INPUT_PULLUP);
}
INPUT_PULLUP sets each pin to “listen” mode with an internal resistor that keeps the pin HIGH by default. When a button is pressed (connecting the pin to GND), the pin goes LOW. No external resistors needed.
float startupNotes[] = {261.6, 329.6, 392.0, 523.3, 392.0, 329.6, 261.6};
for (int n = 0; n < 7; n++) {
  unsigned long noteEnd = millis() + 150;
  while (millis() < noteEnd) { playTone(startupNotes[n], 30); }
  stopTone();
  delay(30);
}
The startup jingle plays 7 notes (C, E, G, C, G, E, C — a C major arpeggio). unsigned long noteEnd = millis() + 150 sets a target end time 150ms from now. The while (millis() < noteEnd) loop keeps calling playTone() for 150ms. Then a short 30ms silence (delay(30)) separates notes.
Lines 67–95: loop() — reading volume and buttons
int rawVol = analogRead(VOLUME_PIN);
int dutyCycle = map(rawVol, 0, 4095, 5, 40);
analogRead reads 0–4095 from the potentiometer. map() converts that range to 5–40 (duty cycle percent). Turning the knob from min to max changes duty cycle from 5% (quiet) to 40% (loud).
currentScale = (currentScale + 1) % 4;Every MODE button press adds 1 to currentScale. The % 4 wraps it: 0 → 1 → 2 → 3 → 0 again.
octaveMultiplier = (octaveMultiplier == 1) ? 2 : 1;The ternary operator ? : is a compact if/else: “if octaveMultiplier equals 1, set it to 2; otherwise set it to 1.” This toggles between normal and one octave up.
The note-playing section:
for (int i = 0; i < 8; i++) {
  if (digitalRead(notePins[i]) == LOW) {
    pressedNote = i;
    activeFreq = scales[currentScale][i] * octaveMultiplier;
    break;
  }
}
Check all 8 buttons. When one is found pressed (LOW), look up its frequency from the current scale, multiply by the octave multiplier, and break out of the loop (so only one note plays at a time — this instrument is monophonic).
The whole thing in one sentence
Every moment loop() runs, it reads the volume knob, checks the mode and octave buttons, scans all 8 note buttons, and if one is pressed, generates the correct frequency as a square wave on the buzzer pin — one period at a time — until the button is released.
First thing to try: Press each button from left to right while in Mode 0 (C Major). You should hear C, D, E, F, G, A, B, C — a full major scale. Then press MODE to switch to Blues scale and try the same buttons. The same finger positions now produce a very different sound.
Check: Press any button — you should hear a note. Turn the potentiometer to change volume. Press the MODE button — the scale changes (you’ll hear a preview). Press OCTAVE to shift everything up. The Serial Monitor shows which frequency each button plays.
Step 3: Learn to play a song
Time: ~15 minutes
Here’s “Twinkle Twinkle” in C Major scale (Scale 0):
Buttons: 1 1 5 5 6 6 5 | 4 4 3 3 2 2 1
Notes:   C C G G A A G | F F E E D D C
"Twinkle little star..."
Here’s “Happy Birthday” in C Major:
Buttons: 1 1 2 1 4 3 | 1 1 2 1 5 4 | 1 1 8 6 4 3 2 | 7 7 6 4 5 4Mark your buttons with tape: write the note names (C, D, E, F, G, A, B, C5) on small tape strips. Now you have a labeled instrument.
What just happened
Music and physics concepts:
- Frequency = pitch — every musical note is a specific vibration rate. Humans can hear approximately 20Hz to 20,000Hz. The piano keyboard covers about 27Hz to 4186Hz. Your instrument covers the middle range.
- Octaves — doubling the frequency raises the pitch exactly one octave. This is a physical law, not a musical convention. Your OCTAVE button demonstrates it.
- Musical scales — a scale is a selection of frequencies from the infinite frequency spectrum. Western major scales follow specific frequency ratios (2:3:5 intervals). Other cultures use different ratios — that’s why Indian music or Middle Eastern music sounds different.
- Square waves vs. sine waves — your buzzer plays square waves (instant on/off). Real instruments produce complex waveforms. A flute is nearly sinusoidal. A guitar has many harmonics. Your instrument sounds “electronic” because of the pure square wave.
- Pulse-width modulation (PWM) — your volume knob changes the duty cycle (on/off ratio) of the square wave. This is how all digital volume control works, from speakers to LED dimmers.
Curriculum alignment: Music Standard MU:Re7.1.8 (Select programs of music, demonstrate the connections to an area of learning). Also connects to Physical Science waves/sound standards.
Presentation tip: Play a recognizable song on your instrument before explaining how it works. Let classmates try it. Then explain: “Every button you pressed generated a specific frequency of vibration. Middle C is 261 cycles per second. The A above it is 440 cycles per second — this note is what orchestras tune to before a concert.” Abstract concepts become concrete when people have just played the notes themselves.
Level Up
Chord mode: Instead of one note per button, program two buttons to play two notes simultaneously (requires two buzzer channels, or a speaker with PWM mixing).
Melody recorder: Add code that records your button presses with timestamps and plays them back. Now you can record and loop yourself — a basic looper pedal.
Better sound: Replace the piezo buzzer with a small speaker (8Ω, 0.5W) and a PAM8403 amplifier module. Add RC filtering on the output to smooth the square wave into something closer to a sine wave. The sound quality improves dramatically.
Custom scales: Research scales from other musical traditions. Japanese pentatonic: C Db F G Ab. Arabian maqam: C D Eb F# G Ab B. Add them to your scale array and switch to them with the MODE button.
★★ You completed: Grade 8 Electronic Instrument!
Troubleshooting
| Problem | Fix |
|---|---|
| No sound at all | Confirm it’s a PASSIVE buzzer. Active buzzers only buzz at one frequency. Check the GPIO 47 (C6: GPIO 7) wiring. |
| Very quiet sound | Turn potentiometer to max. Increase duty cycle in map() from 40 to 50 (don’t go much higher — higher duty cycle = louder but can sound harsh). |
| Wrong note / button doesn’t match expected note | Each notePins[] entry matches a scale frequency at the same index. Double-check which GPIO is which button. |
| Clicking between notes | Normal with square waves. Reduce by adding a tiny delay (5ms) between notes. |
| Only one button works at a time | Correct — this instrument is monophonic (one note at a time). The code has break after finding the first pressed button. Remove the break for experimental polyphony (sounds messy but educational). |