Parent info
Parts you need
Affiliate links — we may earn a small commission
Try this circuit in your browser!
Run the code, press the buttons and watch what happens — before you buy any parts. No account needed.
Open in Simulator →Your classmates traced a map. Your caravan actually moves.
Imagine this: your World History class is studying the Silk Road. Everyone draws dotted lines on a printed map of Asia. Nice work, labeled trade goods, done.
Your project is a large printed map on foam board — but embedded with LEDs marking every major city. When you press a button, trade route LEDs light up in sequence from Chang’an to Rome, one city at a time, like a caravan traveling across Asia. A small servo-powered camel figure moves along a track as the route illuminates.
That’s what we’re building. For about $25.
What you’ll need
| Part | What it does | Price |
|---|---|---|
| ESP32-S3-DevKitC-1 | Brain — controls LEDs and servo, serves web control | ~$12 |
| WS2812B LED strip (60 LEDs) | One LED per major city/region | ~$8 |
| SG90 servo motor | Moves the caravan figure along the route | ~$3 |
| Breadboard + jumper wires | Wires everything | ~$5 |
You also need: large foam board (24”×36”), printed map of Eurasia, hot glue, thin wire or thread, small animal figurine (camel or horse), toothpick.
Total: ~$25 | Time: ~2–3 hours | Difficulty: ●●●○○
How it works (60 seconds)
Each LED in the WS2812B strip represents a Silk Road city or waypoint. The ESP32 turns them on one by one with a delay — simulating a caravan traveling from East to West. At the same time, a servo motor sweeps from 0° to 180°, and a thread attached to the servo arm pulls a small figurine along a track on the map.
The web interface lets you control which route animates (Northern Route, Southern Route, or Maritime Route) from your phone.
Step 0: Build the physical map
Time: ~60 minutes
This is the World History part — and it’s the most impressive visual element.
Print or draw a large Eurasia map on a 24”×36” foam board. Key cities to mark (in order, West to East):
| LED # | City | Region |
|---|---|---|
| 0 | Rome | Western terminus |
| 1 | Constantinople | Byzantium |
| 2 | Antioch | Syria |
| 3 | Baghdad | Persia |
| 4 | Merv | Central Asia |
| 5 | Samarkand | Sogdia |
| 6 | Kashgar | Tarim Basin |
| 7 | Dunhuang | Northwest China |
| 8 | Chang’an (Xi’an) | Eastern terminus |
For the caravan track:
- Cut a shallow groove in the foam board along the main route
- Thread a piece of fishing line or thin wire through it
- Tie one end to a small figurine (camel, horse from a toy set)
- The other end attaches to the servo arm
LED placement:
- Cut small holes at each city location
- Push one LED through each hole from behind
- Route the strip along the back of the board, hidden
Check: Glue the strip so the LEDs poke through to the front cleanly. Tape down loose wires on the back so they don’t block the servo track.
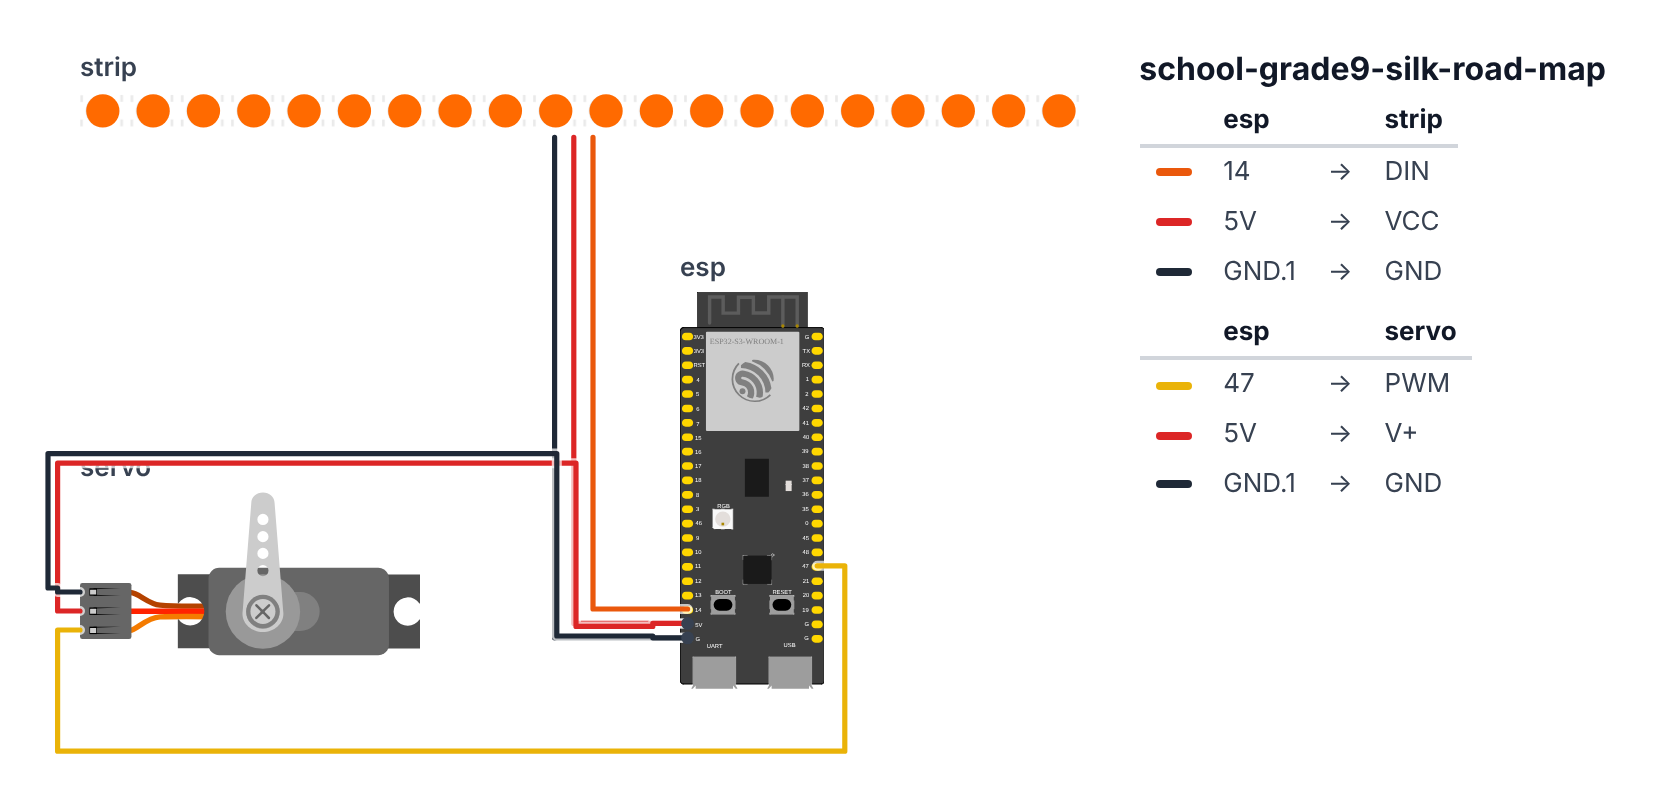
Step 1: Wire it up
LED strip:
- DIN → GPIO14 (C6: GPIO 8) — orange. On the C6, GPIO 8 also drives the board’s own RGB LED, so that little LED copies the strip’s first city. That’s normal.
- VCC → 5V — red
- GND → GND — black
Servo: 4. Signal (orange) → GPIO47 (C6: GPIO 5) — yellow 5. VCC (red) → 5V — red 6. GND (brown) → GND — black
Check: Six wires total. Both the LED strip and servo share the 5V pin. The ESP32’s USB provides enough power for both at these brightness levels.
Step 2: Flash the code
Time: ~15 minutes
Install FastLED and ESP32Servo libraries in Arduino IDE.
The big picture first. This program controls a living trade route map:
- The LED strip has one LED per Silk Road city. Lighting them one by one simulates a caravan traveling across the map.
- The servo motor sweeps from 0° to 180° as the route progresses, pulling a thread that moves the physical caravan figure.
- The web server running on the ESP32 serves a webpage to your phone, so you can tap a button to trigger which trade good animates.
A program is like a recipe. The computer reads it top to bottom and does exactly what is written, nothing more. Copy this entire recipe into Arduino IDE and upload it:
// ========== CHOOSE YOUR BOARD ==========
// Uncomment the line for YOUR board:
#define BOARD_S3    // ESP32-S3-DevKitC-1
//#define BOARD_C6  // ESP32-C6-DevKitC-1
// ========================================

#ifdef BOARD_S3
  #define PIN_LED    14
  #define PIN_SERVO  47
#endif
#ifdef BOARD_C6
  #define PIN_LED     8
  #define PIN_SERVO   5
#endif

#include <WiFi.h>
#include <WebServer.h>
#include <FastLED.h>
#include <ESP32Servo.h>

#define NUM_LEDS    20

const char* ssid = "YOUR_WIFI_NAME";
const char* password = "YOUR_WIFI_PASSWORD";

CRGB leds[NUM_LEDS];
Servo caravan;
WebServer server(80);

const char* cities[] = {
  "Rome", "Constantinople", "Antioch", "Baghdad",
  "Merv", "Samarkand", "Kashgar", "Dunhuang", "Chang'an"
};
const int NUM_CITIES = 9;

CRGB SILK_COLOR = CRGB(255, 215, 0);
CRGB SPICE_COLOR = CRGB(255, 69, 0);
CRGB GLASS_COLOR = CRGB(100, 200, 255);

bool animating = false;
String currentRoute = "northern";

void animateRoute(CRGB color, bool eastToWest) {
  animating = true;

  fill_solid(leds, NUM_LEDS, CRGB::Black);
  FastLED.show();
  delay(500);

  int startCity = eastToWest ? NUM_CITIES - 1 : 0;
  int endCity = eastToWest ? 0 : NUM_CITIES - 1;
  int step = eastToWest ? -1 : 1;

  int startAngle = eastToWest ? 0 : 180;
  int endAngle = eastToWest ? 180 : 0;

  for (int i = startCity; eastToWest ? i >= endCity : i <= endCity; i += step) {
    for (int j = 0; eastToWest ? j >= i : j <= i; j++) {
      leds[j] = color;
    }
    FastLED.show();

    float progress = abs(i - startCity) / float(NUM_CITIES - 1);
    int angle = startAngle + (endAngle - startAngle) * progress;
    caravan.write(angle);

    Serial.print("Arriving at: ");
    Serial.println(cities[i]);
    delay(1200);
  }

  for (int p = 0; p < 5; p++) {
    leds[endCity] = CRGB::White;
    FastLED.show();
    delay(200);
    leds[endCity] = color;
    FastLED.show();
    delay(200);
  }

  animating = false;
}

void handleRoot() {
  String html = "<!DOCTYPE html><html><head>";
  html += "<meta name='viewport' content='width=device-width,initial-scale=1'>";
  html += "<title>Silk Road Map</title>";
  html += "<style>body{font-family:sans-serif;padding:20px;background:#f9f3e3}";
  html += "h1{color:#8B4513}button{padding:14px 20px;margin:8px;font-size:16px;border:none;border-radius:8px;cursor:pointer}";
  html += ".silk{background:#FFD700;color:#333}.spice{background:#FF4500;color:white}.glass{background:#64C8FF;color:#333}";
  html += ".reset{background:#888;color:white}</style></head><body>";
  html += "<h1>Silk Road Trade Routes</h1>";
  html += "<p>Choose a trade good to animate its route:</p>";
  html += "<button class='silk' onclick=\"fetch('/animate?good=silk&dir=east')\">Silk (East to West)</button>";
  html += "<button class='spice' onclick=\"fetch('/animate?good=spice&dir=west')\">Spices (West to East)</button>";
  html += "<button class='glass' onclick=\"fetch('/animate?good=glass&dir=east')\">Glass (East to West)</button>";
  html += "<br><button class='reset' onclick=\"fetch('/reset')\">Reset Map</button>";
  html += "</body></html>";
  server.send(200, "text/html", html);
}

void handleAnimate() {
  if (animating) { server.send(200, "text/plain", "busy"); return; }
  String good = server.arg("good");
  String dir = server.arg("dir");
  bool eastToWest = (dir == "east");

  CRGB color = SILK_COLOR;
  if (good == "spice") color = SPICE_COLOR;
  if (good == "glass") color = GLASS_COLOR;

  server.send(200, "text/plain", "animating " + good);
  animateRoute(color, eastToWest);
}

void handleReset() {
  fill_solid(leds, NUM_LEDS, CRGB::Black);
  FastLED.show();
  caravan.write(90);
  server.send(200, "text/plain", "reset");
}

void setup() {
  Serial.begin(115200);
  FastLED.addLeds<WS2812B, PIN_LED, GRB>(leds, NUM_LEDS);
  FastLED.setBrightness(60);
  caravan.attach(PIN_SERVO);
  caravan.write(0);

  WiFi.begin(ssid, password);
  while (WiFi.status() != WL_CONNECTED) delay(500);
  Serial.println("IP: " + WiFi.localIP().toString());

  server.on("/", handleRoot);
  server.on("/animate", handleAnimate);
  server.on("/reset", handleReset);
  server.begin();

  for (int i = 0; i < NUM_CITIES; i++) {
    leds[i] = CRGB(50, 30, 10);
  }
  FastLED.show();
}

void loop() {
  server.handleClient();
}
Line-by-line: what every line does and why
Lines 1–4: Borrowing ready-made instruction books
#include <WiFi.h>
#include <WebServer.h>
#include <FastLED.h>
#include <ESP32Servo.h>
#include means “grab this instruction book.” WiFi connects the ESP32 to your network. WebServer lets the ESP32 serve a webpage — like a tiny website running on a $12 chip. FastLED controls the addressable LEDs. ESP32Servo controls the servo motor.
Lines 6–8: Giving numbers easy names
#define PIN_LED    14
#define NUM_LEDS    20
#define PIN_SERVO  47
#define is a sticky note. The LED strip’s data wire goes into leg 14 (C6: leg 8). There are 20 LEDs on the strip. The servo signal wire goes into leg 47 (C6: leg 5).
Lines 14–17: Creating the objects
CRGB leds[NUM_LEDS];
Servo caravan;
WebServer server(80);
leds[20] is a shelf with 20 compartments, one color per LED. caravan is the servo motor object. server(80) is a web server that listens on port 80 — that is the standard port for normal websites (it is why you do not need to type :80 in a web address).
Lines 19–27: City names and trade colors
const char* cities[] = {"Rome", "Constantinople", ...};
const int NUM_CITIES = 9;
CRGB SILK_COLOR = CRGB(255, 215, 0);
CRGB SPICE_COLOR = CRGB(255, 69, 0);
CRGB GLASS_COLOR = CRGB(100, 200, 255);
const char* is a text string that never changes. cities[] is an array of 9 city name strings — the caravan’s stops in order. The three color variables use CRGB(red, green, blue) where each number is 0–255. Gold (255, 215, 0) = high red + high green + no blue. Red-orange (255, 69, 0) = lots of red, some green. Light blue (100, 200, 255) = medium red + high green + full blue.
Lines 31–66: animateRoute() — the main animation
void animateRoute(CRGB color, bool eastToWest) {
  animating = true;
  fill_solid(leds, NUM_LEDS, CRGB::Black);
  FastLED.show();
  delay(500);
animating = true sets a flag so that if someone taps the button again while the animation is running, the code ignores it. fill_solid clears all LEDs to black. FastLED.show() applies that change. delay(500) pauses half a second so the screen goes dark before the route begins.
  int startCity = eastToWest ? NUM_CITIES - 1 : 0;
  int endCity = eastToWest ? 0 : NUM_CITIES - 1;
  int step = eastToWest ? -1 : 1;
The ? is a shortcut for “if/else in one line.” Read a ? b : c as “if a is true, use b, otherwise use c.” If traveling east-to-west, we start at city 8 (Chang’an) and count down to city 0 (Rome). If west-to-east, the opposite.
  for (int i = startCity; eastToWest ? i >= endCity : i <= endCity; i += step) {
    for (int j = 0; eastToWest ? j >= i : j <= i; j++) {
      leds[j] = color;
    }
    FastLED.show();
    float progress = abs(i - startCity) / float(NUM_CITIES - 1);
    int angle = startAngle + (endAngle - startAngle) * progress;
    caravan.write(angle);
    Serial.print("Arriving at: ");
    Serial.println(cities[i]);
    delay(1200);
  }
Nested loops: the outer loop steps city by city. The inner loop lights up all cities visited so far — so the route trail stays lit as the caravan moves forward. abs() gives the absolute value (always positive). progress goes from 0.0 to 1.0 as the caravan travels. angle = start + (end - start) * progress is linear interpolation — it maps 0–1 progress to 0–180 degrees. Like a ruler: at 50% progress, the servo is at the midpoint angle. caravan.write(angle) moves the servo to that angle.
  for (int p = 0; p < 5; p++) {
    leds[endCity] = CRGB::White;
    FastLED.show();
    delay(200);
    leds[endCity] = color;
    FastLED.show();
    delay(200);
  }
When the caravan arrives at the final city, it pulses white 5 times — a celebration flash.
Lines 68–105: Web page handlers
void handleRoot() {
  String html = "<!DOCTYPE html>...";
  server.send(200, "text/html", html);
}
handleRoot() builds the webpage as one long text string and sends it back to the phone’s browser. 200 is the HTTP status code meaning “OK, here is your page.” "text/html" tells the browser what kind of content it is receiving.
void handleAnimate() {
  if (animating) { server.send(200, "text/plain", "busy"); return; }
  String good = server.arg("good");
  String dir = server.arg("dir");
When the browser taps “Silk,” it makes a request to /animate?good=silk&dir=east. server.arg("good") extracts the value of the “good” parameter from the URL — that gives us the text “silk”. server.arg("dir") extracts “east”. Then animateRoute() is called with the matching color.
Lines 107–130: setup() and loop()
caravan.attach(PIN_SERVO);
caravan.write(0);
attach() connects the servo library to leg 47 (C6: leg 5). write(0) moves the servo to 0 degrees — the starting position (Chang’an, East).
WiFi.begin(ssid, password);
while (WiFi.status() != WL_CONNECTED) delay(500);
Serial.println("IP: " + WiFi.localIP().toString());
Connect to WiFi. Keep waiting (checking every 500 ms) until connected. Then print the IP address — you need this to open the webpage from your phone.
server.on("/", handleRoot);
server.on("/animate", handleAnimate);
server.on("/reset", handleReset);
server.begin();
server.on() registers URL routes — it says “when the browser asks for /, run handleRoot().” Three routes cover the whole project. server.begin() starts the web server listening.
void loop() {
  server.handleClient();
}
loop() only does one thing: server.handleClient() checks if any phone has sent an HTTP request and processes it. The whole map logic lives inside the animation functions, which are triggered by button taps on the webpage.
The whole thing in one sentence
On power-on, connect to WiFi, start the web server, and glow all city LEDs dim amber. Then forever, check if a phone is requesting the webpage or tapping a button — if so, animate the chosen trade route by lighting cities one by one while the servo moves the caravan figure across the map.
First thing to try: After uploading, find the IP address in Serial Monitor (something like 192.168.1.42). Type http://192.168.1.42 into your phone’s browser. You should see three colored buttons. Tap “Silk” and watch the map light up city by city from Chang’an to Rome.
Check: Open the web dashboard (IP from Serial Monitor). The city LEDs should glow dim amber at startup. Click “Silk” and watch the route illuminate from east to west, city by city.
Step 3: Add trade good labels
Time: ~20 minutes
On your map, add small labels near each city showing what was traded there. Print these on small cards and glue them near the city dots:
- Chang’an: Silk, porcelain, tea
- Dunhuang: Buddhist manuscripts, jade
- Kashgar: Horses, wool
- Samarkand: Glass, gems, paper
- Merv: Cotton, metalwork
- Baghdad: Mathematics, astronomy texts
- Antioch: Olive oil, wine
- Constantinople: Luxury goods, gold
- Rome: Silver, wool textiles
When you animate “Silk,” the city cards explain WHY that route was used.
Step 4: Present it!
Presentation tip: Start with all cities glowing dim amber (like distant cities at night). Say: “The Silk Road wasn’t one road — it was a network of routes used by different traders carrying different goods.” Then trigger the Silk animation going East to West. Then the Spice animation going West to East. “Trade flowed in both directions — not just silk going west, but Roman glassware going east.”
Point out: “This is 4,000 miles of trade route. The caravan took roughly 6 months to travel it. My animation shows one city every 1.2 seconds — so you’re watching 6 months compressed into 11 seconds.”
What just happened
You used servo angle control with proportional positioning — the servo angle tracks the caravan’s progress as a percentage of the route. angle = start + (end - start) * progress is linear interpolation — used in animation software, robotics, and game engines everywhere.
The web server handles button taps from your phone as HTTP requests, triggering animations on the physical map. This is exactly how smart home apps (Philips Hue, etc.) work.
Curriculum connections:
- Common Core History RH.9-10.1: Cite specific textual evidence to support analysis of primary and secondary sources
- Common Core History RH.9-10.7: Integrate quantitative or technical analysis with qualitative analysis
- NGSS Science Practice 2: Developing and using models
The spatial route, the direction of trade, and the goods carried are historical facts encoded in your LED sequence and button labels. Your model is interactive history.
Level Up
Multiple simultaneous routes: Use different LED colors for the Northern Route (through Central Asia), Southern Route (through Persia), and Maritime Silk Road (through Southeast Asia). Show all three simultaneously.
Sound effects: Add a small speaker module (PAM8403, $2). Play camel sounds as the caravan moves, market sounds when it arrives at a city.
Quiz mode: After the animation, the ESP32 lights up a random city and asks “What was traded here?” via the web interface. Right answer → city flashes green.
Troubleshooting
| Problem | Fix |
|---|---|
| Some LEDs are wrong color | Change GRB to RGB in FastLED.addLeds |
| Servo doesn’t move | Check signal wire on GPIO47 (C6: GPIO 5). Try a fresh caravan.write(90) in setup. |
| Animation runs twice | The animating flag prevents this — check if (animating) return; is in place. |
| Web page doesn’t load | Phone must be on same WiFi. Use http:// not https://. IP from Serial Monitor. |
| Upload fails | Hold BOOT button while clicking Upload. |