Parent info
Parts you need
Affiliate links — we may earn a small commission
Try this circuit in your browser!
Run the code, press the buttons and watch what happens — before you buy any parts. No account needed.
Open in Simulator →“When the garage drops below 2°C, send me a notification.”
Imagine opening Home Assistant on your phone and seeing a device card: “Garage Sensor — 1.8°C / 45% humidity.” Below it, an automation you wrote: if temperature drops below 2°C, turn on the frost heater. You built the sensor for $14. Commercial sensors like this cost $60 and require their own hub.
That’s the magic of MQTT: your DIY sensor speaks the same language as every commercial smart home device. And with Home Assistant’s auto-discovery feature, it appears in your dashboard automatically — no configuration, no YAML editing, no restart.
2–3 hours. About $14. Requires a running Home Assistant instance.
What you’ll need
| Part | What it does | Price |
|---|---|---|
| ESP32-S3 Dev Board | The brain — reads the sensor and publishes data to the MQTT broker | ~$12 |
| DHT22 Temperature & Humidity Sensor | Measures temperature (±0.5°C accuracy) and humidity | ~$4 |
| 10kΩ pull-up resistor | Keeps the data line stable (often included with DHT22 kits) | ~$0.10 |
| Breadboard + jumper wires | Connects everything | ~$3 |
You also need: a running Home Assistant instance with the Mosquitto MQTT broker add-on installed.
Total: ~$14 | Time: ~2–3 hours | Difficulty: ●●●○○
Prerequisites — set up Home Assistant first:
- Home Assistant running (on a Raspberry Pi, NUC, or as a VM — see home-assistant.io)
- Mosquitto MQTT broker: Settings → Add-ons → Mosquitto broker → Install → Start
- MQTT integration: Settings → Devices & Services → Add Integration → MQTT
- Create an MQTT user: in Mosquitto config, or use your HA login credentials
- Note your Home Assistant’s IP address (e.g.,
192.168.1.100)
How it works (60 seconds)
MQTT is like a message board. Your ESP32 “posts” sensor data to a topic (like home/living_room/state). Home Assistant “follows” that topic and receives every update.
The broker (Mosquitto, running on your Home Assistant machine) is the post office — it receives messages from the ESP32 and delivers them to anyone who subscribed.
The clever part is auto-discovery: when your ESP32 first connects, it posts a configuration message to a special topic (homeassistant/sensor/.../config). Home Assistant reads that message and automatically creates a new sensor entity in its dashboard — with the right icon, units, and history graph. No YAML. No restart. It just appears.
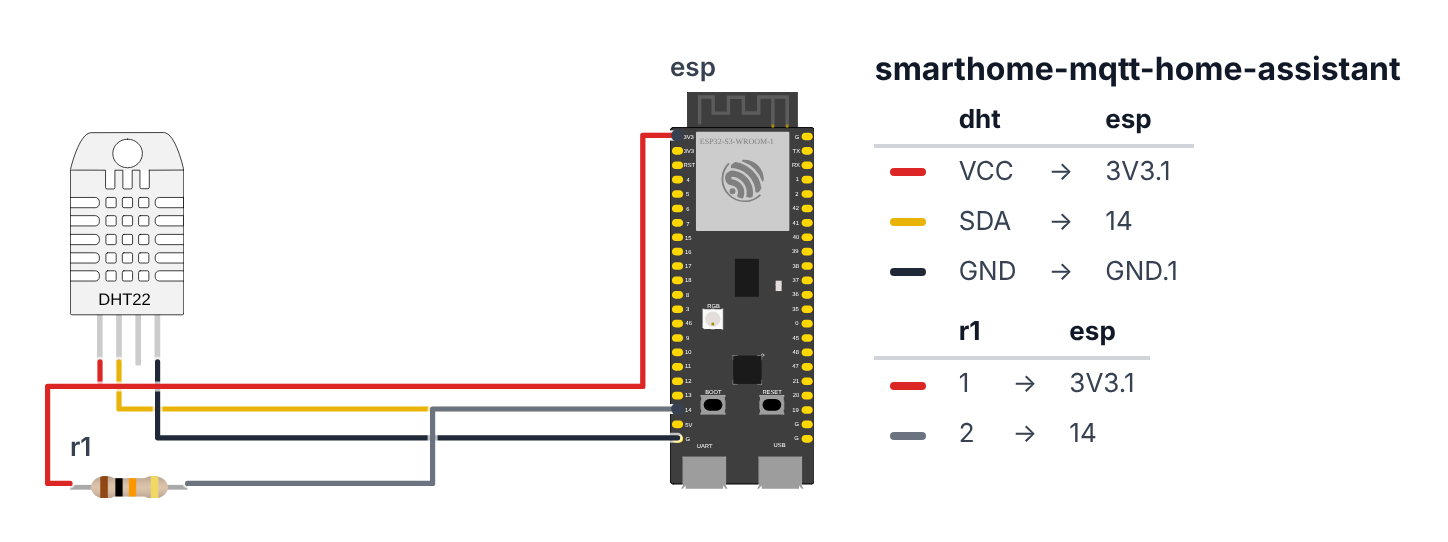
Step 1: Wire it up
Time: ~5 minutes
Same wiring as the temperature dashboard project:
- DHT22 VCC (pin 1) → board 3.3V — red wire
- DHT22 DATA (pin 2) → board GPIO 14 (C6: GPIO 4) — yellow wire
- DHT22 GND (pin 4) → board GND — black wire
- 10kΩ resistor — one end to 3.3V, other end to GPIO 14 (C6: GPIO 4) (pull-up resistor)
Check: 3 wires to DHT22 + the 10kΩ resistor bridging 3.3V to GPIO 14 (C6: GPIO 4). If your DHT22 came as a module (3 pins, small PCB), the pull-up is already built in — skip step 4.
Step 2: Install libraries
Time: ~2 minutes
In Arduino IDE, install these libraries via Library Manager (Tools → Manage Libraries):
- PubSubClient by Nick O’Leary — the MQTT client
- ArduinoJson by Benoit Blanchon — for building the JSON payloads
- DHT sensor library by Adafruit — for reading the DHT22
Step 3: Flash the code
Time: ~10 minutes
Fill in your WiFi credentials, Home Assistant IP, and MQTT credentials:
The big picture first. This program turns the ESP32 into a smart home sensor that Home Assistant recognizes automatically:
- The DHT22 sensor measures temperature and humidity and sends the data as numbers.
- The ESP32 publishes these numbers to an MQTT broker (a message relay server running on Home Assistant) every 30 seconds.
- Before publishing data, it sends a special auto-discovery message to a magic topic that Home Assistant watches. HA reads this message and creates a sensor entity automatically — with the right icon, units, and history graph. No YAML, no restart.
// ========== CHOOSE YOUR BOARD ==========
// Uncomment the line for YOUR board:
#define BOARD_S3    // ESP32-S3-DevKitC-1
//#define BOARD_C6  // ESP32-C6-DevKitC-1
// ========================================

#ifdef BOARD_S3
  #define PIN_DHT   14
#endif
#ifdef BOARD_C6
  #define PIN_DHT    4
#endif

#include <WiFi.h>
#include <PubSubClient.h>
#include <ArduinoJson.h>
#include <DHT.h>

const char* ssid        = "YourWiFiName";
const char* password    = "YourWiFiPassword";
const char* mqttServer  = "192.168.1.100";
const int   mqttPort    = 1883;
const char* mqttUser    = "mqtt_user";
const char* mqttPass    = "mqtt_password";

const char* DEVICE_ID   = "esp32_living_room";
const char* DEVICE_NAME = "Living Room Sensor";

String stateTopic         = String("home/") + DEVICE_ID + "/state";
String discoveryTempTopic = "homeassistant/sensor/" + String(DEVICE_ID) + "_temp/config";
String discoveryHumTopic  = "homeassistant/sensor/" + String(DEVICE_ID) + "_hum/config";

DHT dht(PIN_DHT, DHT22);
WiFiClient wifiClient;
PubSubClient mqtt(wifiClient);

unsigned long lastPublish = 0;
const unsigned long PUBLISH_INTERVAL = 30000;

void publishDiscovery() {
  StaticJsonDocument<512> tempDoc;
  tempDoc["name"]               = String(DEVICE_NAME) + " Temperature";
  tempDoc["unique_id"]          = String(DEVICE_ID) + "_temp";
  tempDoc["state_topic"]        = stateTopic;
  tempDoc["value_template"]     = "{{ value_json.temperature }}";
  tempDoc["unit_of_measurement"] = "°C";
  tempDoc["device_class"]       = "temperature";
  tempDoc["state_class"]        = "measurement";
  JsonObject device = tempDoc.createNestedObject("device");
  device["identifiers"][0] = DEVICE_ID;
  device["name"]           = DEVICE_NAME;
  device["model"]          = "ESP32 + DHT22";
  device["manufacturer"]   = "BuildCool DIY";

  char tempBuf[512];
  serializeJson(tempDoc, tempBuf);
  mqtt.publish(discoveryTempTopic.c_str(), tempBuf, true);

  StaticJsonDocument<512> humDoc;
  humDoc["name"]               = String(DEVICE_NAME) + " Humidity";
  humDoc["unique_id"]          = String(DEVICE_ID) + "_hum";
  humDoc["state_topic"]        = stateTopic;
  humDoc["value_template"]     = "{{ value_json.humidity }}";
  humDoc["unit_of_measurement"] = "%";
  humDoc["device_class"]       = "humidity";
  humDoc["state_class"]        = "measurement";
  JsonObject device2 = humDoc.createNestedObject("device");
  device2["identifiers"][0] = DEVICE_ID;
  device2["name"]           = DEVICE_NAME;
  device2["model"]          = "ESP32 + DHT22";
  device2["manufacturer"]   = "BuildCool DIY";

  char humBuf[512];
  serializeJson(humDoc, humBuf);
  mqtt.publish(discoveryHumTopic.c_str(), humBuf, true);

  Serial.println("Discovery messages published");
}

void publishSensorData() {
  float temp = dht.readTemperature();
  float hum  = dht.readHumidity();

  if (isnan(temp) || isnan(hum)) {
    Serial.println("DHT22 read failed — skipping this reading");
    return;
  }

  StaticJsonDocument<128> doc;
  doc["temperature"] = round(temp * 10.0) / 10.0;
  doc["humidity"]    = round(hum);

  char buf[128];
  serializeJson(doc, buf);
  mqtt.publish(stateTopic.c_str(), buf);

  Serial.printf("Published: %.1f°C, %.0f%%\n", temp, hum);
}

void reconnectMQTT() {
  while (!mqtt.connected()) {
    Serial.print("Connecting to MQTT...");
    String clientId = "esp32_" + String(random(0xffff), HEX);
    if (mqtt.connect(clientId.c_str(), mqttUser, mqttPass)) {
      Serial.println(" connected!");
      publishDiscovery();
    } else {
      Serial.printf(" failed, rc=%d — retry in 5s\n", mqtt.state());
      delay(5000);
    }
  }
}

void setup() {
  Serial.begin(115200);
  dht.begin();

  WiFi.begin(ssid, password);
  while (WiFi.status() != WL_CONNECTED) { delay(500); Serial.print("."); }
  Serial.printf("\nWiFi connected: %s\n", WiFi.localIP().toString().c_str());

  mqtt.setServer(mqttServer, mqttPort);
}

void loop() {
  if (!mqtt.connected()) reconnectMQTT();
  mqtt.loop();

  if (millis() - lastPublish >= PUBLISH_INTERVAL) {
    lastPublish = millis();
    publishSensorData();
  }
}
Line-by-line: what every line does and why
Lines 1–4: Borrowing ready-made tools
#include <WiFi.h>
#include <PubSubClient.h>
#include <ArduinoJson.h>
#include <DHT.h>
#include grabs instruction books. WiFi connects to your network. PubSubClient is the MQTT client library — it handles connecting to the broker and publishing/subscribing to topics. ArduinoJson builds and reads JSON-formatted messages. DHT reads the DHT22 temperature and humidity sensor.
Lines 6–19: Settings and MQTT topic names
const char* mqttServer  = "192.168.1.100";
const int   mqttPort    = 1883;
const char* DEVICE_ID   = "esp32_living_room";
const char* DEVICE_NAME = "Living Room Sensor";
String stateTopic       = String("home/") + DEVICE_ID + "/state";
String discoveryTempTopic = "homeassistant/sensor/" + String(DEVICE_ID) + "_temp/config";
MQTT uses topics like folders. A topic is just a path string: home/esp32_living_room/state. The broker delivers every message published on a topic to all subscribers watching that topic.
stateTopic is where the sensor data goes every 30 seconds.
discoveryTempTopic — this is the magic topic. Home Assistant automatically watches all topics starting with homeassistant/. When it sees a message on this topic, it creates a new sensor entity using the message content as configuration.
String("home/") + DEVICE_ID + "/state" — building the topic string by joining parts. The + operator concatenates strings.
Lines 21–30: Creating the objects
DHT dht(PIN_DHT, DHT22);
WiFiClient wifiClient;
PubSubClient mqtt(wifiClient);
unsigned long lastPublish = 0;
const unsigned long PUBLISH_INTERVAL = 30000;
DHT dht(PIN_DHT, DHT22) — creates the sensor object. PIN_DHT is the pin number from the board block at the top: GPIO 14 on the S3, GPIO 4 on the C6. DHT22 tells the library which sensor model you have (vs DHT11 which uses a different protocol).
WiFiClient wifiClient — a plain (unencrypted) internet connection object. MQTT on port 1883 doesn’t need encryption.
PubSubClient mqtt(wifiClient) — create the MQTT client using the WiFi connection. Think of it as a radio receiver/transmitter that uses the WiFi connection as its antenna.
PUBLISH_INTERVAL = 30000 — 30,000 milliseconds = 30 seconds between sensor readings.
Lines 32–65: publishDiscovery() — the auto-registration message
void publishDiscovery() {
  StaticJsonDocument<512> tempDoc;
  tempDoc["name"]           = String(DEVICE_NAME) + " Temperature";
  tempDoc["unique_id"]      = String(DEVICE_ID) + "_temp";
  tempDoc["state_topic"]    = stateTopic;
  tempDoc["value_template"] = "{{ value_json.temperature }}";
  tempDoc["unit_of_measurement"] = "°C";
  tempDoc["device_class"]   = "temperature";
  ...
  char tempBuf[512];
  serializeJson(tempDoc, tempBuf);
  mqtt.publish(discoveryTempTopic.c_str(), tempBuf, true);
}
StaticJsonDocument<512> tempDoc — a JSON builder with 512 bytes of memory. 512 is the maximum size.
tempDoc["name"] = "Living Room Sensor Temperature" — adds a key-value pair to the JSON object. Think of JSON as a dictionary: each key has a value.
tempDoc["value_template"] = "{{ value_json.temperature }}" — this is a Jinja2 template that Home Assistant uses to extract a specific number from the JSON data message. When HA receives {"temperature":22.5,"humidity":45}, this template extracts just 22.5. Jinja2 is HA’s template language.
tempDoc["device_class"] = "temperature" — tells Home Assistant which icon to use and what type of sensor this is. Without this, HA would show a generic sensor.
tempDoc["state_class"] = "measurement" — tells HA to keep a history graph for this sensor.
serializeJson(tempDoc, tempBuf) — converts the JSON object to a text string. tempBuf is a character array that receives the result.
mqtt.publish(discoveryTempTopic.c_str(), tempBuf, true) — publish the JSON text to the discovery topic. The third argument true means retain — the broker saves this message and replays it to any new subscriber (like HA after a restart). Without retain, the entity disappears from HA every time it restarts.
Lines 67–82: publishSensorData() — the regular readings
void publishSensorData() {
  float temp = dht.readTemperature();
  float hum  = dht.readHumidity();
  if (isnan(temp) || isnan(hum)) {
    Serial.println("DHT22 read failed — skipping this reading");
    return;
  }
  StaticJsonDocument<128> doc;
  doc["temperature"] = round(temp * 10.0) / 10.0;
  doc["humidity"]    = round(hum);
  char buf[128];
  serializeJson(doc, buf);
  mqtt.publish(stateTopic.c_str(), buf);
}
float temp = dht.readTemperature() — read the temperature. float is a decimal number.
isnan(temp) — isnan() stands for “is not a number.” The DHT22 library returns the special value NaN when the sensor fails to respond. isnan() detects this. || means OR — skip if either reading failed.
round(temp * 10.0) / 10.0 — round to 1 decimal place. 22.73... × 10 = 227.3... → rounded to 227 → ÷ 10 = 22.7.
The result published looks like: {"temperature":22.7,"humidity":45} — one small JSON message carries both readings.
Lines 84–98: reconnectMQTT() — keeps the connection alive
void reconnectMQTT() {
  while (!mqtt.connected()) {
    String clientId = "esp32_" + String(random(0xffff), HEX);
    if (mqtt.connect(clientId.c_str(), mqttUser, mqttPass)) {
      publishDiscovery();
    } else {
      delay(5000);
    }
  }
}
MQTT connections can drop (WiFi blip, broker restart). This function reconnects automatically.
String(random(0xffff), HEX) — generate a random client ID. 0xffff is the maximum value (65535). HEX formats the number in hexadecimal. Each connection to the MQTT broker must have a unique client ID — if two ESP32s connect with the same ID, one disconnects the other.
publishDiscovery() after reconnect — if HA was restarted while the ESP32 was disconnected, it may have lost the entity. Re-publishing discovery ensures HA re-creates it.
Lines 100–115: setup() and loop()
mqtt.setServer(mqttServer, mqttPort);Tells the MQTT client the broker’s address and port. Port 1883 is MQTT’s standard unencrypted port (like port 80 for websites).
void loop() {
  if (!mqtt.connected()) reconnectMQTT();
  mqtt.loop();
  if (millis() - lastPublish >= PUBLISH_INTERVAL) {
    lastPublish = millis();
    publishSensorData();
  }
}
mqtt.loop() — must be called regularly. It processes incoming messages (if any) and sends keepalive packets to the broker. Without this, the broker thinks the ESP32 disconnected and drops the connection.
millis() - lastPublish >= PUBLISH_INTERVAL — check if 30 seconds have passed. If yes, read and publish sensor data.
The whole thing in one sentence
The code connects to WiFi, connects to the MQTT broker, publishes auto-discovery messages so Home Assistant creates sensor entities automatically, then every 30 seconds reads the DHT22 and publishes temperature and humidity as JSON to the broker.
First thing to try: open Arduino Serial Monitor after uploading. You should see “WiFi connected” then “Connecting to MQTT… connected!” then “Discovery messages published” then readings every 30 seconds. Go to Home Assistant → Settings → Devices — your sensor should appear automatically.
Check: Open Serial Monitor. You should see “WiFi connected” then “Connecting to MQTT… connected!” then “Discovery messages published.”
Step 4: Check Home Assistant
Time: ~2 minutes
- Open Home Assistant
- Go to Settings → Devices & Services → MQTT → Devices
- Your “Living Room Sensor” should appear automatically — no configuration needed
- Click the device — you’ll see Temperature and Humidity entities with history graphs
- Go back to the main dashboard and add the sensor card
Check: Both temperature and humidity entities exist. The values update every 30 seconds (watch the “Last updated” timestamp). If nothing appears, check the MQTT broker logs in Home Assistant for connection errors.
Step 5: Create your first automation
Time: ~5 minutes
Now use the sensor in an automation:
- Settings → Automations → + Create Automation
- Add Trigger: State → Entity: “Living Room Sensor Temperature” → Below: 18
- Add Action: Notify → send a phone notification “It’s cold — turn on the heater”
- Save
Done. Every time your room drops below 18°C, your phone gets a push notification. This is why you built the sensor.
What just happened
-
MQTT is a pub/sub message bus: Your ESP32 “publishes” to a topic. Home Assistant “subscribes” to the same topic. The Mosquitto broker is the middleman — it receives messages and delivers them to all subscribers. Nobody has to know each other’s IP address; they just know the topic name. This decoupling is why MQTT scales to hundreds of devices on one network.
-
MQTT auto-discovery is magic: When you publish a JSON config message to
homeassistant/sensor/<unique_id>/config, Home Assistant reads it and creates a new entity automatically. No UI configuration. No YAML editing. No restart. This is the same mechanism that commercial Zigbee sensors, Shelly relays, and Tasmota devices use. Your DIY sensor behaves identically to a $60 commercial one because it speaks the same protocol. -
retain=trueon the discovery message: Normally, MQTT messages are fire-and-forget — if nobody is listening when you publish, the message is lost.retain=truetells the broker to store the last message on that topic permanently. When Home Assistant restarts, it receives all retained messages immediately. Without retain, your sensor entity would disappear from HA every time it restarted. -
JSON as a sensor payload: Publishing
{"temperature":22.5,"humidity":45}instead of just22.5means one MQTT message carries both sensors. Thevalue_template: "{{ value_json.temperature }}"in the discovery config tells HA how to extract the right number. This is the standard in modern MQTT home automation.
Level Up
Add deep sleep for battery operation. Replace the continuous loop with: connect WiFi, connect MQTT, publish one reading, then esp_deep_sleep_start(). Use esp_sleep_enable_timer_wakeup(5 * 60 * 1000000ULL) to wake every 5 minutes. Power consumption drops from 240mA (continuous) to under 1mA (average). A 1000mAh LiPo goes from lasting 4 hours to lasting several months. This changes where you can put the sensor.
Add OTA firmware updates. Include ArduinoOTA in setup(). Once the sensor is deployed (inside a wall, on a high shelf, in the garage), you can update firmware from Arduino IDE without touching the device. Add ArduinoOTA.handle() to loop(). Set a password so others can’t push updates to your devices.
Add multiple rooms. Duplicate the code, change DEVICE_ID to esp32_bedroom and DEVICE_NAME to "Bedroom Sensor", flash to a second ESP32. It automatically appears as a second device in Home Assistant. Add 10 rooms — each is $14 and appears automatically.
Troubleshooting
| Problem | Fix |
|---|---|
| MQTT connection fails (rc=-2) | Check your Home Assistant IP address in the code. Check the port is 1883. Verify the MQTT user and password in Mosquitto config. |
| Device appears in HA but values don’t update | Check the state topic in the code matches the state_topic in the discovery config. Check Serial Monitor — are “Published” lines appearing every 30 seconds? |
| DHT22 reads NaN | The pull-up resistor is required. Check it’s connected between 3.3V and GPIO 14 (C6: GPIO 4). Try a different GPIO pin. Wait 2+ seconds between reads (the library enforces this but the first read may fail). |
| Entity disappears from HA after restart | The discovery message must have retain=true — check the third argument in mqtt.publish(...). Without retain, HA loses the entity every restart. |
| Can’t find Mosquitto broker add-on | In Home Assistant: Settings → Add-ons → Add-on Store → search “Mosquitto broker”. If you’re on Home Assistant Container (not OS), install Mosquitto separately. |
| Two sensors with same ID conflict | Each device needs a unique DEVICE_ID. Change esp32_living_room to esp32_bedroom, esp32_garage, etc. for each new device. |