Parent info
Parts you need
Affiliate links — we may earn a small commission
Try this circuit in your browser!
Run the code, press the buttons and watch what happens — before you buy any parts. No account needed.
Open in Simulator →Your classmates built a glass box with plants. Yours takes care of itself.
Grade 7 life science: build a terrarium that demonstrates an ecosystem. Everyone else arranges some moss, ferns, and rocks in a jar, adds a lid, and calls it a closed ecosystem. It’s pretty. It usually dies within two weeks.
Your terrarium has a DHT22 sensor that checks temperature and humidity every 5 minutes. If humidity drops below your target level, a small pump turns on for 3 seconds and mists the plants. The OLED screen shows current conditions at a glance. Your ecosystem doesn’t just look like science — it is automated science.
What you’ll need
| Part | What it does | Price |
|---|---|---|
| ESP32-S3-DevKitC-1 | The brain — runs all automation logic | ~$12 |
| DHT22 sensor | Measures temperature AND humidity together | ~$5 |
| 5V mini water pump + tubing | A tiny submersible pump for a small water reservoir | ~$6 |
| 5V relay module | An electronic switch — lets the ESP32 control the pump safely | ~$4 |
| 0.96” OLED display | Shows live conditions | ~$5 |
| Breadboard + jumper wires | Connects everything. No soldering. | ~$5 |
Total: ~$37 | Time: ~2.5 hours | Difficulty: ●●●○○
Why a relay? The ESP32 runs on 3.3V logic but the pump needs 5V and draws more current than the board’s pins can safely provide. The relay is an electronically-controlled switch — a tiny signal from the ESP32 flips a switch that can handle the pump’s larger current. Think of it like a light switch: your finger (small force) controls a light bulb (large power).
How it works (60 seconds)
DHT22 reports temperature and humidity every 5 minutes → ESP32 compares humidity to your target (e.g., 70%) → if too low, it activates GPIO 15 (C6: GPIO 3) → the relay clicks on → pump runs for 3 seconds → pump turns off. The ESP32 logs every reading and shows a trend on the OLED. If humidity is rising over time, the system is working. If it keeps dropping no matter how much you pump, the terrarium needs a better lid.
Step 0: Build your terrarium
Time: ~30 minutes
Container: A glass jar (1–2 gallon), an aquarium, or a clear plastic storage box with a lid.
Layers (bottom to top):
- Drainage: 1 inch of gravel or pebbles (prevents root rot)
- Separation: A thin layer of sphagnum moss or window screen (keeps soil from mixing with gravel)
- Substrate: 2–3 inches of terrarium soil or potting mix
- Plants: Small ferns, moss, pothos, or any humidity-loving plant
- Decoration (optional): Rocks, small figurines, bark
For the pump system:
- Place a small container (like a shot glass or baby food jar) inside the terrarium, filled with water
- Submerge the mini pump in this reservoir
- Run the tubing from the pump up toward the center of the terrarium
- The other end of the tube can drip water directly onto the soil
For the electronics:
- The DHT22 sensor should be inside the terrarium (to measure actual conditions)
- The ESP32 and breadboard should be outside — electronics + humidity = bad
- Run the DHT22 wires under the lid edge
Step 1: Wire it up
Time: ~15 minutes
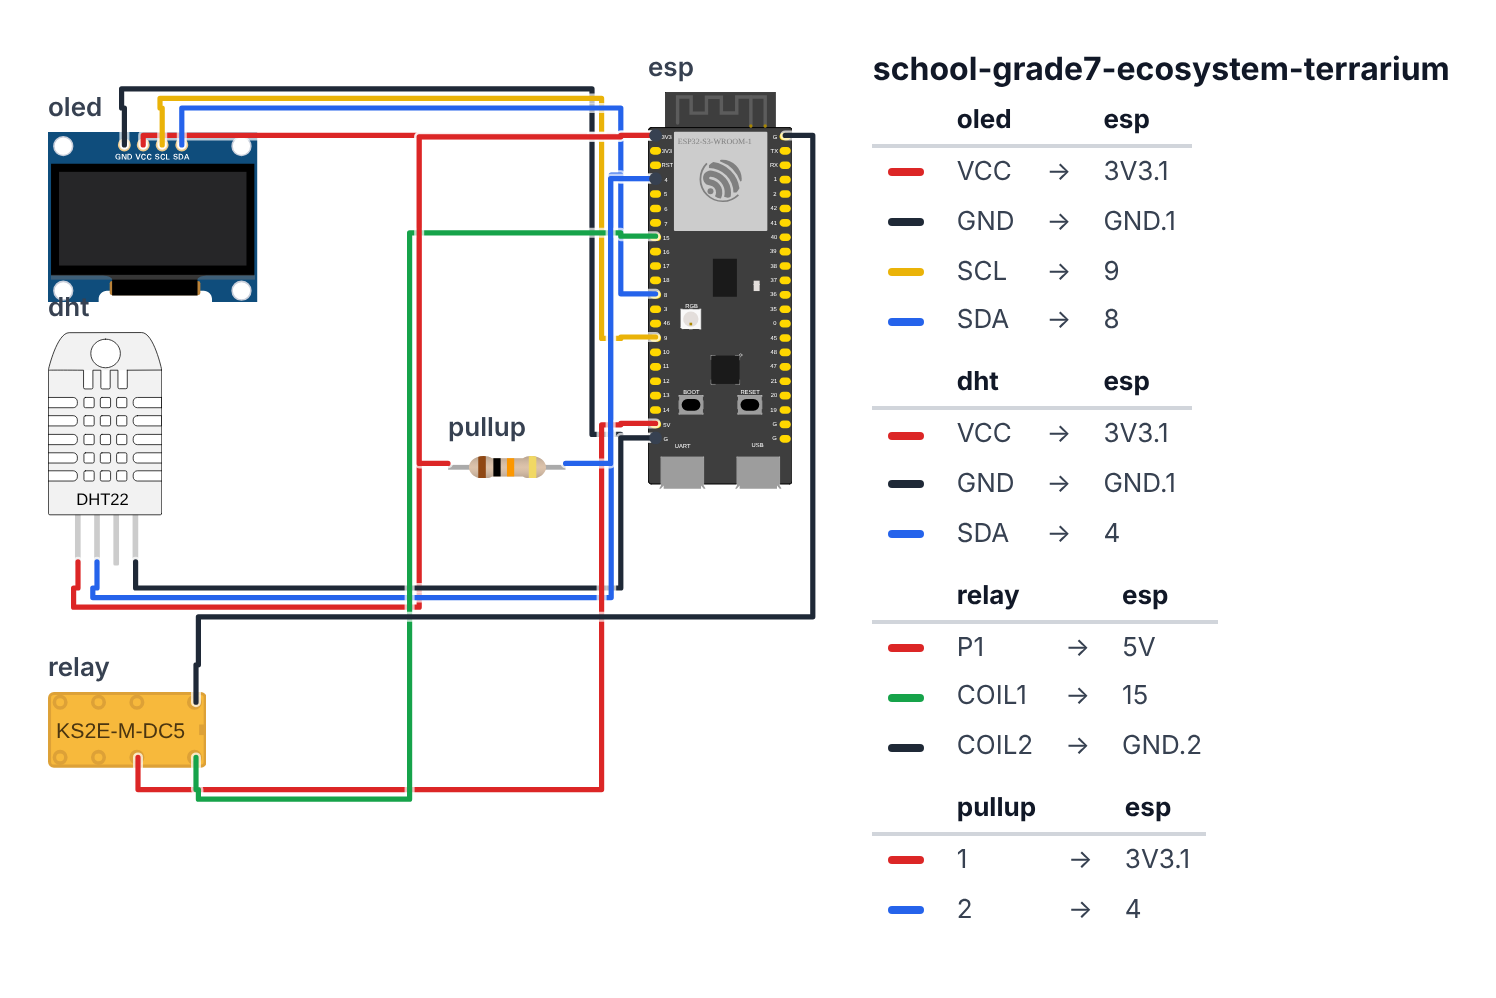
OLED Display (I2C, 4 wires):
- OLED VCC → board 3.3V — red wire
- OLED GND → board GND — black wire
- OLED SCL → board GPIO 9 (C6: GPIO 7) — yellow wire
- OLED SDA → board GPIO 8 (C6: GPIO 6) — blue wire
DHT22 Sensor (3 wires + 1 resistor): 5. DHT22 VCC → board 3.3V — red wire 6. DHT22 GND → board GND — black wire 7. DHT22 DATA → board GPIO 4 (C6: GPIO 0) — blue wire 8. 10kΩ resistor between DHT22 VCC and DATA pins (pull-up resistor — the DHT22 needs this to work reliably)
Relay Module (3 wires): 9. Relay VCC → board 5V — red wire 10. Relay GND → board GND — black wire 11. Relay IN (input signal) → board GPIO 15 (C6: GPIO 3) — green wire
Pump via Relay (2 wires): 12. Pump positive wire → relay COM terminal — red wire 13. Pump negative wire → board GND — black wire 14. Board 5V → relay NO (Normally Open) terminal — red wire
Check: The relay has three screw terminals: COM (common), NO (normally open), NC (normally closed). Connect your pump between COM and NO, with 5V going into NO. When the relay activates, it connects COM to NO, completing the pump circuit.
Step 2: Flash the code
Time: ~20 minutes
Install these libraries in Arduino IDE:
DHT sensor libraryby AdafruitAdafruit Unified Sensorby AdafruitAdafruit SSD1306by AdafruitAdafruit GFX Libraryby Adafruit
Here is the big picture. This program is a thermostat for humidity — exactly like your home thermostat, but for moisture instead of temperature:
- The DHT22 sensor is the “thermometer” — it measures both temperature and humidity every 5 minutes.
- The relay is an electronic switch. The ESP32 can’t directly power the pump (too much current), so it flips the relay instead — like using a small lever to move a big boulder.
- The pump runs for 3 seconds whenever humidity drops below your target.
- The OLED shows current readings, whether humidity is OK or LOW, and how many times the pump has run.
// ========== CHOOSE YOUR BOARD ==========
// Uncomment the line for YOUR board:
#define BOARD_S3    // ESP32-S3-DevKitC-1
//#define BOARD_C6  // ESP32-C6-DevKitC-1
// ========================================

#ifdef BOARD_S3
  #define PIN_SDA     8
  #define PIN_SCL     9
  #define PIN_DHT     4
  #define PIN_RELAY   15
#endif
#ifdef BOARD_C6
  #define PIN_SDA     6
  #define PIN_SCL     7
  #define PIN_DHT     0
  #define PIN_RELAY   3
#endif

#include <Wire.h>
#include <DHT.h>
#include <Adafruit_SSD1306.h>

#define SCREEN_WIDTH 128
#define SCREEN_HEIGHT 64
Adafruit_SSD1306 display(SCREEN_WIDTH, SCREEN_HEIGHT, &Wire, -1);

#define DHT_PIN PIN_DHT
#define DHT_TYPE DHT22
DHT dht(DHT_PIN, DHT_TYPE);

#define RELAY_PIN PIN_RELAY

#define HUMIDITY_TARGET 70.0
#define PUMP_ON_TIME 3000
#define CHECK_INTERVAL 300000
#define MIN_PUMP_INTERVAL 600000

#define HISTORY_SIZE 24
float tempHistory[HISTORY_SIZE];
float humidHistory[HISTORY_SIZE];
int historyIndex = 0;
int historyCount = 0;

unsigned long lastCheck = 0;
unsigned long lastPump = 0;
int pumpCount = 0;

void setup() {
  Serial.begin(115200);
  Wire.begin(PIN_SDA, PIN_SCL);

  pinMode(RELAY_PIN, OUTPUT);
  digitalWrite(RELAY_PIN, HIGH);

  dht.begin();

  if (!display.begin(SSD1306_SWITCHCAPVCC, 0x3C)) {
    Serial.println("Display not found!");
    while (true);
  }

  display.clearDisplay();
  display.setTextColor(SSD1306_WHITE);
  display.setTextSize(1);
  display.setCursor(0, 0);
  display.println("Ecosystem Monitor");
  display.println("Target humidity:");
  display.print(HUMIDITY_TARGET); display.println("%");
  display.println("Starting up...");
  display.display();
  delay(2000);

  Serial.println("Ecosystem Terrarium Controller");
  Serial.println("Time(check#),Temp(C),Humidity(%),Pumped");
}

void activatePump() {
  Serial.println(">>> PUMP ON — humidity too low");

  digitalWrite(RELAY_PIN, LOW);

  display.fillRect(0, 56, 128, 8, SSD1306_BLACK);
  display.setCursor(0, 56);
  display.print("MISTING...");
  display.display();

  delay(PUMP_ON_TIME);

  digitalWrite(RELAY_PIN, HIGH);

  pumpCount++;
  lastPump = millis();

  Serial.println(">>> PUMP OFF");
}

void updateDisplay(float temp, float humidity) {
  display.clearDisplay();
  display.setTextColor(SSD1306_WHITE);

  display.setTextSize(1);
  display.setCursor(0, 0);
  display.println("ECOSYSTEM MONITOR");

  display.setTextSize(2);
  display.setCursor(0, 12);
  display.print(temp, 1);
  display.println("C");

  display.setCursor(0, 30);
  display.print(humidity, 0);
  display.print("% ");

  display.setTextSize(1);
  if (humidity >= HUMIDITY_TARGET) {
    display.print(" OK");
  } else {
    display.print(" LOW");
  }

  display.setCursor(0, 48);
  display.print("Target:"); display.print(HUMIDITY_TARGET, 0); display.print("%");

  display.setCursor(0, 56);
  display.print("Pumped "); display.print(pumpCount); display.print(" times");

  display.display();
}

void checkAndControl() {
  float temperature = dht.readTemperature();
  float humidity = dht.readHumidity();

  if (isnan(temperature) || isnan(humidity)) {
    Serial.println("DHT22 read failed! Check wiring.");
    display.clearDisplay();
    display.setCursor(0, 0);
    display.println("Sensor error!");
    display.println("Check DHT22 wiring");
    display.display();
    return;
  }

  tempHistory[historyIndex] = temperature;
  humidHistory[historyIndex] = humidity;
  historyIndex = (historyIndex + 1) % HISTORY_SIZE;
  historyCount++;

  bool willPump = (humidity < HUMIDITY_TARGET) &&
                  (millis() - lastPump > MIN_PUMP_INTERVAL);
  Serial.print(historyCount); Serial.print(",");
  Serial.print(temperature, 1); Serial.print(",");
  Serial.print(humidity, 1); Serial.print(",");
  Serial.println(willPump ? "YES" : "NO");

  updateDisplay(temperature, humidity);

  if (humidity < HUMIDITY_TARGET && millis() - lastPump > MIN_PUMP_INTERVAL) {
    activatePump();
  }
}

void loop() {
  unsigned long now = millis();

  if (historyCount == 0 || (now - lastCheck >= CHECK_INTERVAL)) {
    checkAndControl();
    lastCheck = now;
  }
}
Line-by-line: what every line does and why
Lines 1–3: The three instruction books
#include <Wire.h>
#include <DHT.h>
#include <Adafruit_SSD1306.h>
Wire handles two-wire I2C communication for the display. DHT is the instruction book for the DHT22 temperature-and-humidity sensor. Adafruit_SSD1306 handles the OLED screen.
Lines 9–11: Creating the DHT22 sensor
#define DHT_PIN PIN_DHT
#define DHT_TYPE DHT22
DHT dht(DHT_PIN, DHT_TYPE);
The sensor signal wire connects to pin 4 (C6: pin 0) — PIN_DHT comes from the board block at the top. We tell the library exactly which type of sensor it is (DHT22 — there are multiple types). Then dht is the name we use to talk to it. dht.readTemperature() and dht.readHumidity() ask it for readings.
Lines 13–19: The automation settings
#define HUMIDITY_TARGET 70.0
#define PUMP_ON_TIME 3000
#define CHECK_INTERVAL 300000
#define MIN_PUMP_INTERVAL 600000
These four numbers are the brain of your automation:
HUMIDITY_TARGET 70.0— if humidity drops below 70%, trigger the pump. For succulents, change this to 40.PUMP_ON_TIME 3000— pump runs for 3,000 ms = 3 seconds per activation.CHECK_INTERVAL 300000— check the sensor every 300,000 ms = 5 minutes.MIN_PUMP_INTERVAL 600000— don’t pump more often than every 10 minutes, even if humidity stays low. This prevents the pump from running constantly if there’s a problem.
Lines 21–30: Data history and counters
#define HISTORY_SIZE 24
float tempHistory[HISTORY_SIZE];
float humidHistory[HISTORY_SIZE];
int historyIndex = 0;
int historyCount = 0;
unsigned long lastCheck = 0;
unsigned long lastPump = 0;
int pumpCount = 0;
Two shelves of 24 compartments store the last 24 readings (2 hours of data at 5-minute intervals). lastCheck remembers when the last sensor read happened. lastPump remembers when the pump last ran. pumpCount is a total count of pump activations — evidence for your science project.
Lines 32–50: setup() — startup
pinMode(RELAY_PIN, OUTPUT);
digitalWrite(RELAY_PIN, HIGH);
pinMode(RELAY_PIN, OUTPUT) tells the ESP32 that pin 15 (C6: pin 3) will send signals. digitalWrite(RELAY_PIN, HIGH) sets it HIGH immediately. Most relay modules are active-LOW, meaning HIGH = relay OFF, LOW = relay ON. So this line ensures the pump does NOT run at startup.
dht.begin() wakes up the sensor. Then the display is initialized and a startup message appears.
Lines 52–70: activatePump() — misting sequence
digitalWrite(RELAY_PIN, LOW);
...
delay(PUMP_ON_TIME);
...
digitalWrite(RELAY_PIN, HIGH);
pumpCount++;
lastPump = millis();
LOW turns the relay on → pump starts. delay(PUMP_ON_TIME) waits 3 seconds while the pump runs. HIGH turns the relay off → pump stops. Then we add 1 to the pump counter and stamp the time. lastPump = millis() is like writing on a sticky note: “pump last ran at this moment.”
Lines 72–98: updateDisplay() — the live dashboard
if (humidity >= HUMIDITY_TARGET) {
  display.print(" OK");
} else {
  display.print(" LOW");
}
An if/else is like a fork in the road. If humidity is at or above the target, show “OK.” Otherwise show “LOW.” The display always shows temperature, current humidity with its status, the target, and how many times the pump has run.
Lines 100–126: checkAndControl() — the brain
float temperature = dht.readTemperature();
float humidity = dht.readHumidity();

if (isnan(temperature) || isnan(humidity)) {
  ...
  return;
}
isnan() means “is this Not A Number?” The DHT22 returns NaN (a special error value) when the reading fails. The || means OR. So: “if temperature is invalid OR humidity is invalid, show an error and return (stop running this function early).” The return is an escape hatch.
if (humidity < HUMIDITY_TARGET && millis() - lastPump > MIN_PUMP_INTERVAL) {
  activatePump();
}
This is the core automation logic. && means AND. Two conditions must both be true: humidity is low, AND enough time has passed since the last pump. Only if both are true does it activate the pump.
Lines 128–134: loop() — the timer
if (historyCount == 0 || (now - lastCheck >= CHECK_INTERVAL)) {
  checkAndControl();
  lastCheck = now;
}
Every loop cycle the ESP32 glances at its stopwatch. If it’s never measured before (historyCount == 0) or 5 minutes have passed, it runs checkAndControl() and updates the timestamp.
The whole thing in one sentence
The terrarium controller wakes up, starts the sensor and display, then keeps watching the clock every loop — and every 5 minutes it reads the humidity, decides whether to run the pump, and updates the screen.
First thing to try: Change CHECK_INTERVAL to 30000 (30 seconds) and breathe on the DHT22 sensor. Humidity spikes. Stop breathing — it drops. When it drops below 70%, the relay clicks and the pump activates.
Check: With
CHECK_INTERVALset to30000(30 seconds) for testing: open Serial Monitor and you should see readings every 30 seconds. Breathe on the DHT22 sensor — humidity should spike. Stop breathing on it — humidity should drop. When it drops below 70%, the relay should click and the pump should run.
Step 3: Tune your ecosystem
Change these values to match your specific terrarium needs:
HUMIDITY_TARGET 70.0— tropical plants like ferns: 60–80%. Succulents: 40–50%.PUMP_ON_TIME 3000— adjust based on your pump size. 3 seconds is a good start.CHECK_INTERVAL 300000— 5 minutes is ideal for running ecosystem. Use 30 seconds for testing.
Watch the system for 2 days. If humidity keeps dropping despite pumping, your lid isn’t sealing well. If humidity is always high without pumping, reduce the target.
What just happened
Concepts you used:
- Negative feedback loop — when humidity drops below target, the pump activates to raise it back up. This is a feedback loop — a system that regulates itself. Your body uses feedback loops for temperature (sweating when hot, shivering when cold). Thermostats use them. Industrial climate control uses them.
- Threshold-based automation — the pump doesn’t run on a schedule; it runs when a condition is met. This is how most automated systems work: condition → action.
- Relay switching — using a small signal to control a larger power device. Used in everything from car engines to industrial machines.
- Microclimate monitoring — you’re measuring conditions inside an enclosed space. Scientists use this to study how enclosed ecosystems maintain their own conditions.
Curriculum alignment: NGSS MS-LS2-1 (Analyze and interpret data to provide evidence for effects of resource availability on organisms and populations). MS-LS2-4 (Construct an argument supported by empirical evidence that changes to physical or biological components of an ecosystem affect populations).
Presentation tip: Bring the live terrarium to your presentation. Show the OLED display with current readings. Then demonstrate: open the lid for a minute (humidity drops), close it (humidity rises). Ask your class: “What happens if I change the target from 70% to 40%?” Then change it live and show them the system reacting. That’s live science.
Level Up
Multiple humidity zones: Add a second DHT22 sensor on a long wire inside a different part of the terrarium. Are conditions uniform? Or does one spot stay wetter than another?
Data logging to SD card: Add a microSD module to write every reading to a CSV file. After a week, you’ll have a complete climate record for your ecosystem.
Light control: Add a relay for a grow light. Program: lights on at 8am, off at 8pm. Combined with humidity control, you have a fully automated grow chamber.
★★ You completed: Grade 7 Ecosystem Terrarium!
Troubleshooting
| Problem | Fix |
|---|---|
| DHT22 reads “nan” | Add the 10kΩ pull-up resistor between VCC and DATA. This is required. |
| Relay clicks but pump doesn’t run | Check pump wiring at relay terminals. Pump may need the positive wire on COM, and 5V on NO. |
| Relay won’t turn off | Your relay may be active-LOW (LOW=on, HIGH=off). The code uses HIGH=off — check your relay module’s documentation. |
| Humidity readings seem too high | DHT22 accuracy: ±2–5% in normal conditions. If consistently wrong, let it run for 30 minutes to thermally stabilize. |
| Pump runs constantly | MIN_PUMP_INTERVAL prevents too-frequent pumping. Increase it, or check that the pump actually adds humidity (tubing might be disconnected). |