Parent info
Parts you need
Affiliate links — we may earn a small commission
Try this circuit in your browser!
Run the code, press the buttons and watch what happens — before you buy any parts. No account needed.
Open in Simulator →It looks like nothing. Scan it. Message revealed.
Imagine this: a small screen on your desk shows a black-and-white pattern. Decorative, maybe. Boring, definitely. Your friend walks in, holds up their phone camera. The message pops up instantly. “Meet at the park at 4. Come alone.”
Nobody else who walked past knew. The message was there the whole time — invisible to anyone without the scan.
That’s the dead drop display. The ESP32 runs a tiny web server so you can update the message from your phone at any time. The OLED shows the new QR code instantly.
In 30 minutes. For about $18.
What you’ll need
| Part | What it does | Price |
|---|---|---|
| ESP32-S3-DevKitC-1 | Runs the web server + renders the QR code on the OLED | ~$12 |
| OLED Display 1.3” (128×64) | Shows the QR code — the 1.3” size gives better scannable resolution | ~$6 |
| Breadboard + jumper wires | Connects OLED to ESP32 | ~$3 |
Total: ~$18 | Time: ~30 minutes | Difficulty: ●●○○○
Use the 1.3” OLED, not 0.96”. The bigger screen gives more pixels per QR module, which makes the code much easier to scan. A QR code on a 0.96” OLED is scannable but marginal.
How it works (60 seconds)
Think of it like a digital sticky note that only cameras can read.
You navigate to the ESP32’s IP address on your phone and type a message. The ESP32 runs it through a QR code library that calculates which squares should be black and which should be white — based on a standardized algorithm. Then it draws those squares pixel-by-pixel on the OLED. Phone cameras can decode this instantly using the same QR standard.
Nobody without a phone camera can read it. Anyone with one can — so only share the location with your accomplice.
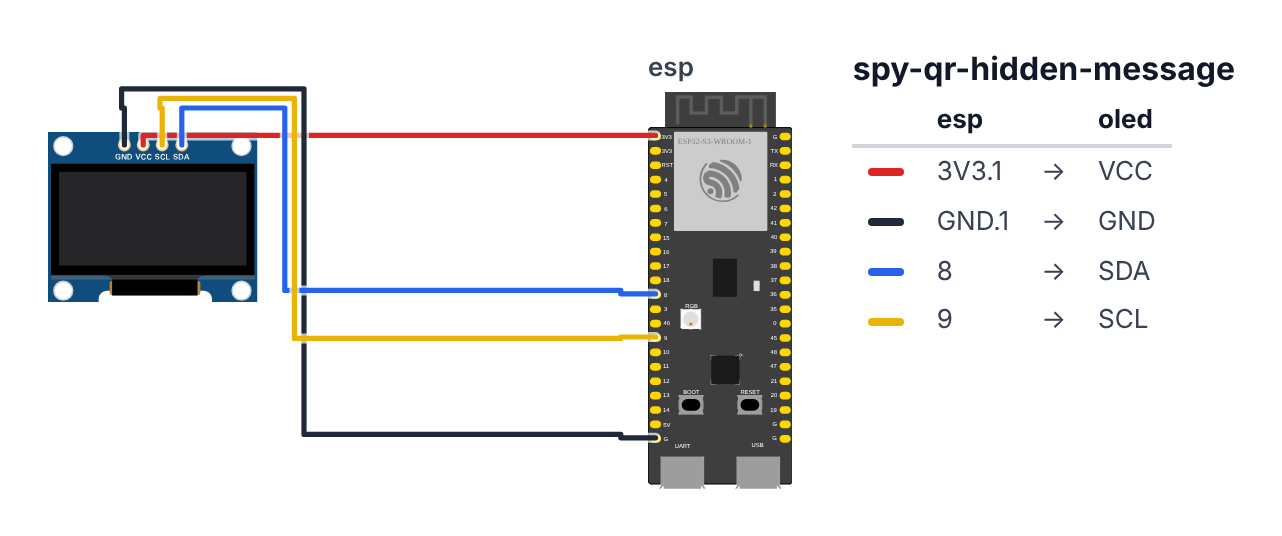
Step 1: Wire it up
Time: ~5 minutes
The OLED uses I2C — just 4 wires:
| ESP32-S3 | ESP32-C6 | Wire Color | OLED Pin |
|---|---|---|---|
| 3.3V | 3.3V | Red | VCC |
| GND | GND | Black | GND |
| GPIO 8 | GPIO 6 | Blue | SDA |
| GPIO 9 | GPIO 7 | Yellow | SCL |
Check: The OLED should flicker briefly when you first power on. If nothing happens, swap SDA and SCL — some OLED breakout boards have them labeled in reverse.
Step 2: Install libraries
In Arduino IDE: Sketch → Include Library → Manage Libraries
- Search “QRCode” → Install (by Richard Moore — look for this exact author)
- Search “Adafruit SSD1306” → Install (by Adafruit)
- When prompted, click Install All (also installs Adafruit GFX dependency)
- Search “ESPAsyncWebServer” → Install, then also install “AsyncTCP”
Step 3: Flash the code
Time: ~5 minutes
The big picture first. This program turns the ESP32 into a remotely updatable secret message board:
- The OLED displays a QR code — a grid of black and white squares that encodes any text.
- A tiny web page running on the ESP32 lets you change the message from your phone.
- You type the new message, tap the button, and the OLED redraws the QR code instantly.
- Anyone who scans the OLED with a phone camera sees the message. Anyone who doesn’t scan just sees a decorative pattern.
// ========== CHOOSE YOUR BOARD ==========
// Uncomment the line for YOUR board:
#define BOARD_S3    // ESP32-S3-DevKitC-1
//#define BOARD_C6  // ESP32-C6-DevKitC-1
// ========================================

#ifdef BOARD_S3
  #define PIN_SDA   8
  #define PIN_SCL   9
#endif
#ifdef BOARD_C6
  #define PIN_SDA   6
  #define PIN_SCL   7
#endif

#include <WiFi.h>
#include <ESPAsyncWebServer.h>
#include <Wire.h>
#include <Adafruit_GFX.h>
#include <Adafruit_SSD1306.h>
#include "qrcode.h"

const char* WIFI_SSID     = "YourWiFiName";
const char* WIFI_PASSWORD = "YourWiFiPassword";

#define SCREEN_WIDTH  128
#define SCREEN_HEIGHT  64
Adafruit_SSD1306 display(SCREEN_WIDTH, SCREEN_HEIGHT, &Wire, -1);

AsyncWebServer server(80);
String currentMessage = "Hello, Agent.";

void renderQR(String text) {
  QRCode qrcode;
  uint8_t qrcodeData[qrcode_getBufferSize(3)];
  qrcode_initText(&qrcode, qrcodeData, 3, 0, text.c_str());

  display.clearDisplay();

  int scale = 2;
  int offsetX = (SCREEN_WIDTH  - (qrcode.size * scale)) / 2;
  int offsetY = (SCREEN_HEIGHT - (qrcode.size * scale)) / 2;

  for (int y = 0; y < qrcode.size; y++) {
    for (int x = 0; x < qrcode.size; x++) {
      if (qrcode_getModule(&qrcode, x, y)) {
        display.fillRect(offsetX + x * scale, offsetY + y * scale, scale, scale, SSD1306_WHITE);
      }
    }
  }
  display.display();
  Serial.println("QR updated: " + text);
}

const char webForm[] PROGMEM = R"rawliteral(
<!DOCTYPE html>
<html>
<head>
  <title>Dead Drop</title>
  <meta name="viewport" content="width=device-width,initial-scale=1">
  <style>
    body{font-family:monospace;background:#111;color:#0f0;padding:20px;}
    input,button{font-family:monospace;font-size:16px;padding:8px;margin:8px 0;}
    input{width:100%;background:#222;color:#0f0;border:1px solid #0f0;}
    button{background:#0f0;color:#000;border:none;cursor:pointer;width:100%;}
  </style>
</head>
<body>
  <h2>Op: Dead Drop</h2>
  <p>Current message: <strong>%MESSAGE%</strong></p>
  <form action="/update" method="GET">
    <input type="text" name="msg" placeholder="Enter new secret message..." maxlength="100">
    <button type="submit">UPDATE QR CODE</button>
  </form>
</body>
</html>
)rawliteral";

void setup() {
  Serial.begin(115200);

  Wire.begin(PIN_SDA, PIN_SCL);
  if (!display.begin(SSD1306_SWITCHCAPVCC, 0x3C)) {
    Serial.println("OLED init failed! Check wiring.");
    while (1);
  }

  WiFi.begin(WIFI_SSID, WIFI_PASSWORD);
  while (WiFi.status() != WL_CONNECTED) {
    delay(500); Serial.print(".");
  }
  Serial.println("\nUpdate messages at: http://" + WiFi.localIP().toString());

  renderQR(currentMessage);

  server.on("/", HTTP_GET, [](AsyncWebServerRequest* request) {
    String page = String(webForm);
    page.replace("%MESSAGE%", currentMessage);
    request->send(200, "text/html", page);
  });

  server.on("/update", HTTP_GET, [](AsyncWebServerRequest* request) {
    if (request->hasParam("msg")) {
      currentMessage = request->getParam("msg")->value();
      currentMessage = currentMessage.substring(0, 100);
      renderQR(currentMessage);
    }
    request->redirect("/");
  });

  server.begin();
  Serial.println("Operation Dead Drop: ARMED");
}

void loop() {
  delay(100);
}
Line-by-line: what every line does and why
Lines 1–6: Borrowing ready-made tools
#include <WiFi.h>
#include <ESPAsyncWebServer.h>
#include <Wire.h>
#include <Adafruit_GFX.h>
#include <Adafruit_SSD1306.h>
#include "qrcode.h"
#include grabs instruction books. WiFi connects to your network. ESPAsyncWebServer hosts the update web page. Wire is the I2C bus for talking to the OLED. Adafruit_GFX and Adafruit_SSD1306 drive the screen. qrcode.h (by Richard Moore) calculates which squares should be black or white for any given text.
Lines 8–16: Settings and creating the display
#define SCREEN_WIDTH  128
#define SCREEN_HEIGHT  64
Adafruit_SSD1306 display(SCREEN_WIDTH, SCREEN_HEIGHT, &Wire, -1);
AsyncWebServer server(80);
String currentMessage = "Hello, Agent.";
#define gives numbers readable names. The screen is 128×64 pixels.
Adafruit_SSD1306 display(...) creates the display object named display. The -1 means no reset pin.
AsyncWebServer server(80) — port 80 is the standard web port. Browsers knock on port 80 by default.
String currentMessage = "Hello, Agent." — the message that’s shown on startup. A String is text that can change length and be edited.
Lines 18–37: renderQR() — draws the QR code
void renderQR(String text) {
  QRCode qrcode;
  uint8_t qrcodeData[qrcode_getBufferSize(3)];
  qrcode_initText(&qrcode, qrcodeData, 3, 0, text.c_str());
  display.clearDisplay();
  int scale = 2;
  int offsetX = (SCREEN_WIDTH  - (qrcode.size * scale)) / 2;
  int offsetY = (SCREEN_HEIGHT - (qrcode.size * scale)) / 2;
  for (int y = 0; y < qrcode.size; y++) {
    for (int x = 0; x < qrcode.size; x++) {
      if (qrcode_getModule(&qrcode, x, y)) {
        display.fillRect(offsetX + x * scale, offsetY + y * scale, scale, scale, SSD1306_WHITE);
      }
    }
  }
  display.display();
}
QRCode qrcode — create a QR code object (like a blank form to fill in).
qrcode_getBufferSize(3) — calculate how much memory a version-3 QR code needs. Version 3 can encode up to 77 characters. uint8_t qrcodeData[...] allocates that memory as an array of bytes.
qrcode_initText(&qrcode, qrcodeData, 3, 0, text.c_str()) — calculate which squares should be black for your text. 3 = version 3. 0 = low error correction (smaller code, easier to fit on screen). text.c_str() converts Arduino String to a C-style string.
int scale = 2 — each QR “module” (one black/white square) is drawn as 2×2 pixels. Without this scaling, the 29×29 grid would be only 29 pixels wide — too small to scan.
offsetX = (SCREEN_WIDTH - (qrcode.size * scale)) / 2 — center the QR code. The screen is 128px wide. If the QR code is 58px wide (29 modules × 2 pixels), offset is (128 - 58) / 2 = 35 pixels from the left.
The two for loops scan every row and column of the QR grid. qrcode_getModule(&qrcode, x, y) returns true if that square should be black.
display.fillRect(...) draws a filled 2×2 square at the calculated pixel position.
display.display() — the most important line. Everything before this drew only in the ESP32’s memory (a hidden draft). display.display() pushes that draft to the actual screen. Nothing appears until you call this.
Lines 39–63: The web form in flash memory
const char webForm[] PROGMEM = R"rawliteral(
  ... HTML ...
)rawliteral";
PROGMEM stores this HTML string in flash memory (the chip’s permanent storage) instead of RAM. The ESP32 has 4MB of flash but only 320KB of RAM. A large HTML string would eat too much of that RAM. PROGMEM is like storing a recipe book in the library instead of keeping it in your pocket.
%MESSAGE% is a placeholder. In setup(), we replace it with the actual current message before sending the page.
Lines 65–97: setup() — runs once at power-on
Wire.begin(PIN_SDA, PIN_SCL) — start the I2C bus. Pin 8 is data (SDA), pin 9 is clock (SCL) (C6: pins 6 and 7).
display.begin(SSD1306_SWITCHCAPVCC, 0x3C) — start the display. 0x3C is the OLED’s address on the I2C bus — like a house number. The if (!...) pattern: ! means NOT. If it did NOT start successfully, print an error and stop forever with while (1).
renderQR(currentMessage) — draw the first QR code immediately on startup.
server.on("/", HTTP_GET, [](AsyncWebServerRequest* request) {
  String page = String(webForm);
  page.replace("%MESSAGE%", currentMessage);
  request->send(200, "text/html", page);
});
This registers a route — “when someone opens /, run this code.” The code copies the HTML form from flash to RAM (String(webForm)), replaces %MESSAGE% with the real current message, then sends it to the browser. 200 is the HTTP success code.
server.on("/update", HTTP_GET, [](AsyncWebServerRequest* request) {
  if (request->hasParam("msg")) {
    currentMessage = request->getParam("msg")->value();
    currentMessage = currentMessage.substring(0, 100);
    renderQR(currentMessage);
  }
  request->redirect("/");
});
When you tap “UPDATE QR CODE,” the browser sends /update?msg=your+text+here. request->hasParam("msg") checks if the msg parameter exists. getParam("msg")->value() extracts the text. substring(0, 100) truncates to 100 characters (version 3 QR codes can’t encode more than 77, and longer strings fail). Then renderQR() redraws the screen. request->redirect("/") sends the browser back to the main form.
Lines 99–101: loop() — almost empty
void loop() {
  delay(100);
}
All the real work happens inside the web server callbacks (functions that run when the browser sends a request). loop() just keeps the board alive. delay(100) prevents the loop from running too fast and wasting power.
The whole thing in one sentence
At startup the code draws a default QR code on the OLED; then it runs a web server so you can type a new message on your phone, which triggers renderQR() to instantly update the screen.
First thing to try: open the IP address in your phone browser and type a short message like "HELLO AGENT". Watch the OLED update in real time. Then point your phone camera at the screen — your message should pop up instantly.
Check: Open Serial Monitor at 115200 baud. You should see “Update messages at: http://192.168.x.x”. The OLED should immediately show a QR code for “Hello, Agent.”
Step 4: Update the message!
Time: ~1 minute
On your phone browser, open the IP address from Serial Monitor.
You’ll see a form: “Enter new secret message…”
Type a message (up to 100 characters). Tap “UPDATE QR CODE”. The OLED updates instantly — you can watch it change in real time.
Now point your phone camera at the OLED. The message pops up without even tapping — most phone cameras automatically detect QR codes in the viewfinder.
Hidden deployment ideas
- Frame it and hang it on your wall — looks decorative, actually a live message board
- Put it on a shelf with books — the tiny screen blends in
- Leave it on your desk during a treasure hunt — clues update remotely as players progress
What just happened (what you learned)
-
QR code modules are the black and white squares that make up a QR pattern. A version 3 QR code is a 29×29 grid of modules. The library calculates which modules should be black for your specific text using a standardized algorithm that any phone camera can reverse.
-
QR version determines grid size and data capacity. Version 1 = 21×21 grid (~17 chars). Version 3 = 29×29 (~77 chars). Version 10 = 57×57 (hundreds of chars). Higher versions need bigger physical displays to be scannable.
-
Scaling and centering is why we multiply module coordinates by
scaleand addoffsetX. Without scaling, a 29-pixel QR code on a 128-pixel screen would be too small to scan reliably. The math is the same as resizing any image. -
PROGMEM stores the HTML string in flash instead of RAM. The ESP32 has 4MB of flash but only 320KB of RAM. Large string literals must live in flash or you’ll run out of working memory.
-
display.display()is a “flush” call. The SSD1306 has its own RAM buffer. All yourfillRect()calls modify the ESP32’s copy of that buffer. Onlydisplay.display()actually sends it to the OLED over I2C.
Level Up
Longer messages: QR version 3 caps at ~77 characters. Upgrade to version 5 or higher by changing the 3 in qrcode_initText(). You’ll need to recalculate offsetX/Y for the new grid size, and scale might need to drop to 1px per module.
PIN-protected updates: Add a PIN entry form before the message form. Only show the update page if the user has entered the correct PIN. const char* ADMIN_PIN = "9274". Teaches basic web authentication.
Mode button: Add a button to GPIO 0 (C6: GPIO 9) (or any available pin with a pull-up resistor). Press it to temporarily show the current message as text on the OLED for 5 seconds, then return to QR mode. Useful for checking what the current message says without scanning.
★★ You completed: Hidden Message in QR Code!
Troubleshooting
| Problem | Fix |
|---|---|
| OLED shows nothing | Check wiring — SDA to GPIO 8, SCL to GPIO 9 (C6: GPIO 6 and GPIO 7), VCC to 3.3V. Try I2C address 0x3D instead of 0x3C in display.begin(). Some OLEDs ship with a different address. |
| QR code won’t scan | Message might be too long for version 3. Try a shorter test message (“HELLO”). Make sure the room isn’t too bright (reflections off the OLED). |
| Web form doesn’t load | Check the IP in Serial Monitor. Make sure your phone is on the same WiFi network as the ESP32. |
| OLED updates but QR won’t scan | Scale might be too small. The scale = 2 setting is the minimum — don’t change it. Try scanning in lower ambient light. |
| “QRCode library not found” | Must be the library by Richard Moore specifically. Search “QRCode” in Library Manager and look for that author name. |
| Characters above 77 get silently cut off | The currentMessage.substring(0, 100) line truncates, but QR version 3 still has a 77-char limit on the actual encoding. Shorter is better. |